Smart Farm Irrigation System Using Arduino® Edge Control
This application note describes how to control a four zones irrigation system using the Edge Control and the Arduino Cloud.
Introduction
Agriculture has always been a key part of human development. Humanity is constantly growing and the demand for more efficient, profitable, and green agriculture is one of the challenges that the industry has been working on during the last years.
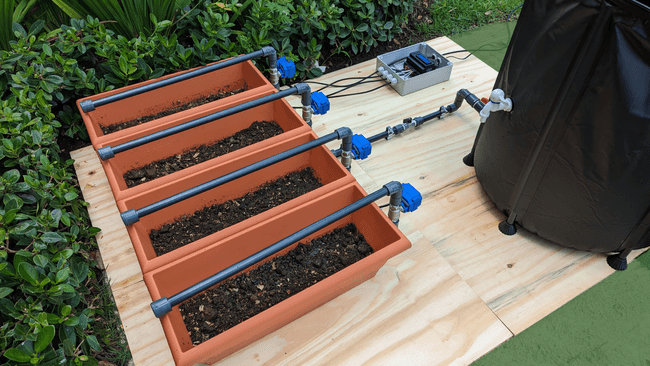
Smart farming is one of the most important actors in this revolution and is more accessible today than ever by using the Arduino Pro solutions. Taking advantage of the control capabilities, sensor data analysis and Cloud connectivity, Arduino Edge Control is perfect for managing agriculture applications.
The shown application note is intended to replicate a scaled smart farming application, that can be implemented on real agriculture fields using the same hardware and firmware.
Goals
The goal of this application note is to showcase a smart farming irrigation system using a combination of an Edge Control, an MKR WiFi 1010, and the Arduino Cloud. The project's objectives are the following:
- Independently control four irrigation zones using motorized ball valves.
- Get water from a smart tank with water level monitoring.
- Program irrigation timers from remote through Arduino Cloud by using Wi-Fi® connectivity.
- Manually activate irrigation from Arduino Cloud through dedicated widgets.
- Monitor average irrigation time and water consumption on dedicated charts on Arduino Cloud.
- Plan irrigation according to the weather forecast, by including an API-based weather station in Arduino Cloud.
Hardware and Software Requirements
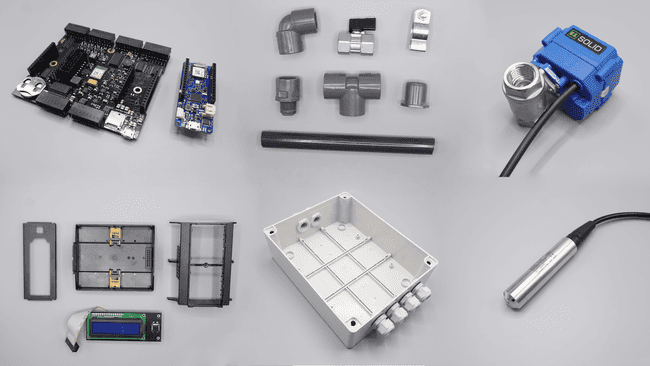
Hardware Requirements
- Arduino Edge Control
- Arduino MKR WiFi 1010
- Arduino Edge Control Enclosure Kit
- Differential pressure Liquid Level Sensor - 4-20 mA (0-1 meter) Submersible.
- 2-Wires Motorized ball Valves (3-Wires version are also supported) (x4)
- 12 VDC power supply (x1)
- 3.4 meters of 15 mm PVC pipes (x1)
- 15 mm PVC TEE pipes (x3)
- 15 mm PVC elbow (x8)
- 15 mm Manual Valve (x1)
- 15 mm PVC caps (x4)
- 15 mm PVC male adapters (x11)
- 15 mm wall pipe brackets (x7)
- Rectangular planters (x4)
- DIN rail (x1)
- Cable glands (x6)
- 6 meters of duplex cable AWG 18 (x1)
- Electrical Register Box (x1)
- Water Tank (x1)
Software Requirements
- Arduino IDE 1.8.10+, Arduino IDE 2, or Arduino Web Editor.
- If you are going to use an offline Arduino IDE, you must install the following libraries:
,Arduino_EdgeControl
,ArduinoIoTCloud
,Arduino_JSON
,ArduinoJson
andArduinoHttpClient
. You can install them through the Arduino IDE Library Manager.Arduino_ConnectionsHandler - The Smart Irrigation System Arduino Sketches.
- Arduino Create Agent to provision the MKR WiFi 1010 on the Arduino Cloud.
Smart Irrigation System Setup
The electrical connections of the intended application are shown in the diagram below:
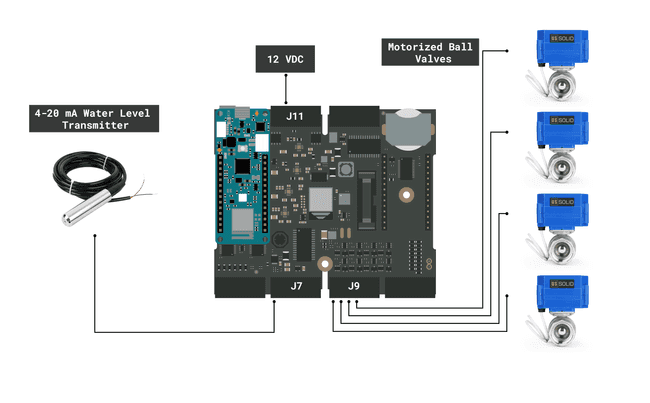
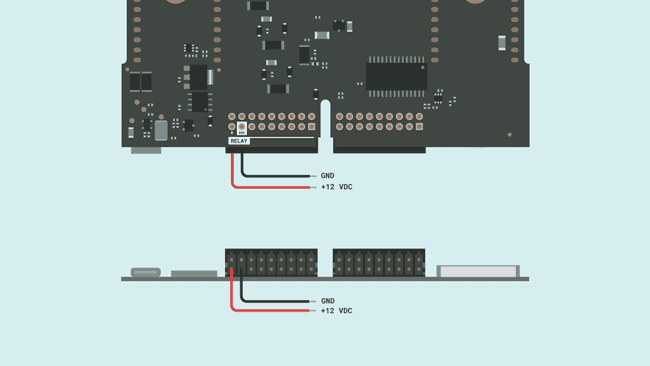
- The Edge Control board will be powered with an external 12 VDC power supply connected to BATT+ and GND of J11 respectively.
- The four motorized ball valves will be connected to the Edge Control Latching outputs of J9 connector from OUT0 to OUT6.
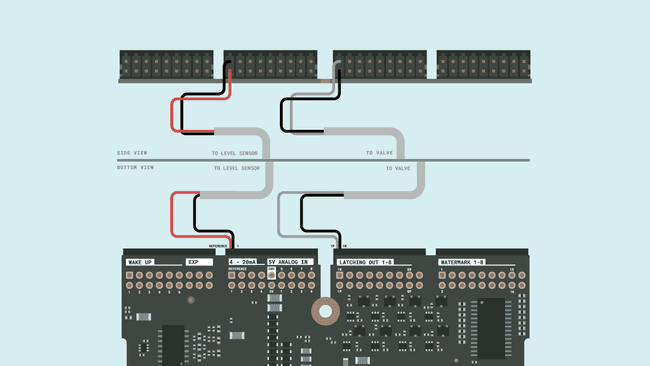
- The water level transmitter will be connected to the +19 V reference and the 4-20 mA input number one of the J7 connector.
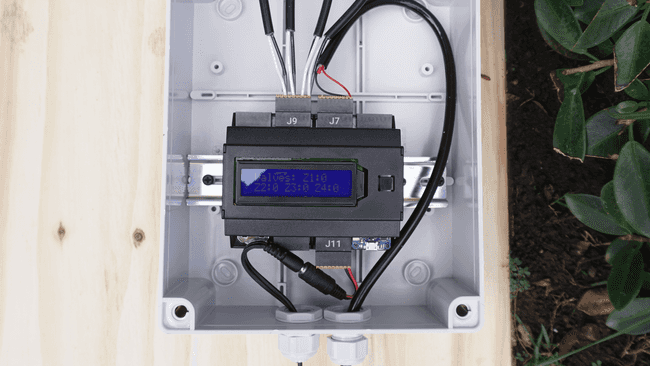
Smart Irrigation System Overview
The irrigation system works as a whole: it integrates the level measurement and the activation of the valves, done by the Edge Control, with the Cloud communication, using the MKR WiFi 1010.
The Edge Control is responsible for keeping track of the time with its integrated real-time clock (RTC), in order to schedule the use of the valves and know when a day has passed. In addition, the same setup is able to:
- Measure the level of the tank water with a 4-20 mA liquid level transmitter to calculate its consumption
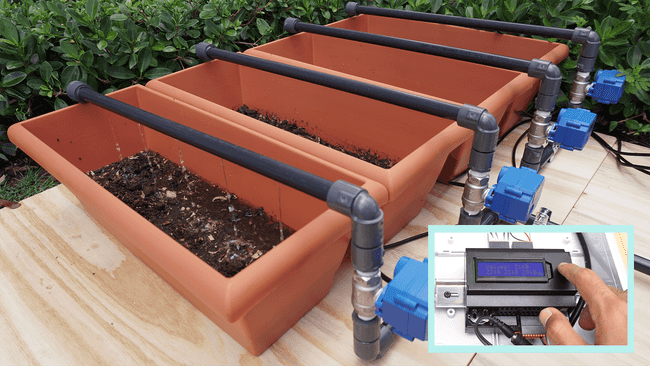
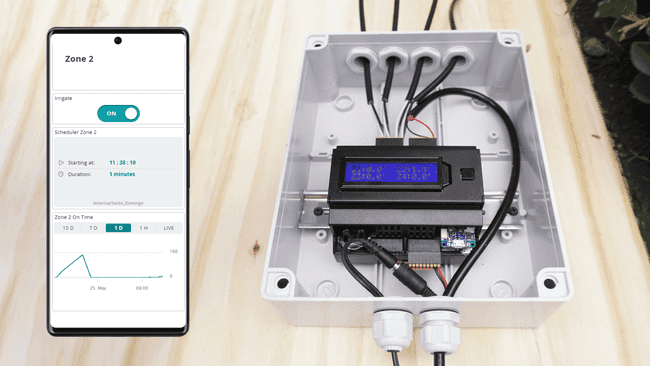
- Control an LCD screen where the status of the valves and timers are shown. In addition, the LCD push button can be used to manually activate the valves.
Moreover, the MKR WiFi 1010 is used to implement the communication between the setup and the Cloud. It notifies the Edge Control of any changes in the Cloud to activate, deactivate or configure a timer to control the valves. In addition, it reports the values of the Edge Control sensors on the Cloud. The communication between both devices is done leveraging the I2C communication protocol.
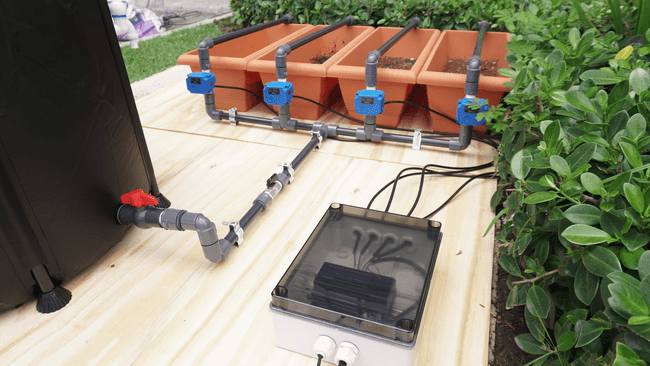
Valves Control
If a valve is activated from the Cloud, the message "opening valve" will appear on the LCD screen when the valve gets opened. If the valve is activated by a Cloud timer, the display will show the same message, including a countdown of the remaining irrigation time. The working time of the valves is monitored and reported on the Cloud to enable an efficient visualization of the average daily use.
Water Usage
At every system startup, the current amount of water is measured and saved. In this way, any decrease in it is counted as consumed water. The water use is reset daily to be able to monitor the average daily use on a dedicated Arduino Cloud chart.
Weather Forecast Consideration
The system is capable of knowing the weather forecast thanks to the use of the MKR WiFi 1010 and the OpenWeather API. If the rain probability gets greater than 90%, the automatic watering timers will be ignored and the smart irrigation will not start. However, it will be possible to continue irrigating manually if the user wishes to.
Arduino Edge Control Code
Let's go through some important code sections to make this application fully operative; starting with the required libraries:
will enable the support for the Edge Control peripherals; install it by searching for it on the Library Manager.Arduino_EdgeControl.h
will enable the I2C communication between the Edge Control, the MKR WiFi 1010 and the other peripherals. It is included in the Board Support Package (BSP) of the Edge Control.Wire.h
There are two headers included in the project code able to handle some helper functions and structures:
handles the shared variables between the Edge Control and the MKR WiFi 1010 through I2C.SensorValues.hpp
handles the real-time clock (RTC) functions to retrieve the local date and time.helpers.h
This code's section also contains the defined structure to handle the number of enclosure button taps to control each valve manually.
1#include "Helpers.h"2#include <Arduino_EdgeControl.h>3#include <Wire.h>4#include "SensorValues.hpp"5
6// The MKR1 board I2C address7#define EDGE_I2C_ADDR 0x058
9/** UI Management **/10// Button statuses11enum ButtonStatus : byte {12 ZERO_TAP,13 SINGLE_TAP,14 DOUBLE_TAP,15 TRIPLE_TAP,16 QUAD_TAP,17 FIVE_TAP,18 LOT_OF_TAPS19};In order to save energy and resources, the Edge Control has different power lines that must be enabled to power the different internal and external peripherals. In this case, the 3.3 V, 5 V, Battery, MKR1 slot, and the +19 V reference for the 4-20 mA sensor's current loop need to be enabled. To handle all the I/O, the I/O Expander together with the Enclosure Kit LCD and the sensors inputs need to be initialized.
With the
setSystemClockRealTimeClock.setEpoch(<Your region unixTime>)You just need to set the RTC once and make sure to have a CR2032 3V battery in the Edge Control holder to maintain the RTC configurations.
1/**2 Main section setup3*/4void setup() {5 EdgeControl.begin();6 Wire.begin();7 delay(500);8 Serial.begin(115200);9
10 Serial.println("Init begin");11
12 // Enable power lines13 Power.enable3V3();14 Power.enable5V();15 Power.on(PWR_3V3);16 Power.on(PWR_VBAT);17 Power.on(PWR_MKR1);18 delay(5000); // wait for the MKR board to boot19 Power.on(PWR_19V);20
21 // Init Edge Control IO Expander22 Serial.print("IO Expander initializazion ");23 if (!Expander.begin()) {24 Serial.println("failed.");25 Serial.println("Please, be sure to enable gated 3V3 and 5V power rails");26 Serial.println("via Power.enable3V3() and Power.enable5V().");27 } else Serial.println("succeeded.");28
29 // LCD button definition30 pinMode(POWER_ON, INPUT);31 attachInterrupt(POWER_ON, buttonPress, RISING);32
33 // Arduino Edge Control ports init34 Input.begin();35 Input.enable();36 Latching.begin();37
38 analogReadResolution(adcResolution);39
40 setSystemClock(__DATE__, __TIME__); // define system time as a reference for the RTC41
42 //RealTimeClock.setEpoch(1684803771-(3600*4)); // use this to set the RTC time once.43
44 // Init the LCD display45 LCD.begin(16, 2);46 LCD.backlight();47
48 LCD.home();49 LCD.print("Smart Irrigation");50 LCD.setCursor(5, 1);51 LCD.print("System");52 delay(2000);53
54 LCD.clear();55}The Edge Control will check the number of button taps for the valve's manual control and handle the right action to do through the use of a switch case statement.
The
updateSensors()To measure the water level, a 4-20 mA (0 to 1 meter) sensor can be used, but you need to express that current information in centimeters first. The Edge Control converts the current from the sensor loop into a voltage by using an internal 220 ohms resistor, which is read by the internal ADC. To convert this voltage back to a current value, the following equation from a 4-20 mA sensor can be used:
y = 16x + 4Where:
- First we solve for x, having the formula:
where x is in meters.x = (y - 4)/16 - To be able to work in centimeters, you can multiply the expression by 100:
.x = (y - 4)*(100/16) - Eventually, you can simplify the expression as:
.x = (y - 4)*6.25
This is a brief explanation of the mathematical expression used inside the sketch to convert the original sensor value voltage into centimeters:
float w_level = ((voltsReference / 220.0 * 1000.0) - 4.0) * 6.25;In order to monitor the daily trend of the valve's active time on Arduino Cloud, the accumulated time is reset each day at midnight.
The
valvesHandler()1void loop() {2 // LCD button taps detector function3 detectTaps();4
5 // Different button taps handler6 switch (buttonStatus) {7 case ZERO_TAP: // will execute always when the button is not being pressed.8 if (controlLCD == 1 && showTimeLCD == 0) {9 ValvesStatusLCD(); // when there is not an active timer10 controlLCD = 0;11 }12
13 if (showTimeLCD == 1) {14 ValvesTimersLCD(); // when there is an active timer15 }16
17 break;18
19 case SINGLE_TAP: // will execute when the button is pressed once.20 Serial.println("Single Tap");21 vals.z1_local = !vals.z1_local;22 sendValues(&vals);23 buttonStatus = ZERO_TAP;24 break;25
26 case DOUBLE_TAP: // will execute when the button is pressed twice.27 Serial.println("Double Tap");28 vals.z2_local = !vals.z2_local;29 sendValues(&vals);30 buttonStatus = ZERO_TAP;31 break;32
33 case TRIPLE_TAP: // will execute when the button is pressed three times.34 Serial.println("Triple Tap");35 vals.z3_local = !vals.z3_local;36 sendValues(&vals);37 buttonStatus = ZERO_TAP;38 break;39
40 case QUAD_TAP: // will execute when the button is pressed four times.41 Serial.println("Quad Tap");42 vals.z4_local = !vals.z4_local;43 sendValues(&vals);44 buttonStatus = ZERO_TAP;45 break;46
47 case FIVE_TAP: // will execute when the button is pressed five times.48 Serial.println("Five Tap");49 LCD.backlight();50 LCD.home();51 52 break;53
54 default:55 Serial.println("Too Many Taps");56 buttonStatus = ZERO_TAP;57 break;58 }59
60 // reset the valves' accumulated active time every day at midnight61 if (getLocalhour() == " 00:00:00") {62 Serial.println("Resetting accumulators every day");63 vals.z1_on_time = 0;64 vals.z2_on_time = 0;65 vals.z3_on_time = 0;66 vals.z4_on_time = 0;67 delay(1000);68 }69
70 unsigned long currentMillis = millis();71
72 if (currentMillis - previousMillis >= interval) {73
74 previousMillis = currentMillis;75
76 //Serial.println(getLocalhour());77
78 // send local sensors values and retrieve Cloud variables status back and forth79 updateSensors();80 }81
82 // activate, deactivate and keep time of valves function83 valvesHandler();84}Arduino MKR WiFi 1010 Code
The MKR WiFi 1010 needs the following libraries:
handles the Arduino Cloud connection and project variables publishing. It can be installed directly from the Arduino Library Manager.ArduinoIoTCloud.h
manages the Wi-Fi® connection and can be installed directly from the Arduino Library Manager.Arduino_ConnectionHandler.h
andArduinoJson.h
parse and create JSON structures for the HTTP requests. They can be installed directly from the Arduino Library Manager.Arduino_JSON
requests weather data from the Open Weather API. It can be installed directly from the Arduino Library Manager.ArduinoHttpClient.h
will enable the I2C communication between the Edge Control, the MKR WiFi 1010 and the other peripherals. It is included in the BSP of the MKR WiFi board.Wire.h
controls the MKR built-in RGB LED. It is included in the BSP of the MKR WiFi 1010.utility/wifi_drv.h
There are two headers included in the project code that handles some helper functions and structures:
is automatically generated by the Arduino Cloud. However, if you are using an offline IDE, verify it is in the same directory as your sketch and includes all the Arduino Cloud variables.thingProperties.h
handles the shared variables between the Edge Control and the MKR WiFi 1010 through I2C.SensorValues.hpp
In the global variables, the MKR board I2C address is defined. It must be the same as defined in the Edge Control code. In addition, the water tank dimensions are also set up.
1#include "thingProperties.h"2#include <ArduinoJson.h>3#include <Wire.h>4#include "SensorValues.hpp"5#include <utility/wifi_drv.h>6#include <ArduinoHttpClient.h>7#include <Arduino_JSON.h>8
9// The MKR1 board I2C address10#define SELF_I2C_ADDR 0x0511
12// Water tank constants13#define PI 3.141592653589793238462643383279514#define radius 0.28 // in metersTo properly retrieve weather information from the Open Weather API, you must create an account to use it; there you will find a unique API Key needed to format your HTTP requests.
Replace the
citycountryCode1// OpenWeather server address:2const char serverAddress[] = "api.openweathermap.org";3int port = 443;4
5// Your OpenWeather API Key6String openWeatherMapApiKey = "<API Key>";7
8// Replace with your country code and city9String city = "Santiago de los Caballeros";10String countryCode = "DO";The MKR WiFi 1010 communicates with the Arduino Cloud and checks for changes on every variable, from the valves' switches to the scheduled activated timers. The board turns its LED blue when it is successfully connected to the Cloud. Also, it asks for a weather forecast every 10 minutes to update the temperature, humidity and rain probability in the Arduino Cloud dashboard.
1void loop() {2 // function that asks for timers scheduled on the Cloud3 scheduleHandler();4
5 unsigned long currentMillis = millis();6
7 if (currentMillis - previousMillis >= intervalStat) {8 // save the last time you asked for connectivity status9 previousMillis = currentMillis;10
11 // Turn on the blue LED if the board is successfully connected to the Cloud.12 if (ArduinoCloud.connected()) {13 WiFiDrv::analogWrite(27, 122);14 } else {15 WiFiDrv::analogWrite(27, 0);16 }17 }18
19 // doing this just once when a WiFi connection is established20 if (bootForecast == 1 && WiFi.status() == WL_CONNECTED) {21 getForecast(); // request rain probability22 getWeather(); // request temperature and humidity23 bootForecast = 0;24 }25
26
27 if (millis() - lastRequest > interval) {28 // request weather variables each interval29 if (WiFi.status() == WL_CONNECTED) {30 getForecast();31 getWeather();32 }33 lastRequest = millis();34 }35
36 ArduinoCloud.update();37}The system needs to be as fast as possible when a valve activation is requested. For this reason, each valve has its own function that is called once the valve status changes on the Arduino Cloud.
1/*2 Since Z1 is READ_WRITE variable, onZ1Change() is3 executed every time a new value is received from IoT Cloud.4*/5void onZ1Change() {6 // Add your code here to act upon Z1 change7 Serial.println("Z1 changed!!");8 SensorValues_t vals;9 vals.z1_local = z1;10 delay(1000);11}The
uploadValues(SensorValues_t *vals)v = πr²hWhere:
is the tank radius in meters.r
is the tank height in meters.hAs
andr
are in meters, the volume result will be in cubic meters (m³). For a more intuitive perception of water quantity, the volume can be converted into liters:h
1m³ = 1000 LSince the level sensor output is in centimeters, it can be converted (height) into meters by dividing by 100:
h = (water_level/100)To turn m³ into liters, multiply by 1000:
water_volume = PI*(radius)*(radius)*(water_level/100)*1000To evaluate water consumption, the initial water level is stored as a reference point. Any level measured below that point will be considered as consumed water, updating the
water_usage1water_level = vals->water_level_local;2 water_volume = PI * (radius) * (radius) * ((int)water_level/100) * 1000;3
4 if (waterCtrl == 0) {5 currentWater = water_volume;6 Serial.println("Initial Water Volume: ");7 Serial.println(currentWater);8 water_usage = 0;9 waterCtrl = 1;10 }11
12 if (water_volume < currentWater) {13 water_usage += currentWater - water_volume;14 currentWater = water_volume;15 } else if (water_volume > currentWater) {16 currentWater = water_volume;17 }The Arduino Cloud Dashboard
Taking advantage of the Arduino Cloud, it is possible to seamlessly integrate a simple but powerful dashboard to monitor and visualize the status of the system from remote, resulting in a professional Human-Computer Interaction (HCI) as shown below:
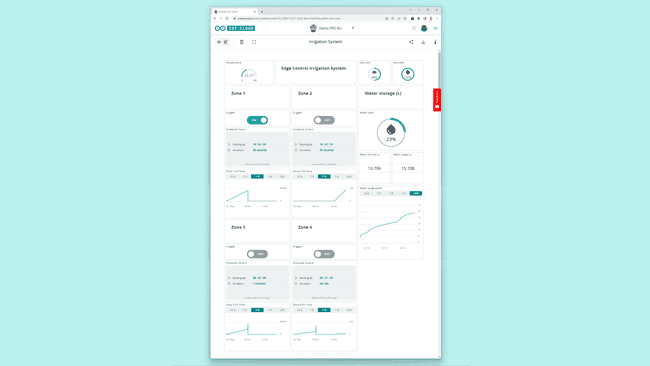
Within the Arduino Cloud's dashboard, the system variables can be monitored and controlled as follow:
- Temperature, humidity and rain probability are displayed in gauges, showing the current weather status and forecast.
- Each motorized valve can be toggled through a dedicated switch accompanied by a scheduler widget to set automatic irrigation routines.
- Each valve activated time is shown in a time series chart.
- Water consumption can be monitored in dedicated widgets: one that shows the current water level in percentage from 0-100%, a water volume widget that shows the remaining liters of water in the tank and a water usage widget that shows the daily consumed liters.
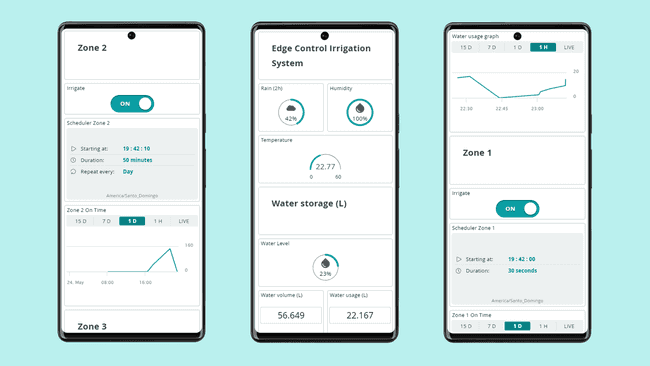
The dashboard is easily accessible from a browser, mobile phone or tablet, allowing a user to receive an instantaneous update on the irrigation status from anywhere.
Full Smart Irrigation System Example
All the necessary files to replicate this application note can be found below:
- The complete code can be downloaded here.
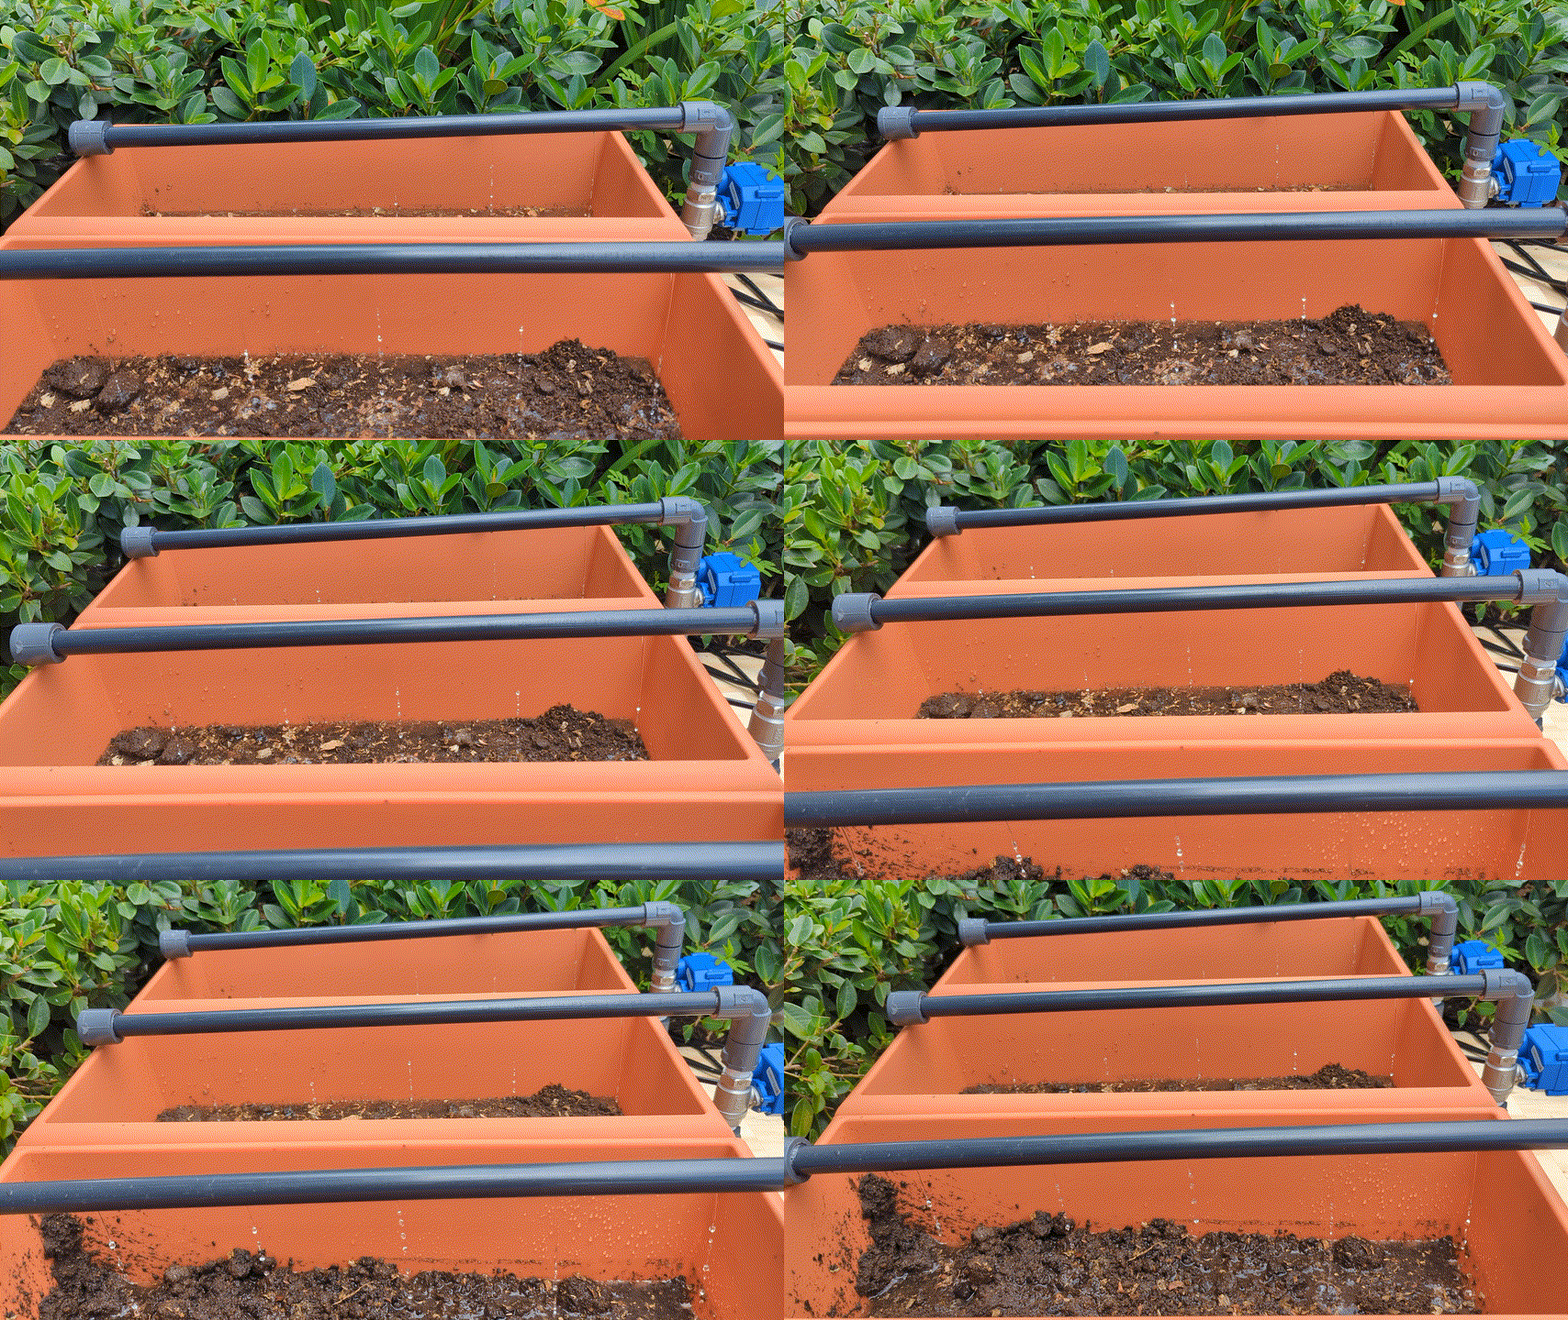
The Irrigation System Working
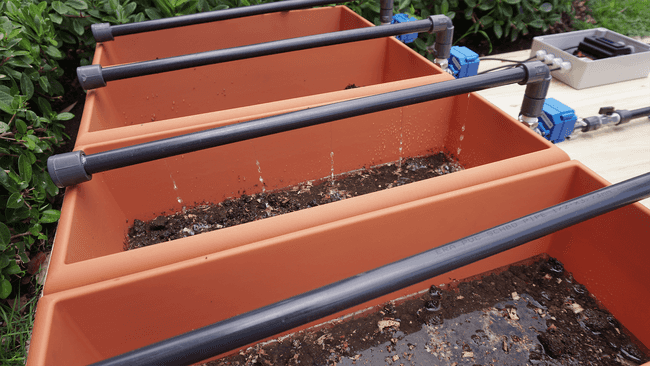
Below you can find some additional images and animations showing how the system works:
Conclusion
In this application note, you have learned how to build a smart irrigation system to water your crops automatically, manually or remotely. Thanks to real-time weather analysis, you can avoid irrigation when it is raining, saving water and avoiding over-irrigation or flooding problems.
Arduino Edge Control allows you to easily implement this kind of agriculture systems ready for field deployment. However, if Wi-Fi® access is limited in your area, the connectivity can be extended using alternative boards, like the Arduino MKR WAN 1310.
Thanks to the Edge Control capabilities to connect to the Cloud and be remotely controlled, it is a great choice for developing robust and agriculture environment-proof solutions.
Next Steps
Since you already know how to develop a Smart Irrigation System with Arduino Edge Control and the MKR WiFi 1010, it is time for you to continue exploring all the capabilities of the Arduino Pro portfolio and integrating it into your professional setup.
You can extend the capabilities of your Edge Control-based system by adding different connectivity options, leveraging the Arduino MKR family like LoRaWAN®, GSM, RS-485 or Ethernet.
Suggest changes
The content on docs.arduino.cc is facilitated through a public GitHub repository. If you see anything wrong, you can edit this page here.
License
The Arduino documentation is licensed under the Creative Commons Attribution-Share Alike 4.0 license.