Portenta Machine Control User Manual
Learn about the hardware and software features of the Arduino® Portenta Machine Control.
This user manual provides a comprehensive overview of the Portenta Machine Control, covering its major hardware and software elements. With this user manual, you will learn how to set up, configure, and use all the main features of the Portenta Machine Control.
This User Manual teaches how to use the Portenta Machine Control with the new
library. If you want to know how to use it with IEC 61131-3 PLC programming languages, check the PLC IDE Tutorials. In case you are already using the older version of the Arduino_PortentaMachineControl
library, check the following tutorial to know the differences and how to migrate your code to the latest version.Arduino_MachineControl
Hardware and Software Requirements
Hardware Requirements
- Portenta Machine Control (x1)
- Micro-USB cable (x1)
- +24 VDC/0.5 A power supply (x1)
- 2.4 GHz RP-SMA male antenna (x1) (only required for testing Wi-Fi®/Bluetooth® capabilities)
Software Requirements
This User Manual shows how to use the Portenta Machine Control using the Arduino IDE environment. To learn more about how to use it with IEC-61131-3 languages and the PLC IDE, check out our tutorials here.
Portenta Machine Control Overview
The Portenta Machine Control is designed for efficiency and adaptability in industrial environments. It is compatible with the Arduino framework and other embedded platforms and provides a flexible solution for controlling various equipment and machinery. The Portenta H7 board (included) is central to its operation, which ensures stable performance across a broad temperature spectrum, ranging from -40 °C to +85 °C, without external cooling requirements.
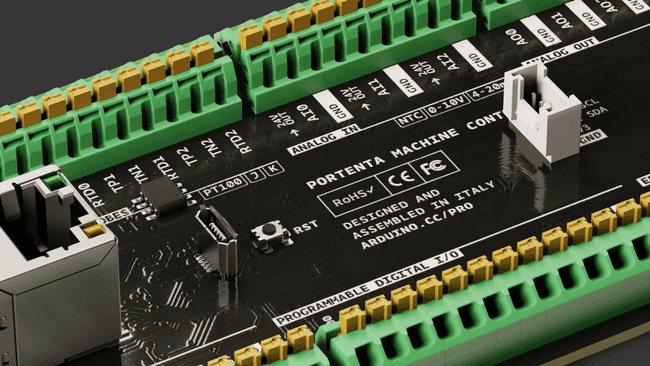
This controller offers many connectivity options, from USB and Ethernet to Wi-Fi® and Bluetooth® Low Energy, as well as industry-specific protocols like Modbus and Canbus. It can also connect with various external sensors, actuators, and different Human Machine Interfaces (HMI), such as displays and touch panels, showcasing its adaptability. It is designed for harsh industrial operations with features like DIN bar compatible housing, compact size, and an integrated Real-Time Clock (RTC). For real-time control or predictive maintenance tasks, the Portenta Machine Control is a solid choice for businesses aiming to enhance production and equipment management processes.
Portenta Machine Control Main Components
The Portenta Machine Control features a secure, certified, and durable design that enables it for automation and industrial applications.
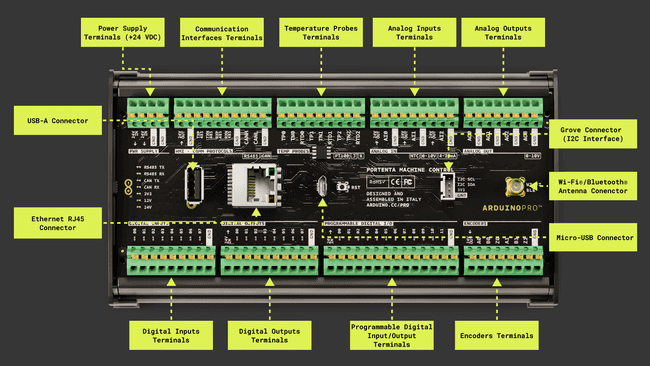
Here is an overview of the controller's main components shown in the image above:
Microcontroller: At the heart of the Portenta Machine Control is the STM32H747XI, a powerful, robust, and high-performance dual-core microcontroller from STMicroelectronics®. This microcontroller is built around an Arm® Cortex®-M7 and an Arm® Cortex®-M4 32-bit RISC cores. The Arm® Cortex®-M7 core operates at up to 480 MHz, while the Arm® Cortex®-M4 core operates at up to 240 MHz.
Memory and storage:
- 2 MB of Flash Memory
- 1 MB of RAM
- Additional onboard memory of 8 MB SDRAM
- 16 MB Flash QSPI
Security: The controller features an onboard ready-to-use secure element from NXP®, the SE0502. This secure element, specifically designed for Internet of Things (IoT) devices, provides advanced security features, perfect for Industrial IoT (IIoT) environments where security is critical.
Power architecture: The controller's power system was designed to be resilient. It operates at an input voltage of +24 VDC, with reverse polarity protection, ensuring the controller remains safeguarded from power irregularities.
Digital and analog ports: Equipped with a versatile set of input and output ports, the Portenta Machine Control supports:
- 8x digital input ports with 8x Status LEDs labeled as
DIGITAL INPUTS - 8x digital output ports with 8x Status LEDs labeled as
DIGITAL OUTPUTS - 3x software-configurable analog input ports labeled as
ANALOG IN - 4x analog output ports labeled as
ANALOG OUT - 12x digital programmable input/output ports labeled as
PROGRAMMABLE DIGITAL I/O
Temperature sensing: With three software-configurable temperature channels, the Portenta Machine Control can measure a variety of temperature ranges using:
- Type K thermocouples
- Type J thermocouples
- PT100 sensors
Communication interfaces and protocols: Seamless connectivity is a hallmark of this controller. The Portenta Machine Control offers high-speed, software-configurable communication interfaces and protocols such as:
- CAN bus
- RS-232
- RS-422
- RS-485
- I2C interface (accessible via a Grove connector)
- Modbus RTU (over RS-485)
- Modbus TCP (over Ethernet)
Ethernet and USB: The Portenta Machine Control features onboard Ethernet connectivity and full-speed USB-A and half-speed micro-USB Type B connectors for wired communication.
Wireless connectivity: The Portenta Machine Control supports 2.4 GHz Wi-Fi® (802.11 b/g/n) and Bluetooth® Low Energy (4.2 supported by firmware and 5.1 supported by hardware).
Additional features: The Portenta Machine Control features an onboard RTC with at least 48 hours of memory retention and two encoder channels. Moreover, Electrostatic Discharge (ESD) protection on all inputs and output ports ensures the longevity and durability of the controller.
Form factor: The Portenta Machine Control can be standalone on a DIN rail, a grid, or a panel, providing quick and easy access to all input/output ports and peripherals.
Portenta Machine Control Core and Libraries
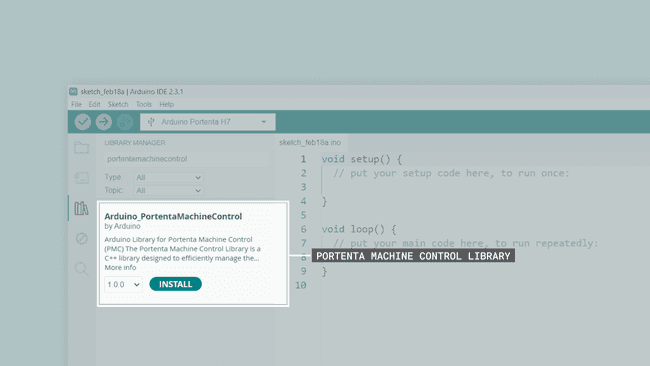
The
Arduino Mbed OS Portenta BoardsportentaArduino Mbed OS Portenta Boards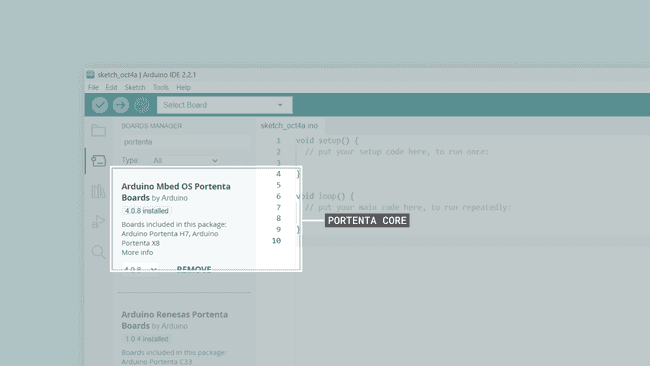
The
Arduino_PortentaMachineControl- Navigate to Tools > Manage Libraries... or click the Library Manager icon in the left tab of the IDE.
- In the Library Manager tab, search for
and install the latestportentamachinecontrol
library version. If the IDE asks you to install additional dependent libraries, install all of them.Arduino_PortentaMachineControl
Arduino PLC IDE
PLC IDE is the Arduino solution to program Portenta Machine Control devices using the five programming languages recognized by the IEC 61131-3 standard.
The IEC 61131-3 programming languages include:
- Ladder Diagram (LD)
- Functional Block Diagram (FBD)
- Structured Text (ST)
- Sequential Function Chart (SFC)
- Instruction List (IL)
In the PLC IDE, you can mix PLC programming with standard Arduino sketches within the integrated sketch editor and share variables between the two environments. You can also automate tasks in your software applications; this gives you control over scheduling and repetition, enhancing the reliability and efficiency of your project. Moreover, communication protocols such as Modbus RTU and Modbus TCP can be managed effortlessly using integrated no-code fieldbus configurators.
Check out the following resources that will show you how to start with the Arduino PLC IDE and use IEC 61131-3 programming languages with the Portenta Machine Control:
Pinout
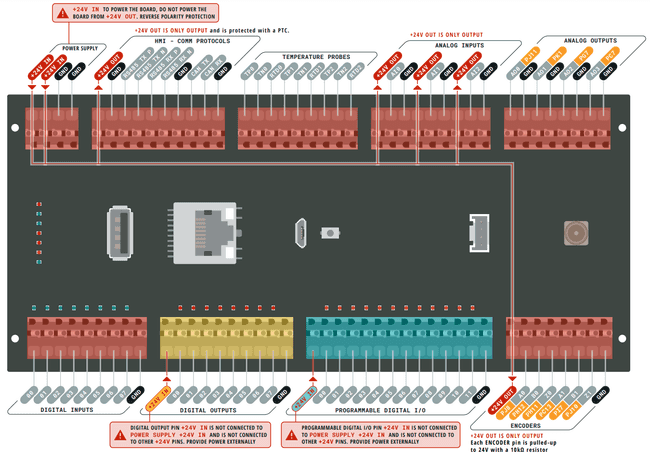
The complete pinout is available and downloadable as PDF from the link below:
Datasheet
The complete datasheet is available and downloadable as PDF from the link below:
STEP Files
The complete STEP files are available and downloadable from the link below:
First Use
Powering the Portenta Machine Control
Portenta Machine Control can be powered in different ways:
- Using an external +24 VDC/0.5 A power supply connected to Portenta's Machine Control power supply terminals. Please refer to the pinout section of the user manual.
- Using a micro-USB cable (not included) for programming purposes only.
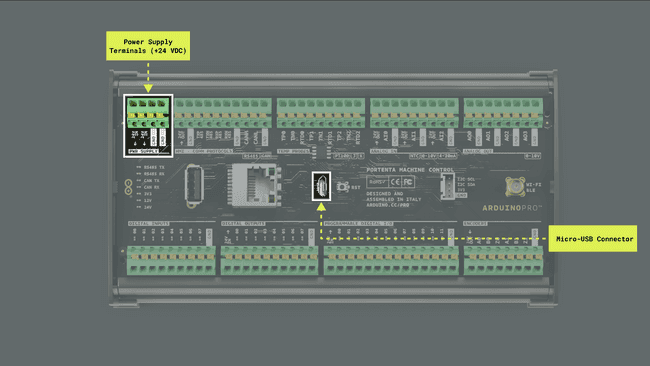
The Portenta Machine Control has several LEDs that indicate how the board is being powered:
- If the board is powered using a micro-USB cable, the 3V3 LED (red) will be turned on.
- The 12V LED (yellow) and the 24V LED (green LED) will be turned on if the board is powered using an external +24 VDC power supply.
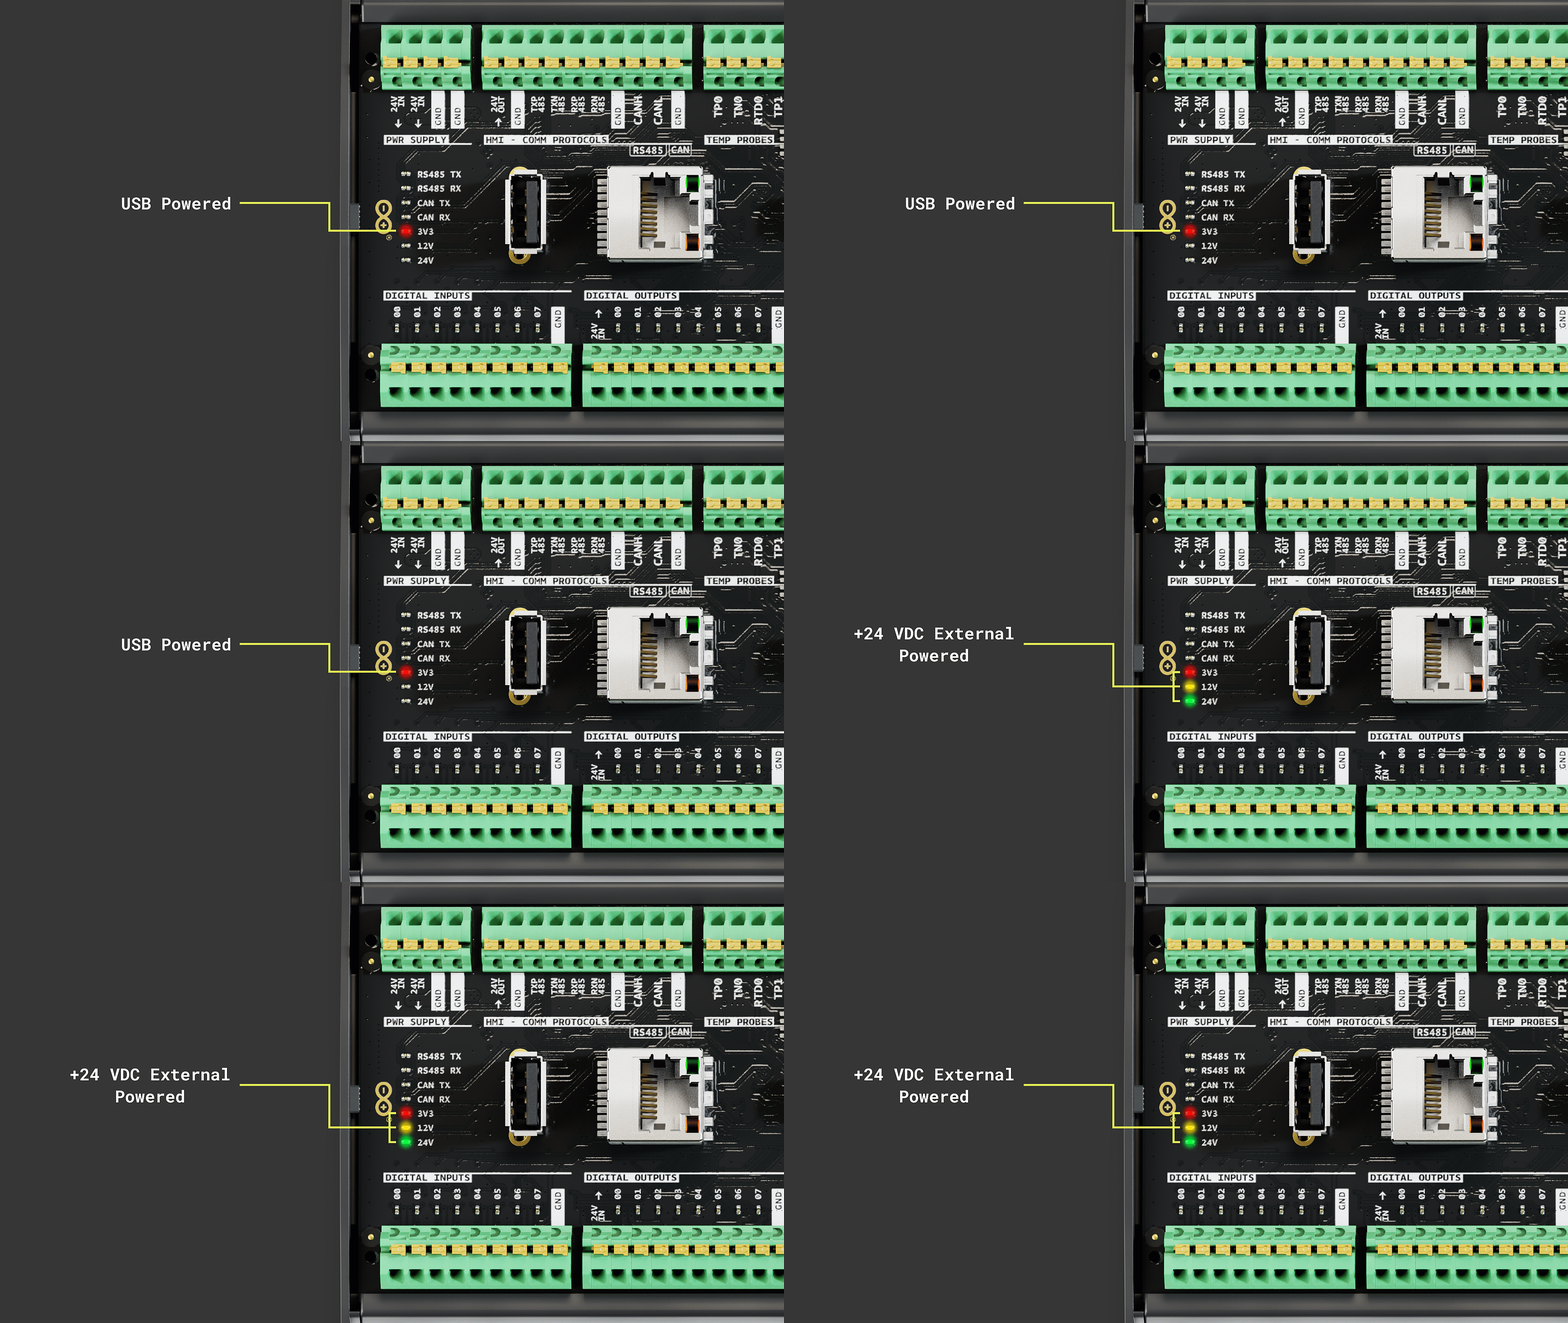
Portenta Machine Control Terminals Features
Access to the main components and features of the Portenta Machine Control is provided through onboard terminal blocks, specifically from the SPTAF-1 connector series by Phoenix Contact. These connectors are distinguished by their low profile, ability to handle high currents, and intuitive push-in wire termination system. Below are the technical specifications of the Portenta Machine Control terminals:
- Pitch: 3.5 mm
- Connection method: Push-in spring connection
- Connection direction: 45º
The connector and wire specifications for the Portenta Machine Control terminals are outlined in the table below, indicating supported conductor cross sections and their respective capacities:
| Conductor Cross Section | Capacity |
|---|---|
| Solid | 0.2 mm2 - 1.5 mm2 |
| Flexible | 0.2 mm2 - 1.5 mm2 |
| Flexible, with ferrule without plastic sleeve | 0.25 mm2 - 0.75 mm2 |
| Flexible, with ferrule with plastic sleeve | 0.25 mm2 - 0.75 mm2 |
| AWG | 24 - 16 |
Hello World Example
Let's program the Portenta Machine Control with a modified version of the classic
hello worldBlinkArduino_PortentaMachineControlRemember to install the
core and the Arduino Mbed OS Portenta Boards
library; please refer to this section of the User Manual to learn how to do it.Arduino_PortentaMachineControl
Copy and paste the sketch below into a new sketch in the Arduino IDE.
1// Include the Arduino_PortentaMachineControl library2#include <Arduino_PortentaMachineControl.h>3
4void setup() {5 // Initialize the digital outputs terminals of the Arduino_PortentaMachineControl library6 MachineControl_DigitalOutputs.begin();7}8
9void loop() {10 // Turn on the digital output at channel 011 MachineControl_DigitalOutputs.write(0, HIGH);12 delay(1000);13 // Turn off the digital output at channel 014 MachineControl_DigitalOutputs.write(0, LOW);15 delay(1000);16}The sketch begins by including the
Arduino_PortentaMachineControlsetup()loop()setup()0To upload the sketch to your Portenta Machine Control, click the Verify button to compile the sketch and check for errors; once verification is successful, click the Upload button to program the controller with the sketch.
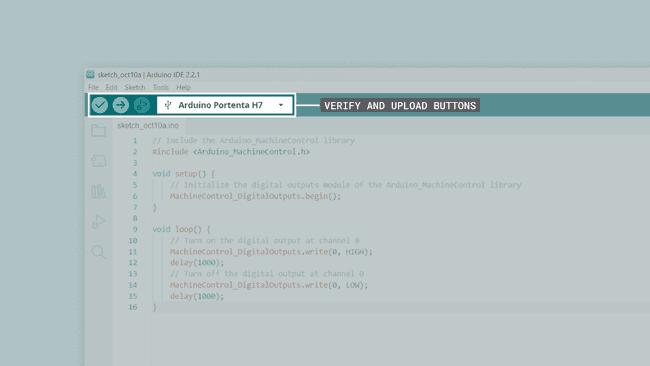
Upon successful upload, observe the red LED on your controller's digital output labeled as
00
Digital Outputs
The Portenta Machine Control has up to eight digital output channels, as shown in the image below.
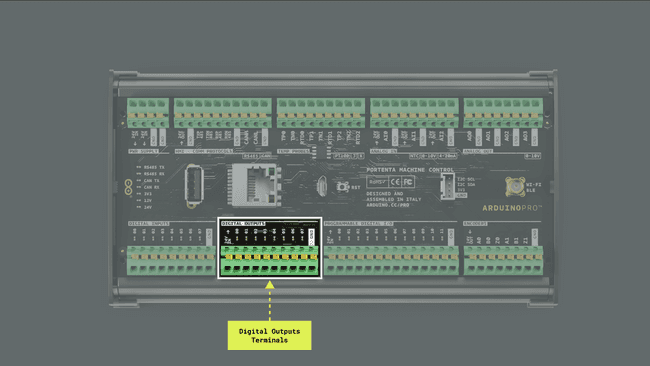
Some of the key features of the digital output channels of the Portenta Machine Control are the following:
- Digital outputs are high-side switches (TPS4H160AQPWPRQ1), handling up to 500 mA.
- All digital output terminals have overcurrent protection. If the current exceeds 700 mA (with a tolerance of ±20%), the channel opens to prevent damage.
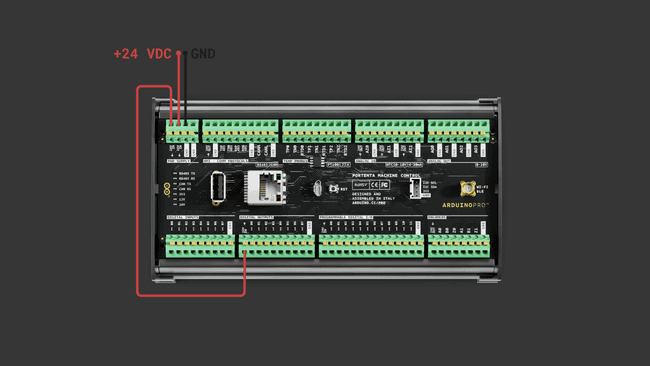
The digital output channels must be connected to an external +24 VDC power supply through pin
; this power supply can be shared with the controller's +24 VDC power supply, as shown in the image below. Moreover, pin 24V IN
is not galvanically isolated, meaning the input power supply voltage must share the same 24V IN
as the controller.GND
There are two modes of overcurrent protection in the digital output channels:
- Latch mode: When overcurrent is detected, the digital output channel remains open and can only be closed manually via software.
- Auto retry: Upon detecting overcurrent, the channel opens. After a short duration (several tens of milliseconds), it attempts to close automatically. If the overcurrent condition persists in the channel, it will keep toggling.
Ensure each channel does not exceed a maximum current of 500 mA to avoid potential damage or malfunctions in the digital output channels.
The example sketch below showcases a "scanning" effect using the digital output channels of the Portenta Machine Control, activating each channel sequentially. This method also provides visual feedback through the Arduino IDE's Serial Monitor, indicating which channel is active at any given moment.
1/*2 Portenta Machine Control's Digital Outputs 3 Name: portenta_machine_control_digital_outputs_example.ino4 Purpose: Demonstrates a "scanning" effect using the digital output channels.5 @author Arduino PRO Content Team6 @version 1.0 01/10/237*/8
9#include <Arduino_PortentaMachineControl.h>10
11void setup() {12 // Initialize serial communication at 9600 bauds13 Serial.begin(9600);14
15 // Initialize the digital outputs to latch mode (true)16 MachineControl_DigitalOutputs.begin(true);17
18 // Turn all channels off at startup19 MachineControl_DigitalOutputs.writeAll(0);20}21
22void loop() {23 // Sequentially activate each channel from 00 to 0724 for (int i = 0; i < 8; i++) { 25 // Turn on the current channel26 // Wait to make the effect visible27 MachineControl_DigitalOutputs.write(i, HIGH); 28 Serial.println("- CH" + String(i) + ": ON");29 delay(200);30
31 // Turn off the current channel32 // Wait to smooth the transition33 MachineControl_DigitalOutputs.write(i, LOW);34 delay(200); 35 }36}Note that the sketch shown above uses the following functions from the
Arduino_PortentaMachineControl
: This function initializes the digital outputs channels with overcurrent behavior set to latch mode, meaning that upon overcurrent detection, channels remain open until manually toggled in software.MachineControl_DigitalOutputs.begin(true)
: This function initially sets all digital output channels to an open state (off).MachineControl_DigitalOutputs.writeAll(0)
: This function controls individual channel states, turning them either on (MachineControl_DigitalOutputs.write(channel, HIGH/LOW)
) or off (HIGH
). In the example sketch, this function creates the "scanning" effect by activating one channel at a time.LOW
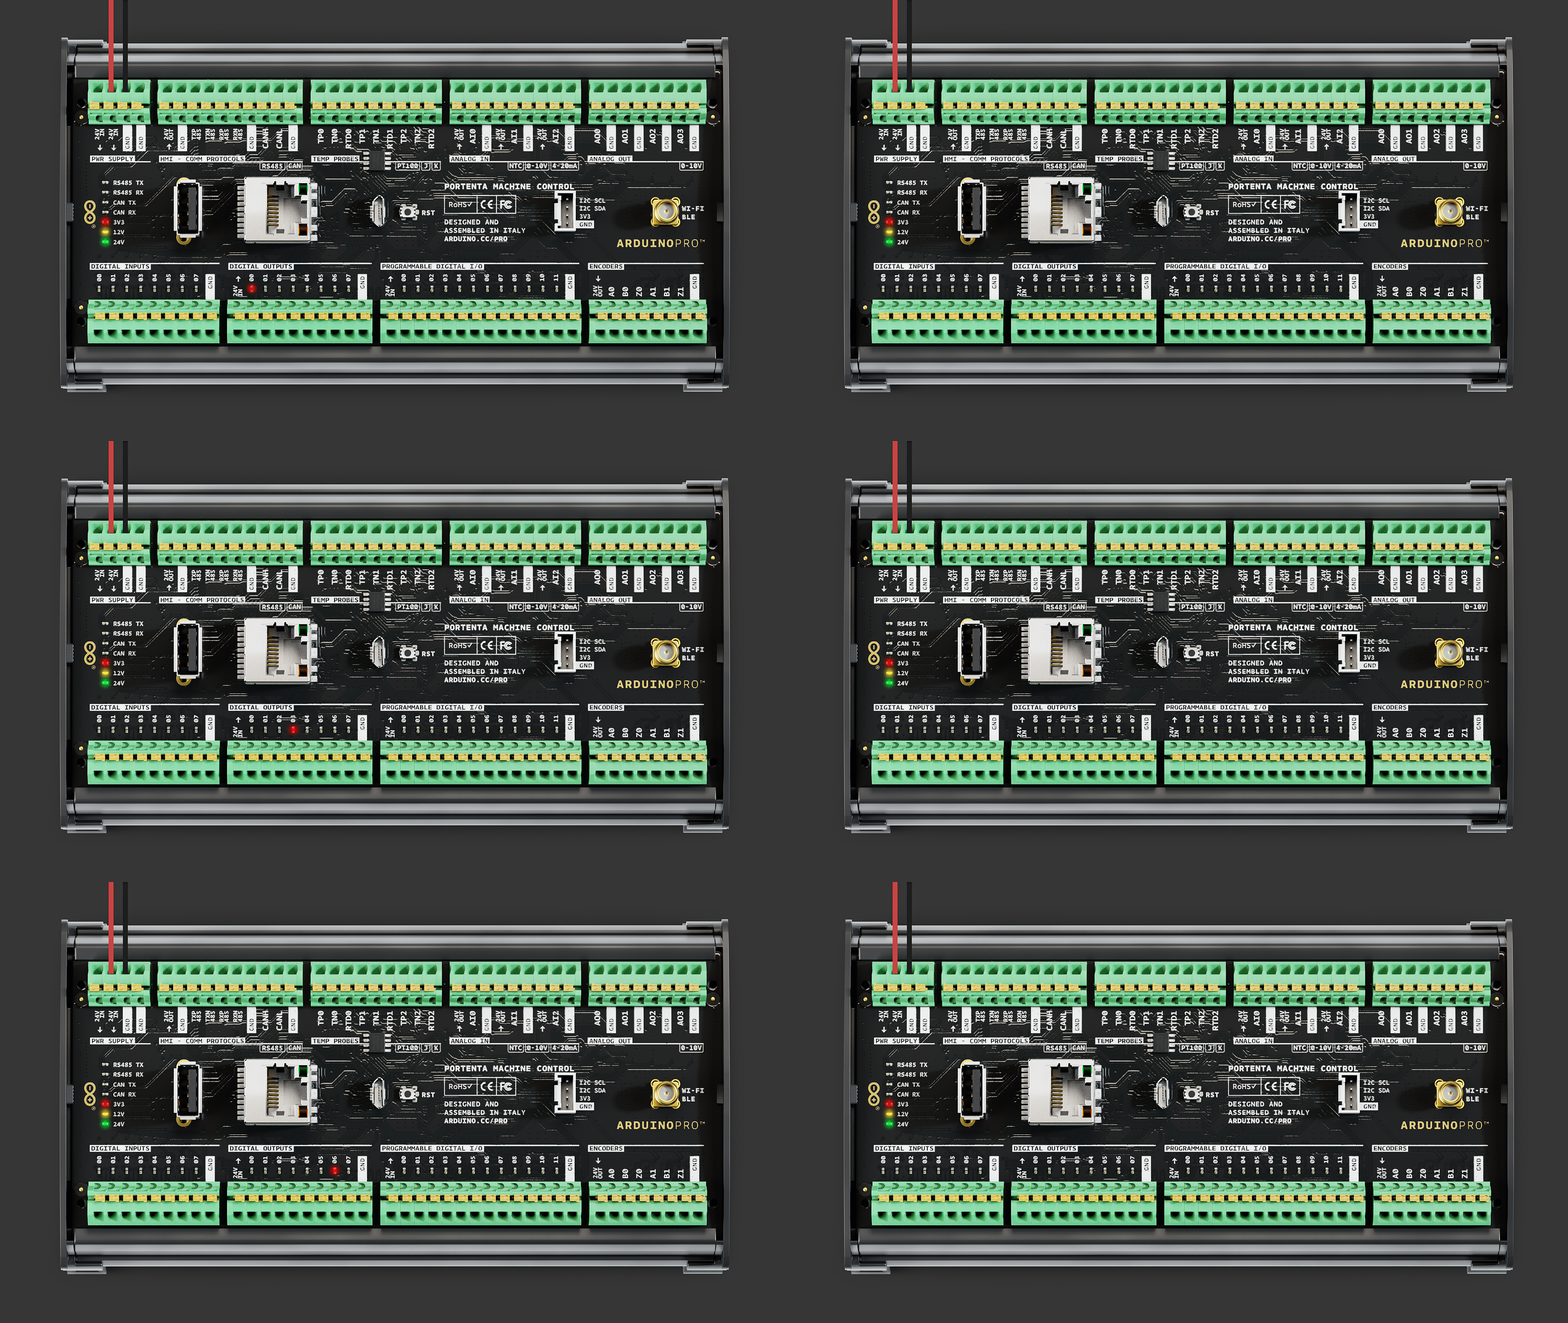
The expected behavior of the digital output channels LEDs is shown below.
Analog Outputs
The Portenta Machine Control has up to four independent analog output channels, as shown in the image below. These analog output channels enable precise voltage control for various applications.
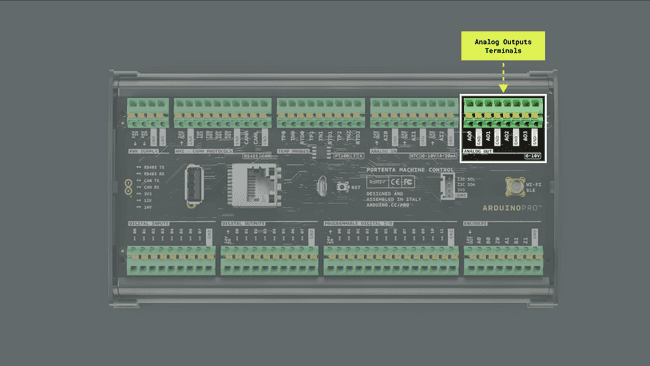
Some of the key features of the analog output channels of the Portenta Machine Control are the following:
- Analog outputs can be configured with specific PWM periods, affecting the frequency and resolution of the voltage output.
- Each channel supports voltage outputs ranging from 0 VDC to 10.5 VDC and can source up to 20 mA.
Each analog output channel is designed with a double low-pass filter and a high-current operational amplifier (OPA2990IDSGR) set up in a non-inverting topology with a gain factor of 3.3. This design allows for an effective filtering and amplification of the signal, resulting in a high-quality/low-noise analog output signal.
The output signal of the analog output channels of the Portenta Machine Control is a DC voltage whose amplitude is a function of the defined PWM duty cycle.
Below is an example demonstrating using a single analog output channel to generate a sine wave voltage output.
1/*2 Portenta Machine Control's Analog Output 3 Name: portenta_machine_control_sine_wave_example.ino4 Purpose: This sketch demonstrates the generation of a sine wave 5 using an analog output channel of the Portenta Machine Control.6
7 @author Arduino PRO Content Team8 @version 1.0 01/10/239*/10
11#include <math.h> 12#include <Arduino_PortentaMachineControl.h>13
14// PWM period set to 4 ms (or 250 Hz)15#define PERIOD_MS 4 16
17void setup() {18 // Initialize serial communication at 9600 bauds19 Serial.begin(9600);20
21 // Initialize the analog output channels22 MachineControl_AnalogOut.begin();23 24 // Set the PWM period for channel 0 to 4 ms (or 250 Hz)25 MachineControl_AnalogOut.setPeriod(0, PERIOD_MS);26}27
28void loop() {29 // Iterate through 360 degrees, generating a complete sine wave output30 for (int i = 0; i < 360; i += 5) {31 32 // Calculate the sine wave voltage output from 0 to 10 VDC33 float voltage = 5 + 5 * sin(i * (PI / 180)); 34
35 // Set the voltage for channel 036 MachineControl_AnalogOut.write(0, voltage);37
38 // Print the current voltage to the IDE's serial monitor (with two decimal precision)39 Serial.println("Channel 0 set at " + String(voltage, 2) + "V");40
41 // Introduce a delay to adjust the frequency of the sine wave42 delay(15); 43 }44}In the example sketch, the sine wave signal is generated by iterating through 360 degrees; the sine function is computed for each degree value. The sine function yields a value between -1 and 1; to convert this into a voltage value between 0 and 10 VDC, an offset of 5 VDC is added, and the result is then multiplied by 5. With this formula, the sine wave oscillates between 0 to 10 VDC. The delay introduced at the end of each iteration helps adjust the frequency of the sine wave signal, resulting in the desired waveform at the analog output.
Notice that the sketch shown above uses the following functions from the
Arduino_PortentaMachineControl
: This function initializes the analog output channels, preparing them for voltage output.MachineControl_AnalogOut.begin()
: This function configures the PWM period for the specified analog output channel. In the example shown above, it is set to 4 ms or 250 Hz.MachineControl_AnalogOut.setPeriod(channel, period)
: This function controls the voltage output for the specified channel. In the example above, a sine wave is generated for channelMachineControl_AnalogOut.write(channel, voltage)
ranging from 0 to 10 VDC.AO0
The expected result of the generated sine wave measured with an oscilloscope in the analog output channel
AO0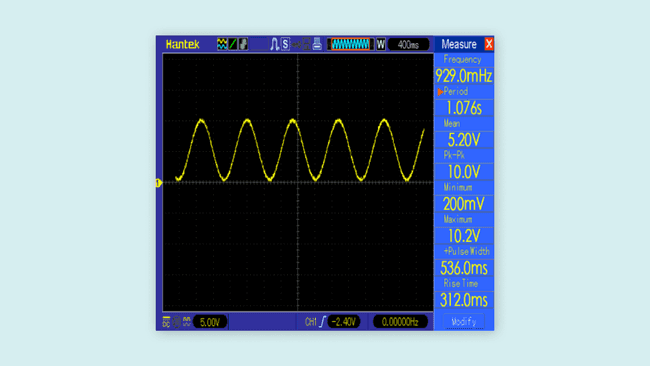
Digital Inputs
The Portenta Machine Control has up to eight digital input channels, as shown in the image below. Each channel incorporates a voltage divider comprising a 680 kΩ and a 100 kΩ resistor, which scales an input from 0 to 24 VDC down to 0 to 3 VDC.
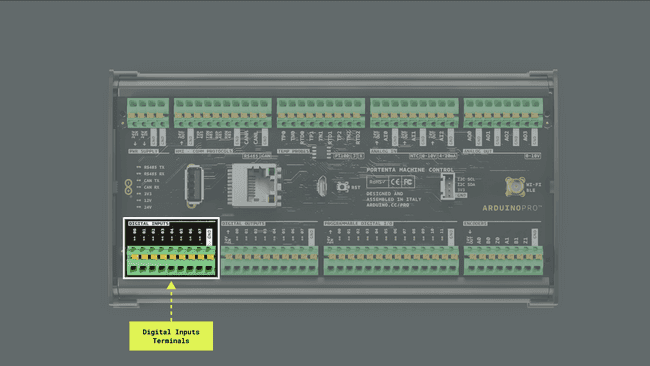
Below is an example sketch showcasing how to periodically read data from all the digital input channels.
1/*2 Portenta Machine Control Digital Input Example3 Name: portenta_machine_control_digital_input_example.ino4 Purpose: This sketch demonstrates how to periodically read 5 from all the digital input channels on the Portenta Machine Control.6
7 Author: Arduino PRO Content Team8 Version: 1.0 01/10/239*/10
11#include <Arduino_PortentaMachineControl.h>12
13const int totalChannels = 8;14const int channelPins[totalChannels] = {DIN_READ_CH_PIN_00, DIN_READ_CH_PIN_01, DIN_READ_CH_PIN_02, DIN_READ_CH_PIN_03, DIN_READ_CH_PIN_04, DIN_READ_CH_PIN_05, DIN_READ_CH_PIN_06, DIN_READ_CH_PIN_07};15
16void setup() {17 // Initialize serial communication at 9600 bauds18 Serial.begin(9600);19
20 // Initialize Wire transmission21 Wire.begin();22
23 // Initialize the digital input channels24 // If initialization fails, notify via Serial Monitor25 if (!MachineControl_DigitalInputs.begin()) {26 Serial.println("- Failed to initialize the digital input GPIO expander!");27 }28}29
30void loop() {31 // Read the status of each digital input channel and display it32 for (int i = 0; i < totalChannels; i++) {33 uint16_t readings = MachineControl_DigitalInputs.read(channelPins[i]);34 Serial.print("- CH0" + String(i) + ": " + String(readings) + "\t");35 }36
37 // Print a new line for better readability38 Serial.println();39 delay(500);40}Note that the example sketch uses a loop to individually read each digital input channel using the
MachineControl_DigitalInputs.read()Arduino_PortentaMachineControlAnalog Inputs
The Portenta Machine Control has up to three independent analog input channels named
AI0AI1AI2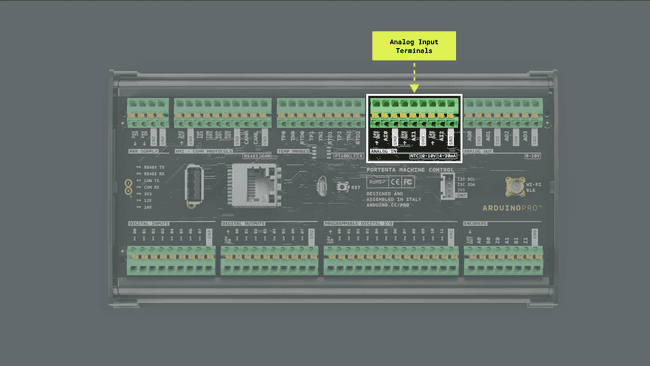
The configuration of Portenta's Machine Control analog input channels is determined by an analog switch (TS12A44514PWR), which allows switching between three different operational modes:
- 0-10V: The analog input channel uses a resistor divider consisting of a 100 kΩ and a 39 kΩ resistor for this mode. This scales down an input voltage in the 0 VDC to 10 VDC range to a range of 0 VDC to 2.8 VDC. The resulting input impedance in this configuration is approximately 28 kΩ.
- 4-20 mA: The analog input channel connects to a 120 Ω resistor for this mode. This configuration allows a 4 mA to 20 mA input current to be converted to a voltage in the 0.48 VDC to 2.4 VDC range.
- NTC: For this mode, the input is connected to a 3 VDC voltage reference (REF3330AIRSER). A 100 kΩ resistor is then placed in series, forming a part of the resistor divider powered by the voltage reference.
Each analog input channel has an output voltage pin supplying +24 VDC for powering sensors. This pin has integrated protection through a 500 mA PTC resettable fuse.
To use a specific operational mode with Portenta's Machine Control analog input channels, the
MachineControl_AnalogIn.begin(SensorType)Arduino_PortentaMachineControlMachineControl_AnalogIn.begin(SensorType)
: 0-10V modeSensorType::V_0_10
: 4-20mA modeSensorType::MA_4_20
: NTC modeSensorType::NTC
Below is an example sketch showcasing how to read voltages from the analog input channels set to the 0-10V mode.
1/*2 Portenta Machine Control's Analog Input 3 Name: portenta_machine_control_analog_input_simple_example.ino4 Purpose: This sketch demonstrates reading voltage values 5 from the analog input channels set in the 0-10V mode 6 of the Portenta Machine Control.7
8 @author Arduino PRO Content Team9 @version 1.0 01/10/2310*/11
12#include <Arduino_PortentaMachineControl.h>13
14// Define the resistor divider ratio for 0-10V input mode15const float RES_DIVIDER = 0.28057;16
17// Define the ADC reference voltage18const float REFERENCE = 3.0;19
20void setup() {21 // Initialize serial communication at 9600 bauds22 Serial.begin(9600);23
24 // Initialize the analog input channels of the Portenta Machine Control in 0-10V mode25 MachineControl_AnalogIn.begin(SensorType::V_0_10);26}27
28void loop() {29 // Loop through each analog input channel30 // Read its current voltage31 // Print the current voltage value in the IDE's Serial Monitor32 for (int i = 0; i < 3; i++) {33 float voltage = readVoltage(i);34 Serial.print("- Voltage CH");35 Serial.print(i);36 Serial.print(": ");37 Serial.print(voltage, 3);38 Serial.println(" VDC");39 }40 41 // Add a delay for readability and a separator for the next set of readings42 Serial.println();43 delay(250);44}45
46/**47 Reads the raw ADC value from the specified channel, then48 calculates the actual voltage using the predefined resistor 49 divider ratio and the reference voltage50 51 @param channel (int)52 @return The calculated voltage value in volts53*/54float readVoltage(int channel) {55 // Read the raw ADC value from the specified channel56 float raw_voltage = MachineControl_AnalogIn.read(channel);57 58 // Convert the raw ADC value to the actual voltage 59 // Use the resistor divider ratio and reference voltage 60 // Return the calculated voltage61 return (raw_voltage * REFERENCE) / 65535 / RES_DIVIDER;62}Note that the example sketch uses the
MachineControl_AnalogIn.read(channel)RES_DIVIDERREFERENCE*For each analog input channel, there is a resistor divider made by 100K and 39K resistors, meaning that the input voltage is divided by a ratio of 0.28 approximately (
constant); the analog input channels voltage reference (RES_DIVIDER
constant) is 3V.* REFERENCE
Programmable Digital I/O
The Portenta Machine Control has up to 12 programmable digital input/output channels, as shown in the image below.
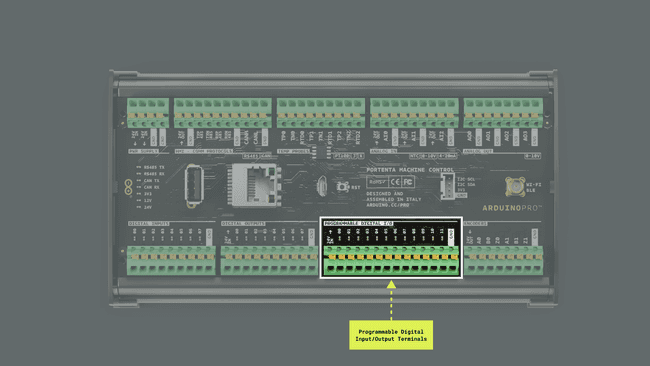
The programmable digital input/output channels are powered via three quad-channel high-side switches (TPS4H160AQPWPRQ1). Each channel comes with a nominal current value of 0.6 A. However, due to internal circuit tolerances of the high-side switches, this value can spike up to 0.9 A.
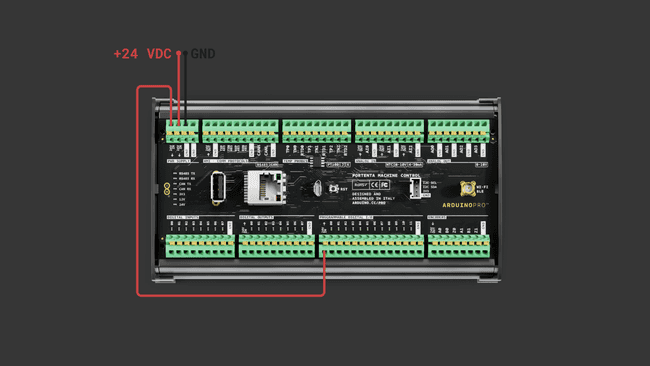
The programmable digital input/output channels must be connected to an external +24 VDC power supply through pin
. This power supply can be shared with the controller's +24 VDC power supply. Moreover, pin 24V IN
is not galvanically isolated, meaning the input power supply voltage must share the same 24V IN
as the controller.GND
There are two modes of overcurrent protection in the programmable digital input/output channels:
- Latch mode: The channel is deactivated once the current limit is hit. The respective channel enable pin must be toggled to reactivate the channel.
- Retry mode: The channel is momentarily shut down upon reaching the current limit but reconnects briefly.
The programmable digital input/output channels integrate an internal mechanism to protect against kickback from inductive loads. Additionally, there is an external safeguard via a 60 VDC, 2 A Schottky diode (PMEG6020ER). Each of the 12 digital input channels uses a resistor divider setup consisting of a 680 kΩ and 100 kΩ resistor; this configuration scales down a 0 to 24 VDC input to a 0 to 3 VDC range. While the high-side switches function separately from the digital input channels, it is possible to read the status of the high-side switches via the digital input channels.
Ensure each channel does not exceed a maximum current of 500 mA to avoid potential damage or malfunctions in the programmable digital input/output channels.
The sketch below showcases using the programmable digital input/output channels of the Portenta Machine Control. This example shows how to transmit values on the programmable channels periodically and also read from them regularly.
1/*2 Portenta Machine Control's Programmable Digital I/Os3 Name: portenta_machine_control_programmable_digital_io_example.ino4 Purpose: Demonstrates the usage of the programmable digital input/output channels5 on the Portenta Machine Control. It includes initializing the channels, 6 setting digital outputs, reading digital inputs, and toggling the outputs.7 8 @author Arduino PRO Content Team9 @version 1.0 01/10/2310*/11
12#include <Arduino_PortentaMachineControl.h>13
14void setup() {15 // Initialize serial communication at 9600 bauds16 Serial.begin(9600);17 18 // Initialize I2C communication19 Wire.begin();20 21 // Wait for serial port to connect, needed for native USB port only22 while (!Serial) {23 ; 24 }25
26 // Attempt to initialize the programmable digital input/output channels27 if (!MachineControl_DigitalProgrammables.begin()) {28 Serial.println("- Failed to initialize the programmable digital I/Os!");29 return;30 }31 Serial.println("- Programmable digital I/Os initialized successfully!");32}33
34void loop() {35 // Turn ON the digital output channel 3 using the defined macro36 MachineControl_DigitalProgrammables.set(IO_WRITE_CH_PIN_03, SWITCH_ON); 37 delay(1000);38
39 // Read the status of digital input channel 3 using the defined macro40 int status = MachineControl_DigitalProgrammables.read(IO_READ_CH_PIN_03);41 Serial.println("- Channel 03 status: " + String(status));42 delay(1000);43
44 // Turn ON all digital output channels45 MachineControl_DigitalProgrammables.writeAll(SWITCH_ON_ALL);46 delay(1000);47
48 // Read and display the status of all digital input channels49 uint32_t inputs = MachineControl_DigitalProgrammables.readAll();50 for (int i = 0; i < 12; i++) {51 Serial.println("- CH" + formatChannel(i) + ": " + String((inputs & (1 << i)) >> i));52 }53 Serial.println();54
55 // Toggle the states of all digital output channels56 MachineControl_DigitalProgrammables.toggle();57 delay(1000);58 inputs = MachineControl_DigitalProgrammables.readAll();59 for (int i = 0; i < 12; i++) {60 Serial.println("- CH" + formatChannel(i) + ": " + String((inputs & (1 << i)) >> i));61 }62 Serial.println();63}64
65/**66 Formats the channel number with leading zeros to 67 achieve a consistent 2-digit format68
69 @param channel70 @return A string with the channel number in 2-digit format71*/72String formatChannel(int channel) {73 if(channel < 10) {74 return "0" + String(channel);75 }76 return String(channel);77}The example sketch uses the following Arduino_PortentaMachineControl functions:
: Utilized to initialize the programmable digital input/output channels, it returns aMachineControl_DigitalProgrammables.begin()
if the initialization fails.FALSE
is based on the I2C protocol. To work properly, it must be preceded byMachineControl_DigitalProgrammables
, which initializes the I2C interface.Wire.begin()
: Used to define a particular channel's state (ON/OFF).MachineControl_DigitalProgrammables.set(pin, state)
: Used to discern the state of a specific channel.MachineControl_DigitalProgrammables.read(pin)
: Used to configure the state (ON/OFF) for all available pins or channels simultaneously.MachineControl_DigitalProgrammables.writeAll(state)
: Used to read the states of all available channels collectively.MachineControl_DigitalProgrammables.readAll()
: Used to invert the states of all the channels.MachineControl_DigitalProgrammables.toggle()
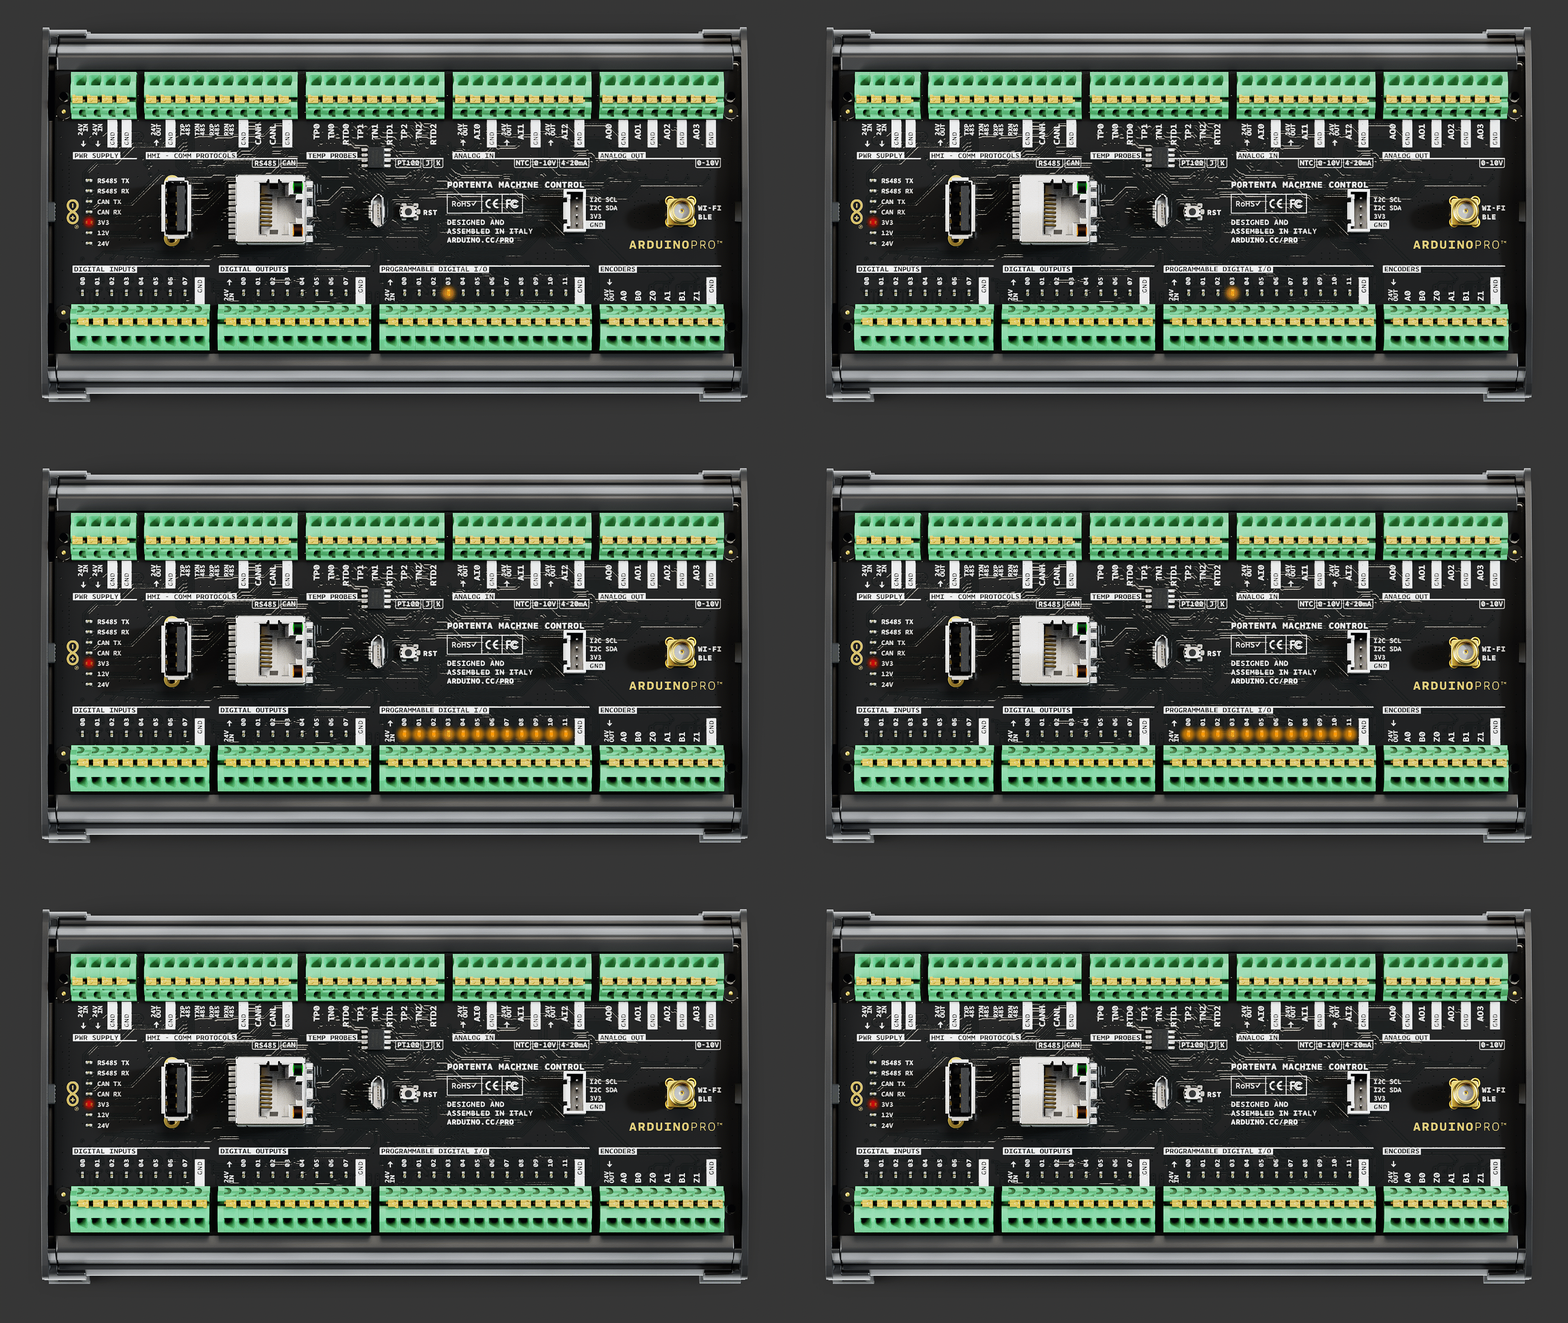
Open the Serial Monitor to watch the I/Os states. The sketch will showcase the reading and state control process of the I/Os of the channels.
Communication
This user manual section covers the different communication interfaces and protocols the Portenta Machine Control supports, including the Ethernet, Wi-Fi®, Bluetooth®, RS-485, Modbus, and CAN Bus.
Ethernet
The Portenta Machine Control features an onboard low-power 10BASE-T/100BASE-TX Ethernet physical layer (PHY) transceiver. The transceiver complies with the IEEE 802.3 and 802.3u standards and supports communication with an Ethernet MAC through a standard RMII interface. The Ethernet transceiver is accessible through the onboard RJ45 connector.
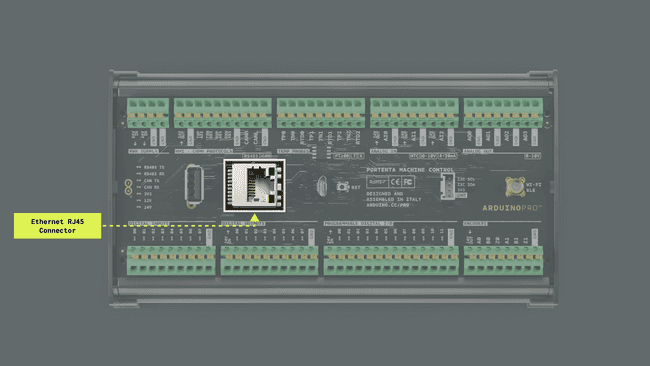
The
Arduino Mbed OS Portenta BoardsEthernetThe sketch below enables a Portenta Machine Control to connect to the Internet via an Ethernet connection. Once connected, it performs a
GETip-api.comArduino_JSON1/**2 Portenta's Machine Control Web Client (Ethernet version)3 Name: portenta_machine_control_ethernet_web_client.ino4 Purpose: This sketch connects a Portenta Machine Control5 to ip-api.com via Ethernet and fetches IP details for 6 the controller7
8 @author Arduino PRO Content Team9 @version 1.0 01/10/2310*/11
12// Include the necessary libraries13#include <Ethernet.h>14#include <Arduino_JSON.h>15
16// Server address for ip-api.com17const char* server = "ip-api.com";18
19// API endpoint path to get IP details in JSON format20String path = "/json/";21
22// Static IP configuration for the Portenta Machine Control device23// Used only if DHCP IP configuration fails24IPAddress ip(10, 130, 22, 84);25
26// Ethernet client instance for the communication27EthernetClient client;28
29// JSON variable to store and process the fetched data30JSONVar doc;31
32// Variable to ensure we fetch data only once33bool dataFetched = false;34
35void setup() {36 // Initialize serial communication at 115200 bauds37 Serial.begin(115200);38
39 // Wait for the serial port to connect,40 // This is necessary for boards that have native USB41 while (!Serial);42
43 // Attempt to start Ethernet connection via DHCP44 // If DHCP failed, print a diagnostic message45 if (Ethernet.begin() == 0) {46 Serial.println("- Failed to configure Ethernet using DHCP!");47
48 // Try to configure Ethernet with the predefined static IP address49 Ethernet.begin(ip);50 }51 delay(2000);52}53
54void loop() {55 // Ensure we haven't fetched data already56 // ensure the Ethernet link is active57 // establish a connection to the server58 // compose and send the HTTP GET request59 if (!dataFetched) {60 if (Ethernet.linkStatus() == LinkON) {61 if (client.connect(server, 80)) {62 client.print("GET ");63 client.print(path);64 client.println(" HTTP/1.1");65 client.print("Host: ");66 client.println(server);67 client.println("Connection: close");68 client.println();69
70 // Wait and skip the HTTP headers to get to the JSON data71 char endOfHeaders[] = "\r\n\r\n";72 client.find(endOfHeaders);73
74 // Read and parse the JSON response75 String payload = client.readString();76 doc = JSON.parse(payload);77
78 // Check if the parsing was successful79 if (JSON.typeof(doc) == "undefined") {80 Serial.println("- Parsing failed!");81 return;82 }83
84 // Extract and print the IP details85 Serial.println("*** IP Details:");86 Serial.print("- IP Address: ");87 Serial.println((const char*)doc["query"]);88 Serial.print("- City: ");89 Serial.println((const char*)doc["city"]);90 Serial.print("- Region: ");91 Serial.println((const char*)doc["regionName"]);92 Serial.print("- Country: ");93 Serial.println((const char*)doc["country"]);94 Serial.println("");95
96 // Mark data as fetched97 dataFetched = true;98 }99 // Close the client connection once done100 client.stop();101 } else {102 Serial.println("- Ethernet link disconnected!");103 }104 }105}The sketch includes the
EthernetArduino_JSONsetup()Once the Ethernet connection runs, the sketch connects to the
ip-api.comHTTP GETWithin the
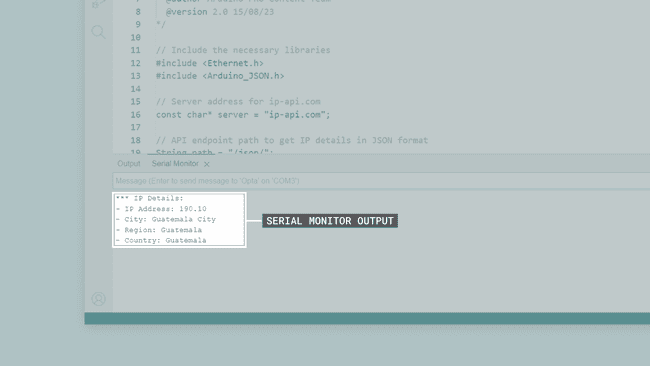
loop()HTTP GETip-api.comKey IP details such as IP address, city, region, and country are extracted and then displayed in the IDE's Serial Monitor using the parsed data. If the Ethernet link happens to be disconnected, a corresponding message is printed to the Serial Monitor. Should the JSON parsing fail, an error message is showcased on the IDE's Serial Monitor, prompting the sketch to exit the current iteration of the
loop()You should see the following output in the Arduino IDE's Serial Monitor:
Wi-Fi®
The Portenta Machine Control features an onboard Wi-Fi® module that provides seamless wireless connectivity, allowing it to connect to Wi-Fi® networks and interact with other devices Over-The-Air (OTA).
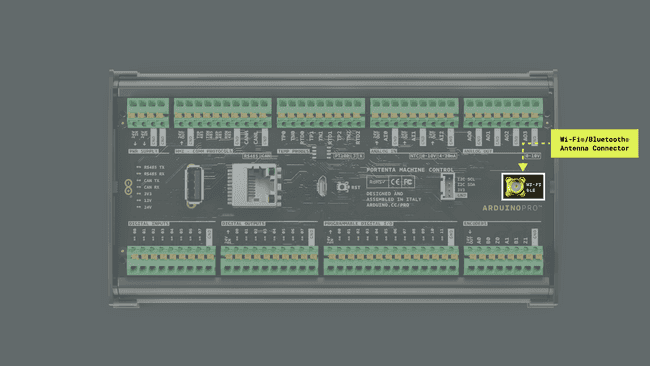
Some of the key capabilities of Portenta's Machine Control onboard Wi-Fi® module are the following:
- Wireless connectivity: The onboard Wi-Fi® module supports IEEE 802.11b/g/n Wi-Fi® standards, enabling devices to establish reliable and high-speed wireless connections to access the Internet and communicate with other devices.
- Secure communication: The onboard module incorporates various security protocols such as WEP, WPA, WPA2, and WPA3, ensuring robust data encryption and protection against unauthorized access during wireless communication.
- Antenna connector: Portenta Machine Control devices feature an onboard vertical SMA antenna connector (5-1814832-2) specifically matched for the onboard Wi-Fi® module RF requirements.
The
Arduino Mbed OS Portenta BoardsWiFiThe sketch below enables a Portenta Machine Control device to connect to the Internet via Wi-Fi® (like the Ethernet example). Once connected, it performs a
GETip-api.comArduino_JSONYou need to create first a header file named
arduino_secrets.h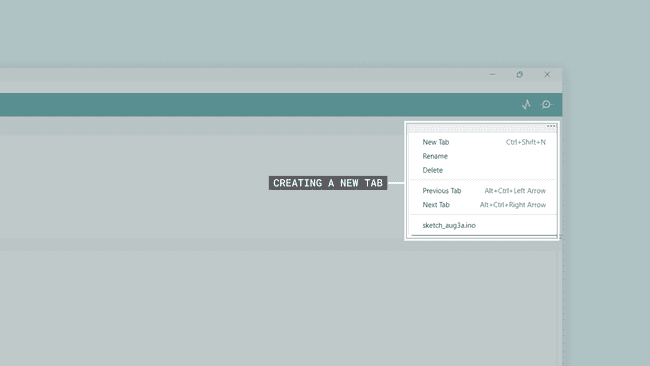
Put
arduino_secrets.h1#define SECRET_SSID "YOUR_SSID"; // Your network SSID (name)2#define SECRET_PASS "YOUR_PASS"; // Your network password (use for WPA, or use as key for WEP)Replace
YOUR_SSIDYOUR_PASS1/**2 Portenta's Machine Control Web Client (Wi-Fi version)3 Name: portenta_machine_control_wifi_web_client.ino4 Purpose: This sketch connects a Portenta Machine Control 5 to ip-api.com via Wi-Fi and fetches IP details6
7 @author Arduino PRO Content Team8 @version 1.0 01/10/239*/10
11#include <WiFi.h>12#include <Arduino_JSON.h>13
14// Wi-Fi network details15char ssid[] = SECRET_SSID;16char password[] = SECRET_PASS;17
18// Server address for ip-api.com19const char* server = "ip-api.com";20
21// API endpoint path to get IP details in JSON format22String path = "/json";23
24// Wi-Fi client instance for the communication25WiFiClient client;26
27// JSON variable to store and process the fetched data28JSONVar doc;29
30// Variable to ensure we fetch data only once31bool dataFetched = false;32
33void setup() {34 // Initialize serial communication at 115200 bauds35 Serial.begin(115200);36
37 // Wait for the serial port to connect,38 // this is necessary for boards that have native USB39 while (!Serial);40
41 // Start the Wi-Fi connection using the provided SSID and password42 Serial.print("- Connecting to ");43 Serial.println(ssid);44 WiFi.begin(ssid, password);45
46 while (WiFi.status() != WL_CONNECTED) {47 delay(1000);48 Serial.print(".");49 }50
51 Serial.println();52 Serial.println("- Wi-Fi connected!");53 Serial.print("- IP address: ");54 Serial.println(WiFi.localIP());55 Serial.println();56}57
58void loop() {59 // Check if the IP details have been fetched;60 // if not, call the function to fetch IP details,61 // set the flag to true after fetching62 if (!dataFetched) {63 fetchIPDetails();64 dataFetched = true;65 }66}67
68/**69 Fetch IP details from defined server70
71 @param none72 @return IP details73*/74void fetchIPDetails() {75 if (client.connect(server, 80)) {76 // Compose and send the HTTP GET request77 client.print("GET ");78 client.print(path);79 client.println(" HTTP/1.1");80 client.print("Host: ");81 client.println(server);82 client.println("Connection: close");83 client.println();84
85 // Wait and skip the HTTP headers to get to the JSON data86 char endOfHeaders[] = "\r\n\r\n";87 client.find(endOfHeaders);88
89 // Read and parse the JSON response90 String payload = client.readStringUntil('\n');91 doc = JSON.parse(payload);92
93 // Check if the parsing was successful94 if (JSON.typeof(doc) == "undefined") {95 Serial.println("- Parsing failed!");96 return;97 }98
99 // Extract and print the IP details100 Serial.println("*** IP Details:");101 String query = doc["query"];102 Serial.print("- IP Address: ");103 Serial.println(query);104 String city = doc["city"];105 Serial.print("- City: ");106 Serial.println(city);107 String region = doc["regionName"];108 Serial.print("- Region: ");109 Serial.println(region);110 String country = doc["country"];111 Serial.print("- Country: ");112 Serial.println(country);113 Serial.println("");114 } else {115 Serial.println("- Failed to connect to server!");116 }117
118 // Close the client connection once done119 client.stop();120}The sketch includes the
WiFiArduino_JSONsetup()Once the Wi-Fi® connection is established, the sketch is ready to connect to the
ip-api.comHTTP GETGETThe
loop()HTTP GETJSON.parse()Arduino_JSONloop()Since the data is fetched only once, there's no need to send
HTTP GET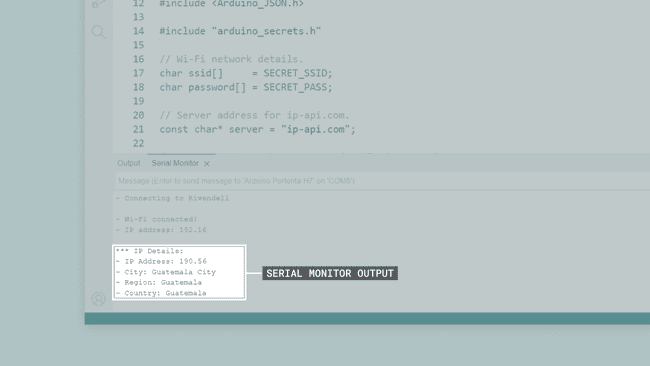
Bluetooth®
The Portenta Machine Control features an onboard Bluetooth® module that provides seamless wireless connectivity, allowing it to connect to other Bluetooth® devices and networks.

To enable Bluetooth® communication on the Portenta Machine Control, you can use the ArduinoBLE library. Let's use an example code demonstrating some of the capabilities of Poternta's Machine Control Bluetooth® module. Here is an example of how to use the
ArduinoBLE1/**2 Portenta's Machine Control Bluetooth3 Name: portenta_machine_control_bluetooth.ino4 Purpose: Read temperature from a thermocouple input of 5 the Portenta Machine Control, then exposes the temperature 6 value using a Bluetooth standard service7
8 @author Arduino PRO Content Team9 @version 1.0 01/10/2310*/11
12#include <ArduinoBLE.h>13#include <Arduino_PortentaMachineControl.h>14
15
16// Define the environmental sensing service and its temperature characteristic17BLEService temperatureService("181A");18BLEIntCharacteristic temperatureIntChar("2A6E", BLERead | BLENotify);19
20
21void setup() {22 // Initialize the digital outputs terminals of the Portenta Machine Control 23 MachineControl_DigitalOutputs.begin();24
25 // Initialize serial communication at 9600 bauds26 Serial.begin(9600);27
28 // Initialize the Portenta's Machine Control BLE module29 if (!BLE.begin()) {30 Serial.println("- Starting BLE failed!");31 while (1)32 ;33 }34 35 // Initialize temperature probes36 MachineControl_TCTempProbe.begin();37 38 // Set the local name and advertised service for the BLE module39 BLE.setLocalName("Temperature Sensor");40 BLE.setAdvertisedService(temperatureService);41 temperatureService.addCharacteristic(temperatureIntChar);42 BLE.addService(temperatureService);43
44 // Start advertising the BLE service45 BLE.advertise();46 Serial.println("- Bluetooth device active, waiting for connections...");47}48
49void loop() {50 // Check for incoming BLE connections51 BLEDevice central = BLE.central();52
53 // If a central device is connected54 if (central) {55 Serial.print("- Connected to device: ");56 Serial.println(central.address());57
58 // Turn on a digital output channel of the Portenta Machine Control when connected59 MachineControl_DigitalOutputs.write(0, HIGH);60
61 // While the central device is connected62 while (central.connected()) {63 // Read the temperature from a type K thermocouple,64 // update the BLE characteristic with the temperature value65 MachineControl_TCTempProbe.selectChannel(0);66 float temp_ch0 = MachineControl_TCTempProbe.readTemperature();67
68 Serial.print("- Temperature is: ");69 Serial.println(temp_ch0);70 temperatureIntChar.writeValue(temp_ch0 * 100);71
72 delay(1000);73 }74
75 Serial.print("- BLE not connected: ");76 Serial.println(central.address());77 }78
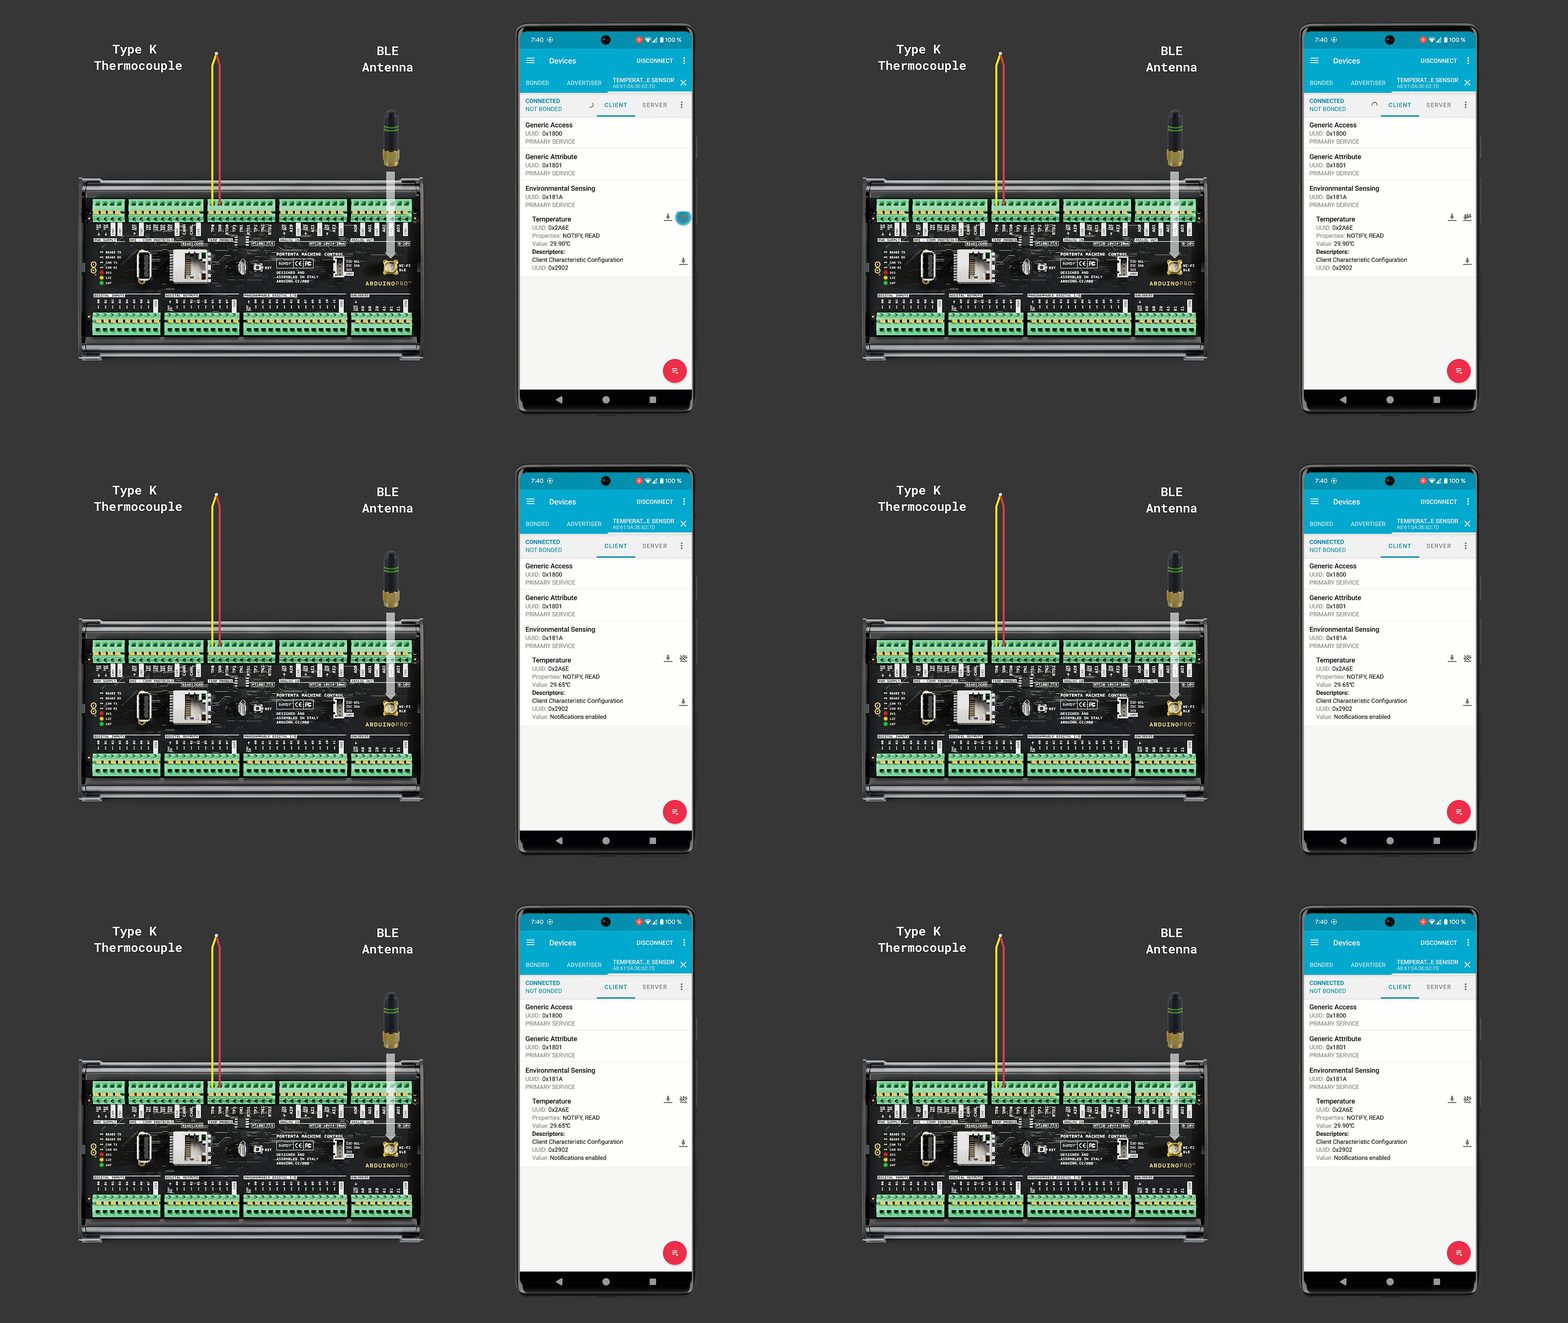
79 // Digital output channel of the Portenta Machine Control80 // blinks when Bluetooth® is not connected to an external device81 MachineControl_DigitalOutputs.write(0, HIGH);82 delay(200);83 MachineControl_DigitalOutputs.write(0, LOW);84 delay(200);85}The example sketch shown above uses a standard Bluetooth® Low Energy service and characteristic for transmitting temperature read by one of the thermocouple input terminals of the Portenta Machine Control to a central device.
- The sketch begins by importing all the necessary libraries and defining the Bluetooth® Low Energy service and characteristics.
- In the
function, the code initializes the Portenta Machine Control and sets up the Bluetooth® Low Energy service and characteristics. Then, it begins advertising the defined Bluetooth® Low Energy service.setup() - A Bluetooth® Low Energy connection is constantly verified in the
function; when a central device connects to the Portenta Machine Control, channel 0 of its digital output terminals is turned on. The sketch then enters into a loop that constantly reads the temperature from a thermocouple input terminal. The temperature is printed to the IDE's Serial Monitor and transmitted to the central device over the defined Bluetooth® Low Energy characteristic.loop()
RS-485 (Half/Full Duplex)
The Portenta Machine Control has a built-in RS-485 interface that enables the implementation of robust and reliable data transmission systems. RS-485 interface is a protocol widely used in industrial applications. The wide common-mode range enables data transmission over longer cable lengths and in noisy environments such as the floor of a factory. Also, the high input impedance of the receivers allows more devices to be attached to the communication lines.
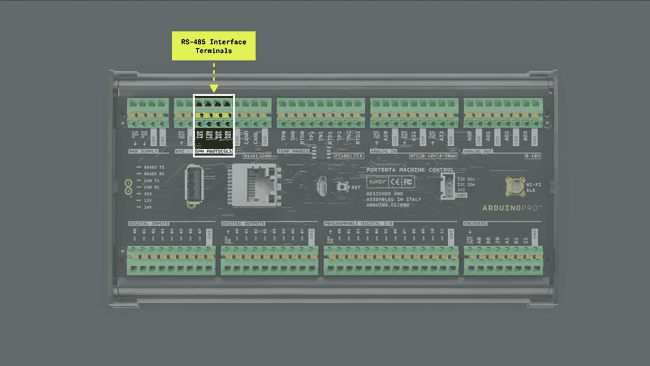
The onboard RS-485 transceiver is the SP335 from MaxLinear. The SP335 is an advanced multiprotocol transceiver that supports RS-232, RS-485, and RS-422 serial standards. Integrated cable termination and multiple configuration modes allow all three protocols to be used interchangeably over a single cable or connector with no additional switching components.
The Portenta Machine Control has onboard termination resistors; its RS-485 interface can be configured to be half-duplex or full-duplex.
Some of the key capabilities of Portenta's Machine Control onboard RS-485 transceiver are the following:
- High-speed operation: The RS-485 transceiver can operate up to 20 Mbps.
- EMI Reduction: The slew rate is limited to 250 kbps to minimize electromagnetic interference (EMI), enhancing signal integrity.
- ESD protection: Transmitter outputs and receiver inputs are protected against electrostatic discharge (ESD) up to ±15 kV.
- High impedance: The transceiver inputs exhibit high impedance, allowing up to 256 devices on a single communication bus.
- Communication mode: The transceiver can be configured either half or full-duplex.
- Termination resistors: 120 Ω termination resistors are integrated and can be connected or disconnected through software.
RS-485 data lines in the Portenta Machine Control are labeled as described in the following table:
| Pin Name | RS-485 Full-duplex | RS-485 Half-duplex |
|---|---|---|
| RS485 TX P | | |
| RS485 TX N | | |
| RS485 RX P | | - |
| RS485 RX N | | - |
RS-485 data line labels differ between manufacturers. Most manufacturers will use
and +
to label the data lines or variations such as –
and D+
. Some manufacturers will label inputs as D-
and A
but get the polarity backward, so B
is positive and A
negative. Although predicting how other manufacturers will mark these lines is impossible, practical experience suggests that the B
line should be connected to the -
terminal. The A
line should be connected to the +
terminal. Reversing the polarity will not damage an RS-485 device, but the communication will not work as expected.B
The example sketch below shows how to use the RS-485 interface of the Portenta Machine Control for half-duplex communication.
1/*2 Portenta Machine Control's RS-485 Half-Duplex Communication3 Name: portenta_machine_control_rs485_example.ino4 Purpose: Demonstrates half-duplex RS-485 communication using5 the Portenta Machine Control.6
7 @author Arduino PRO Content Team8 @version 1.0 01/10/239*/10
11// Include the necessary libraries12#include <Arduino_PortentaMachineControl.h>13
14// Define the interval for sending messages15constexpr unsigned long sendInterval { 1000 };16unsigned long sendNow { 0 };17unsigned long counter { 0 }; 18
19void setup() {20 // Initialize serial communication at 9600 bauds21 Serial.begin(9600);22
23 // Wait for the serial port to connect,24 //tThis is necessary for boards that have native USB25 while (!Serial);26
27 Serial.println("- Initializing RS-485 interface...");28
29 // Initialize the RS-485 interface with a baud rate of 115200 and specific timings,30 // the timings define the preamble and postamble durations for RS-485 communication31 MachineControl_RS485Comm.begin(115200, 0, 500);32
33 // Set the RS-485 interface in receive mode initially34 MachineControl_RS485Comm.receive();35 Serial.println("- RS-485 initialization complete!");36}37
38void loop() {39 // Check if there is incoming data and read it40 if (MachineControl_RS485Comm.available()) {41 Serial.write(MachineControl_RS485Comm.read());42 }43
44 // Send data at defined intervals45 if (millis() > sendNow) {46 // Disable receive mode before starting the transmission47 MachineControl_RS485Comm.noReceive();48
49 // Begin transmission and send a message with a counter50 MachineControl_RS485Comm.beginTransmission();51 MachineControl_RS485Comm.print("- Message: ");52 MachineControl_RS485Comm.println(counter++);53
54 // End the transmission and switch back to receive mode55 MachineControl_RS485Comm.endTransmission();56 MachineControl_RS485Comm.receive();57
58 // Update the time for the next transmission59 sendNow = millis() + sendInterval;60 }61}In this example sketch, a message is periodically sent over the RS-485 interface of the Portenta Machine Control. The sketch initializes the RS-485 interface for half-duplex communication and sends a
StringThe example sketch uses the following functions from the
Arduino_PortentaMachineControl
: Initializes the RS-485 module with specified baud rate and timing settings.MachineControl_RS485Comm.begin(baud, pre, post)
: Puts the module in receive mode.MachineControl_RS485Comm.receive()
: Disables receive mode for transmission.MachineControl_RS485Comm.noReceive()
: Prepares the module to start transmitting data.MachineControl_RS485Comm.beginTransmission()
: Ends data transmission and prepares the module to receive data.MachineControl_RS485Comm.endTransmission()
: Checks if data can be read.MachineControl_RS485Comm.available()
: Reads incoming data.MachineControl_RS485Comm.read()
To receive and show the messages on your computer, you can use a USB to RS-485 converter, such as the converter used by the Arduino Pro Content Team. You can use the Arduino IDE's Serial Monitor to display the messages received in the converter or another serial terminal such as CoolTerm, a simple and cross-platform (Windows, Mac, and Linux) serial port terminal application (no terminal emulation) that is geared towards hobbyists and professionals.
As a practical example, we will establish a full duplex communication between two Portenta Machine Control devices. Follow the wiring below for the RS-485 full-duplex communication.
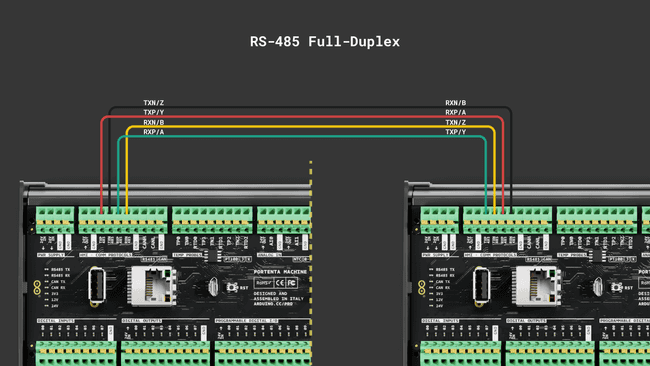
For both Portenta Machine Control devices, use the example sketch shown below; this example sketch can also be found on the Arduino IDE by navigating to File > Examples > Arduino_PortentaMachineControl > RS485_fullduplex.
1/*2 * Portenta Machine Control's RS-485 Full Duplex Communication3 * Name: RS485_fullduplex.ino4 * Purpose: Demonstrates full duplex RS-485 communication using5 * the Portenta Machine Control; the sketch shows how to send 6 * and receive data periodically on the RS-485 interface7 *8 * @author Riccardo Rizzo, modified by Arduino PRO Content Team9 * @version 1.0 01/10/2310 */11
12// Include the necessary libraries13#include "Arduino_PortentaMachineControl.h"14
15// Define the interval for sending messages16constexpr unsigned long sendInterval { 1000 };17unsigned long sendNow { 0 };18unsigned long counter = 0;19
20void setup() {21 // Initialize serial communication at 9600 bauds22 // Wait for the serial port to connect23 Serial.begin(9600);24 while (!Serial);25
26 Serial.println("- Start RS485 initialization...");27
28 // Initialize the RS-485 interface with specific settings,29 // specify baud rate, preamble and postamble times for RS-485 communication30 MachineControl_RS485Comm.begin(115200, 0, 500);31
32 // Enable full duplex mode and 120 Ohm termination resistors33 MachineControl_RS485Comm.setFullDuplex(true);34 35 // Set the RS-485 interface in receive mode initially36 MachineControl_RS485Comm.receive();37 38 Serial.println("- Initialization done!");39}40
41void loop() {42 // Check if there is incoming data and read it43 if (MachineControl_RS485Comm.available())44 Serial.write(MachineControl_RS485Comm.read());45
46 // Send data at defined intervals47 if (millis() > sendNow) {48 // Disable receive mode before starting the transmission49 MachineControl_RS485Comm.noReceive();50
51 // Begin transmission and send a message with a counter52 MachineControl_RS485Comm.beginTransmission();53 MachineControl_RS485Comm.print("- Hello ");54 MachineControl_RS485Comm.println(counter++);55
56 // End the transmission and switch back to receive mode57 MachineControl_RS485Comm.endTransmission();58 59 // Re-enable receive mode after transmission60 MachineControl_RS485Comm.receive();61
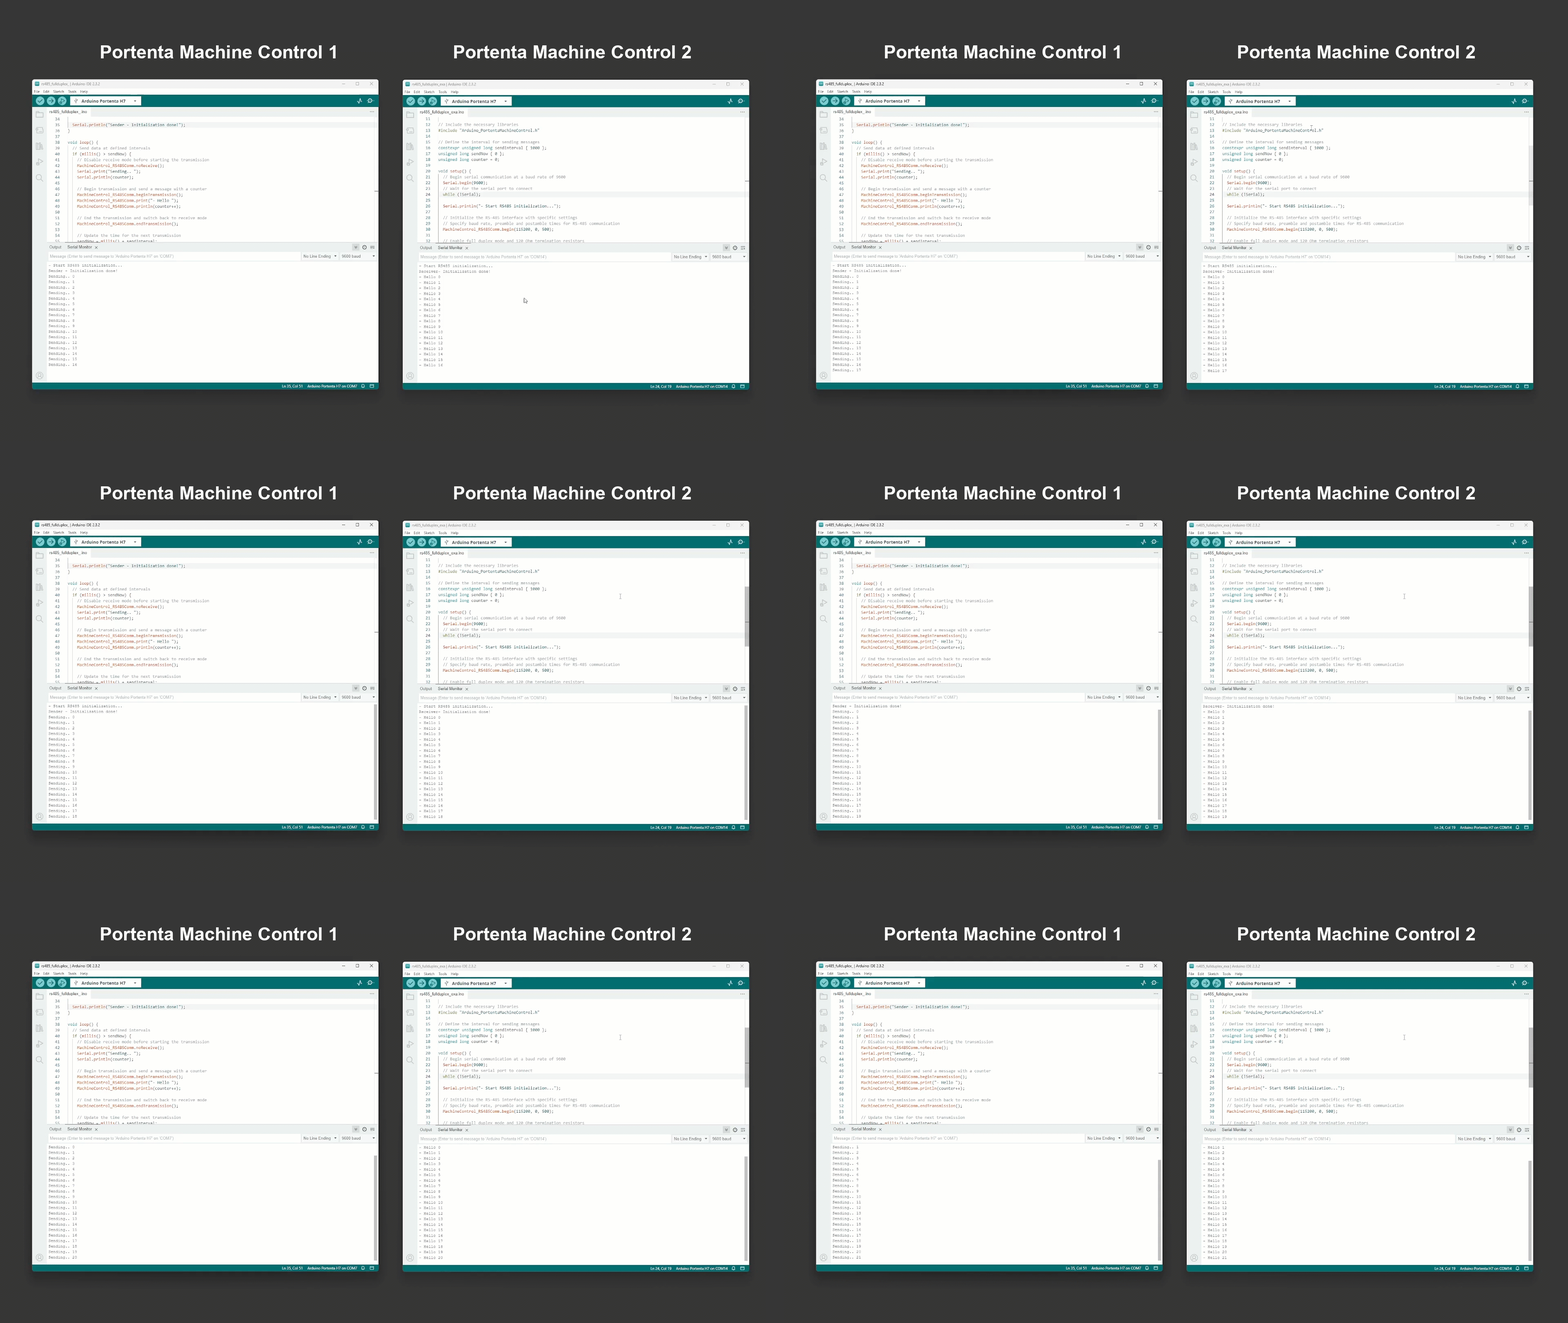
62 // Update the time for the next transmission63 sendNow = millis() + sendInterval;64 }65}Both devices will send and receive messages respectively through the RS-485 interface and will print them in the IDE's Serial Monitor, as shown in the animation below.
Modbus (RTU/TCP)
The Portenta Machine Control incorporates a built-in Modbus interface, enabling the implementation of robust and reliable data transmission systems. Modbus, in its RTU version that operates RS-485 serial transmission or in its TCP version that works over Ethernet, remains one of the most widely used protocols for industrial automation applications, building management systems, and process control, among others.
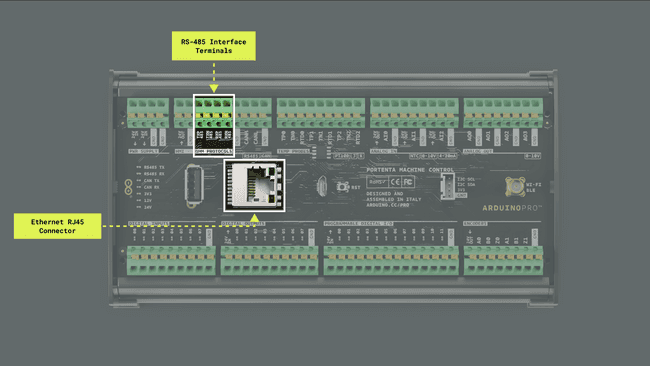
The many nodes connected in a Modbus network, whether RTU or TCP, allow high flexibility and scalability in constructing automation and control systems.
To use the Modbus protocol with your Portenta Machine Control, you will need the
and ArduinoRS485
libraries. You can install them via the Library Manager of the Arduino IDE.ArduinoModbus
Modbus RTU
Modbus RTU, generally operating in half-duplex mode, with its capability to handle noisy and long-distance transmission lines, makes it an excellent choice for industrial environments. Modbus RTU communication is supported using Portenta's Machine Control RS-485 physical interface.
The Portenta Machine Control has onboard termination resistors; its RS-485 interface can be configured as a half or full duplex.
The example below shows how to enable Modbus RTU communication between a Portenta Machine Control device and an Opta™ device. For wiring both devices, follow the diagram below:
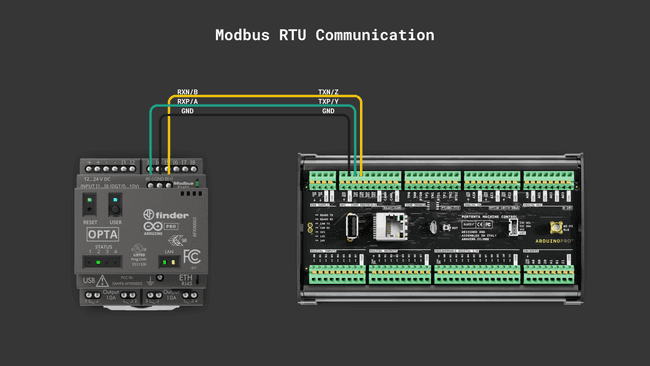
The following example sketch will let the Portenta Machine Control device toggle the four onboard Opta™ LEDs via Modbus RTU. The Portenta Machine Control will be the client, while the Opta™ device will be the server.
For the Opta™ device, defined as the server, use the following example sketch below.
1/*2 Opta's Modbus RTU Server Example3 Name: opta_modbus_rtu_server_led_control.ino4 Purpose: Demonstrates controlling the onboard LEDs of an 5 Opta device using the Modbus RTU protocol6
7 @author Arduino PRO Content Team8 @version 1.0 01/10/239*/10
11// Include the necessary libraries 12#include <ArduinoRS485.h>13#include <ArduinoModbus.h>14
15// Define the baud rate for Modbus communication16constexpr auto baudrate{ 38400 };17
18// Define the number of coils to control LEDs19const int numCoils = 4;20
21// Calculate preDelay and postDelay in microseconds as per Modbus RTU Specification22// Modbus over serial line specification and implementation guide V1.0223// Paragraph 2.5.1.1 Modbus Message RTU Framing24// https://modbus.org/docs/Modbus_over_serial_line_V1_02.pdf25constexpr auto bitduration{ 1.f / baudrate };26constexpr auto preDelayBR{ bitduration * 9.6f * 3.5f * 1e6 };27constexpr auto postDelayBR{ bitduration * 9.6f * 3.5f * 1e6 };28
29void setup() {30 // Initialize serial communication at 9600 bauds31 Serial.begin(9600);32
33 // Print a startup message34 Serial.println("- Modbus RTU Server");35
36 // Set RS485 transmission delays as per Modbus specification37 RS485.setDelays(preDelayBR, postDelayBR);38
39 // Start the Modbus RTU server with a specific slave ID and baud rate40 // Halt execution if the server fails to start41 if (!ModbusRTUServer.begin(1, baudrate, SERIAL_8N1)) {42 Serial.println("- Failed to start Modbus RTU Server!");43 while (1)44 ; 45 }46
47 // Initialize the onboard LEDs 48 pinMode(LED_D0, OUTPUT);49 pinMode(LED_D1, OUTPUT);50 pinMode(LED_D2, OUTPUT);51 pinMode(LED_D3, OUTPUT);52
53 // Configure coils for controlling the onboard LEDs54 ModbusRTUServer.configureCoils(0x00, numCoils);55}56
57void loop() {58 // Poll for Modbus RTU requests and process them59 int packetReceived = ModbusRTUServer.poll();60
61 if (packetReceived) {62 // Process each coil's state and control LEDs accordingly63 for (int i = 0; i < numCoils; i++) {64 // Read coil value65 // Update discrete input with the coil's state66 int coilValue = ModbusRTUServer.coilRead(i); 67 ModbusRTUServer.discreteInputWrite(i, coilValue); 68
69 // Debug output to the IDE's serial monitor70 Serial.print("- LED ");71 Serial.print(i);72 Serial.print(" : ");73 Serial.println(coilValue);74
75 // Control the onboard LEDs based on the coil values76 switch (i) {77 case 0:78 digitalWrite(LED_D0, coilValue);79 break;80 case 1:81 digitalWrite(LED_D1, coilValue);82 break;83 case 2:84 digitalWrite(LED_D2, coilValue);85 break;86 case 3:87 digitalWrite(LED_D3, coilValue);88 // New line for better readability89 Serial.println(); 90 break;91 default:92 // Error handling for unexpected coil addresses93 Serial.println("- Output out of scope!"); 94 break;95 }96 }97 }98}For the Portenta Machine Control, defined as the client, use the following example sketch.
1/*2 Portenta's Machine Control Modbus RTU Client Example3 Name: portenta_machine_control_modbus_rtu_client_led_control.ino4 Purpose: Demonstrates controlling Modbus RTU coils using a 5 Portenta Machine Control device6
7 @author Arduino PRO Content Team8 @version 1.0 01/10/239*/10
11// Include the necessary libraries12#include <Arduino_PortentaMachineControl.h>13#include <ArduinoRS485.h>14#include <ArduinoModbus.h>15
16// Define the baud rate for Modbus communication17constexpr auto baudrate{ 38400 };18
19// Calculate preDelay and postDelay in microseconds as per Modbus RTU Specification20// Modbus over serial line specification and implementation guide V1.0221// Paragraph 2.5.1.1 Modbus Message RTU Framing22// https://modbus.org/docs/Modbus_over_serial_line_V1_02.pdf23constexpr auto bitduration{ 1.f / baudrate };24constexpr auto preDelay{ bitduration * 9.6f * 3.5f * 1e6 };25constexpr auto postDelay{ bitduration * 9.6f * 3.5f * 1e6 };26
27// Counter variable to demonstrate coil control logic28int counter = 0;29
30void setup() {31 // Initialize serial communication at 9600 bauds32 Serial.begin(9600);33
34 // Initialize RS-485 communication with specified baud rate and delays35 MachineControl_RS485Comm.begin(baudrate, preDelay, postDelay);36
37 // Short delay to ensure RS-485 communication is stable38 delay(2500);39
40 // Indicate start of Modbus RTU client operation41 Serial.println("- Modbus RTU Coils control");42
43 // Start the Modbus RTU client with the RS-485 communication settings44 if (!ModbusRTUClient.begin(MachineControl_RS485Comm, baudrate, SERIAL_8N1)) {45 Serial.println("- Failed to start Modbus RTU Client!");46 // Halt execution if unable to start47 while (1)48 ; 49 }50}51
52void loop() {53 // Increment counter to change coil values on each iteration54 counter++;55
56 // Determine coil value based on the counter's parity57 byte coilValue = ((counter % 2) == 0) ? 0x00 : 0x01;58
59 // Attempt to write coil values to a Modbus RTU server60 Serial.print("- Writing coil values ... ");61
62 // Begin transmission to Modbus server (slave ID 1) to write coil values at address 0x0063 ModbusRTUClient.beginTransmission(1, COILS, 0x00, 4);64 for (int i = 0; i < 4; i++) {65 // Write the same value to all 4 coils66 ModbusRTUClient.write(coilValue); 67 }68
69 // Check for successful transmission and report errors if any,70 // print error code if transmission failed or confirm successful coil value writing71 if (!ModbusRTUClient.endTransmission()) {72 Serial.print("- Failed! Error code: ");73 Serial.println(ModbusRTUClient.lastError()); 74 } else {75 Serial.println("- Success!"); 76 }77
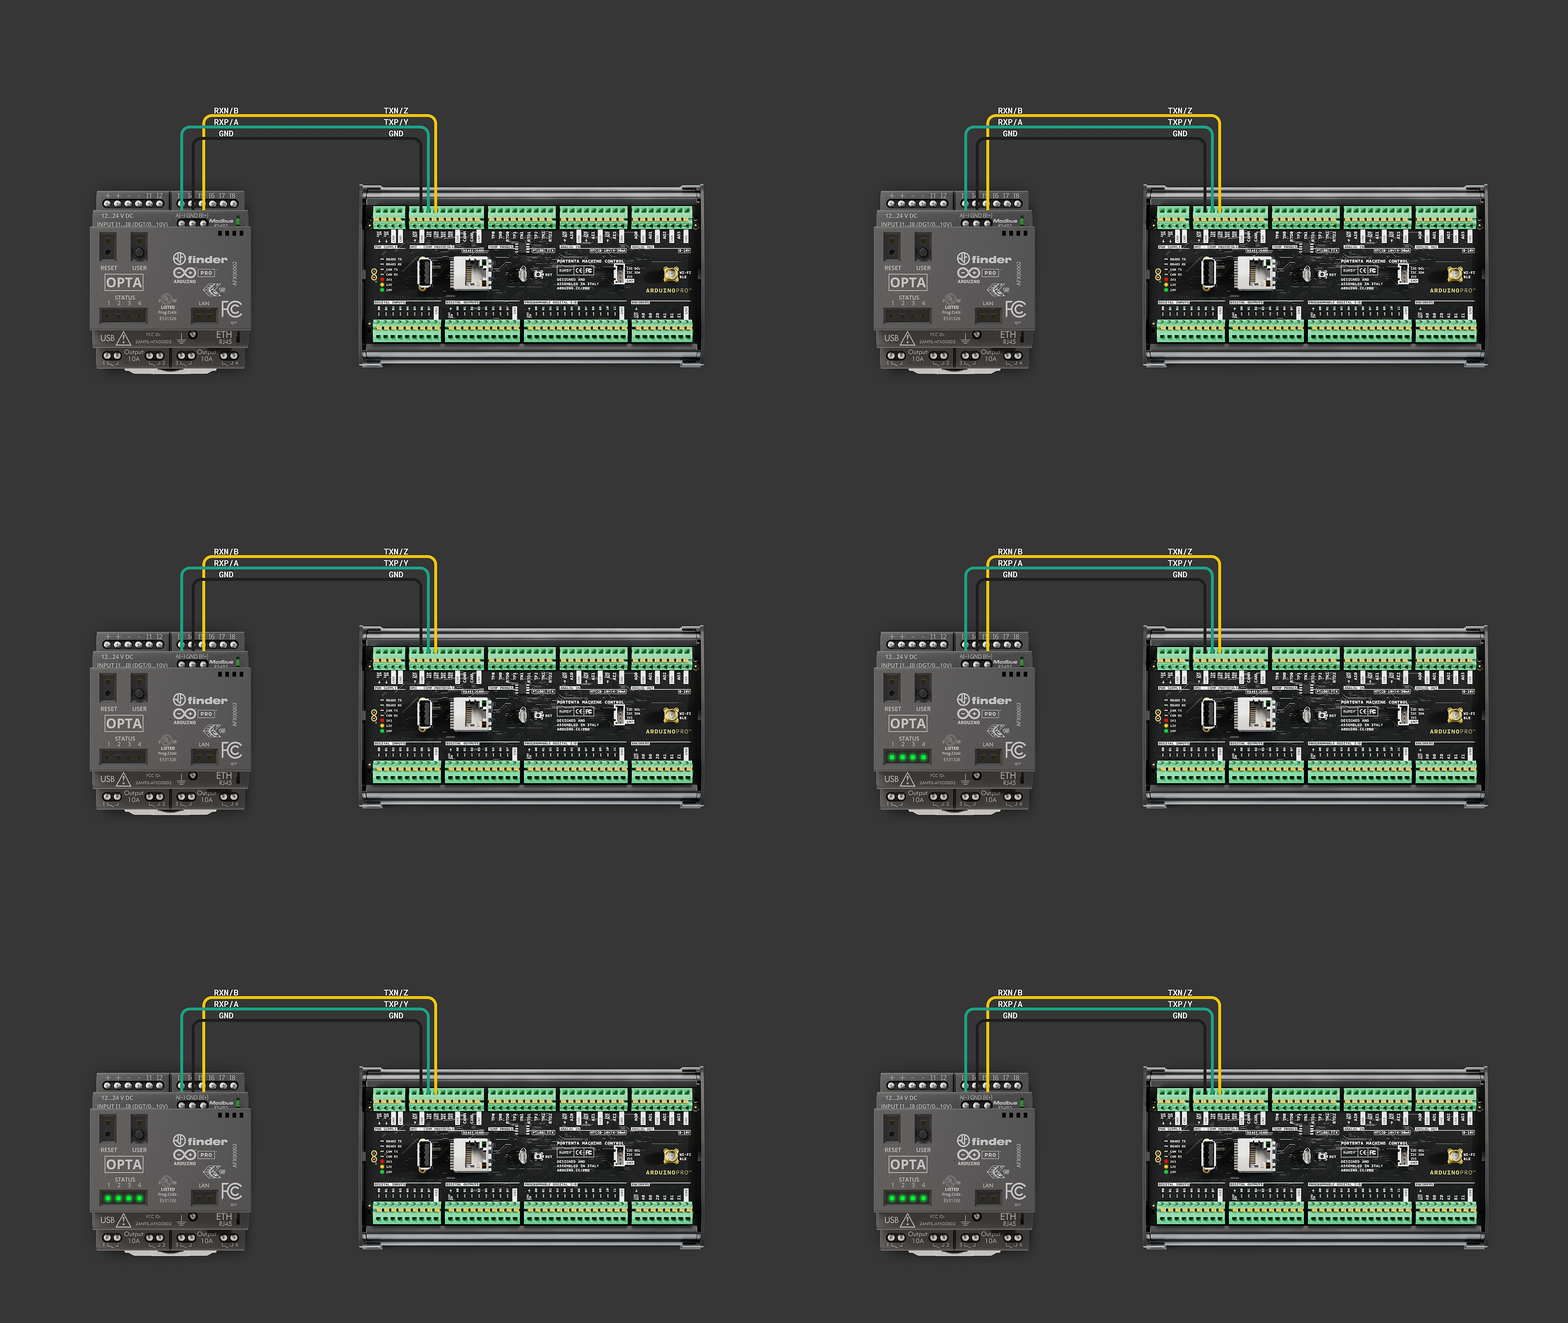
78 // Delay before next operation to simulate periodic control79 delay(1000);80}You should see the four onboard LEDs of the Opta™ device turn on and off, as shown below.
Modbus TCP
Modbus TCP, taking advantage of Ethernet connectivity, allows easy integration with existing computer networks and facilitates data communication over long distances using the existing network infrastructure. It operates in full-duplex mode, allowing simultaneous sending and receiving of data.
The example below shows how to enable Modbus TCP communication between two Portenta Machine Controls. For wiring both devices, we have two options:
- A direct connection between the Portenta Machine Controls through an Ethernet cable.
- Individually connect each device to an internet router via Ethernet cables.
We will use the second option since it will allow us to scale the application by adding more devices to the network.
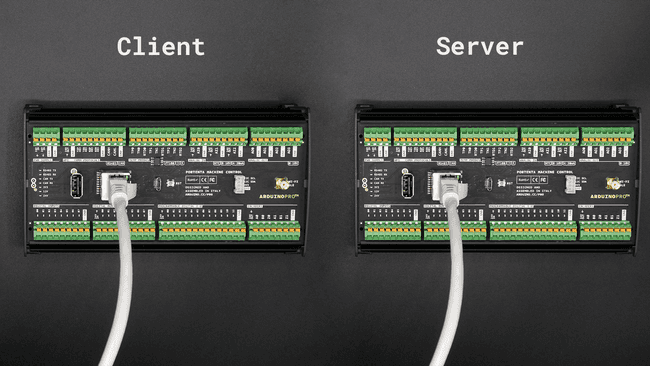
The following example sketch will let one Portenta Machine Control toggle the digital output LEDs of a second Portenta Machine Control through the Modbus TCP protocol. One Portenta Machine Control will be the client, and the other will be the server; as they are both connected to an internet router, IP addresses are the way for them to route their messages.
We can define a Static or DHCP IP address to them using the function
Ethernet.begin()1// DHCP (will assign an IP automatically)2Ethernet.begin();3
4// Static IP 5Ethernet.begin(<mac>, <IP>);The client must know the server IP to establish communication between them.
Use the following example sketch for the Portenta Machine Control defined as the client.
1/*2 Portenta Machine Control's Modbus TCP Communication3 Name: portenta_machine_control_modbus_tcp_example.ino4 Purpose: Demonstrates controlling an Opta™ device using 5 Modbus TCP protocol on the Portenta Machine Control6
7 @author Arduino PRO Content Team8 @version 1.0 01/10/239*/10
11// Include necessary libraries for Ethernet and Modbus communication12#include <SPI.h>13#include <Ethernet.h>14#include <ArduinoRS485.h>15#include <ArduinoModbus.h>16
17EthernetClient ethClient;18ModbusTCPClient modbusTCPClient(ethClient);19
20// Define the IP address for the Portenta Machine Control21IPAddress ip(10, 0, 0, 157);22
23// Define the IP Address of the Modbus TCP server (Opta device)24IPAddress server(10, 0, 0, 227);25
26void setup() {27 // Initialize serial communication at 9600 bauds,28 // wait for the serial port to connect29 Serial.begin(9600);30 while (!Serial);31
32 // Initialize Ethernet connection with the specified IP address33 // Using NULL for MAC to auto-assign the device's MAC address34 Ethernet.begin(NULL, ip); 35
36 // Check Ethernet hardware presence37 if (Ethernet.hardwareStatus() == EthernetNoHardware) {38 Serial.println("- Ethernet interface was not found!");39 while (true);40 }41
42 // Check Ethernet cable connection43 if (Ethernet.linkStatus() == LinkOFF) {44 Serial.println("- Ethernet cable is not connected!");45 }46}47
48void loop() {49 // Attempt to connect to Modbus TCP server if not already connected50 if (!modbusTCPClient.connected()) {51 Serial.println("- Attempting to connect to Modbus TCP server...");52
53 // Start Modbus TCP client54 if (!modbusTCPClient.begin(server, 502)) {55 Serial.println("- Failed to connect to Modbus TCP server!");56 } else {57 Serial.println("- Connected to Modbus TCP server!");58 }59 } else {60 // Modbus TCP client is connected, perform communication;61 // write a value to a coil at address 0x0062 if (!modbusTCPClient.coilWrite(0x00, 0x01)) {63 Serial.print("- Failed to write coil: ");64 Serial.println(modbusTCPClient.lastError());65 }66
67 // Wait for a second68 delay(1000);69
70 // Reset the coil at address 0x0071 if (!modbusTCPClient.coilWrite(0x00, 0x00)) {72 Serial.print("- Failed to reset coil: ");73 Serial.println(modbusTCPClient.lastError());74 }75
76 // Wait for a second77 delay(1000); 78 }79}For the second Portenta Machine Control defined as the server, use the following example sketch.
1/*2 Portenta Machine Control's Modbus TCP Communication3 Name: pmc_modbus_tcp_server.ino4 Purpose: Demonstrates setting up a Modbus TCP server on an 5 Opta device to control an LED using Modbus TCP protocol6
7 @author Arduino PRO Content Team8 @version 1.0 01/10/239*/10
11#include <SPI.h>12#include <Ethernet.h>13#include <ArduinoRS485.h>14#include <ArduinoModbus.h>15#include <Arduino_PortentaMachineControl.h>16
17// Define the IP address for the Modbus TCP server18IPAddress ip(10, 0, 0, 227);19
20// Server will listen on Modbus TCP standard port 50221EthernetServer ethServer(502); 22
23// Create a Modbus TCP server instance24ModbusTCPServer modbusTCPServer;25
26void setup() {27 // Initialize serial communication at 9600 bauds,28 // wait for the serial port to connect,29 // initialize Ethernet connection with the specified IP address30 Serial.begin(9600);31 while (!Serial);32 Ethernet.begin(NULL, ip); 33
34 // Check Ethernet hardware and cable connections35 if (Ethernet.hardwareStatus() == EthernetNoHardware) {36 Serial.println("- Ethernet interface not found!");37 while (true);38 }39 if (Ethernet.linkStatus() == LinkOFF) {40 Serial.println("- Ethernet cable not connected!");41 }42
43 // Start the Modbus TCP server44 ethServer.begin();45 if (!modbusTCPServer.begin()) {46 Serial.println("- Failed to start Modbus TCP Server!");47 while (1);48 }49
50 //Set over current behavior of all channels to latch mode (true)51 MachineControl_DigitalOutputs.begin(true);52
53 //At startup set all channels to OPEN54 MachineControl_DigitalOutputs.writeAll(0);55
56 // Configure a single coil at address 0x00 for Modbus communication57 modbusTCPServer.configureCoils(0x00, 1);58 59}60
61void loop() {62 // Handle incoming client connections and process Modbus requests63 EthernetClient client = ethServer.available();64 if (client) {65 Serial.println("- Client connected!");66
67 // Accept and handle the client connection for Modbus communication68 modbusTCPServer.accept(client);69
70 // Update the LED state based on Modbus coil value71 while (client.connected()) {72 // Process Modbus requests73 // Update the LED74 modbusTCPServer.poll(); 75 updateLED();76 }77
78 Serial.println("Client disconnected.");79 }80}81
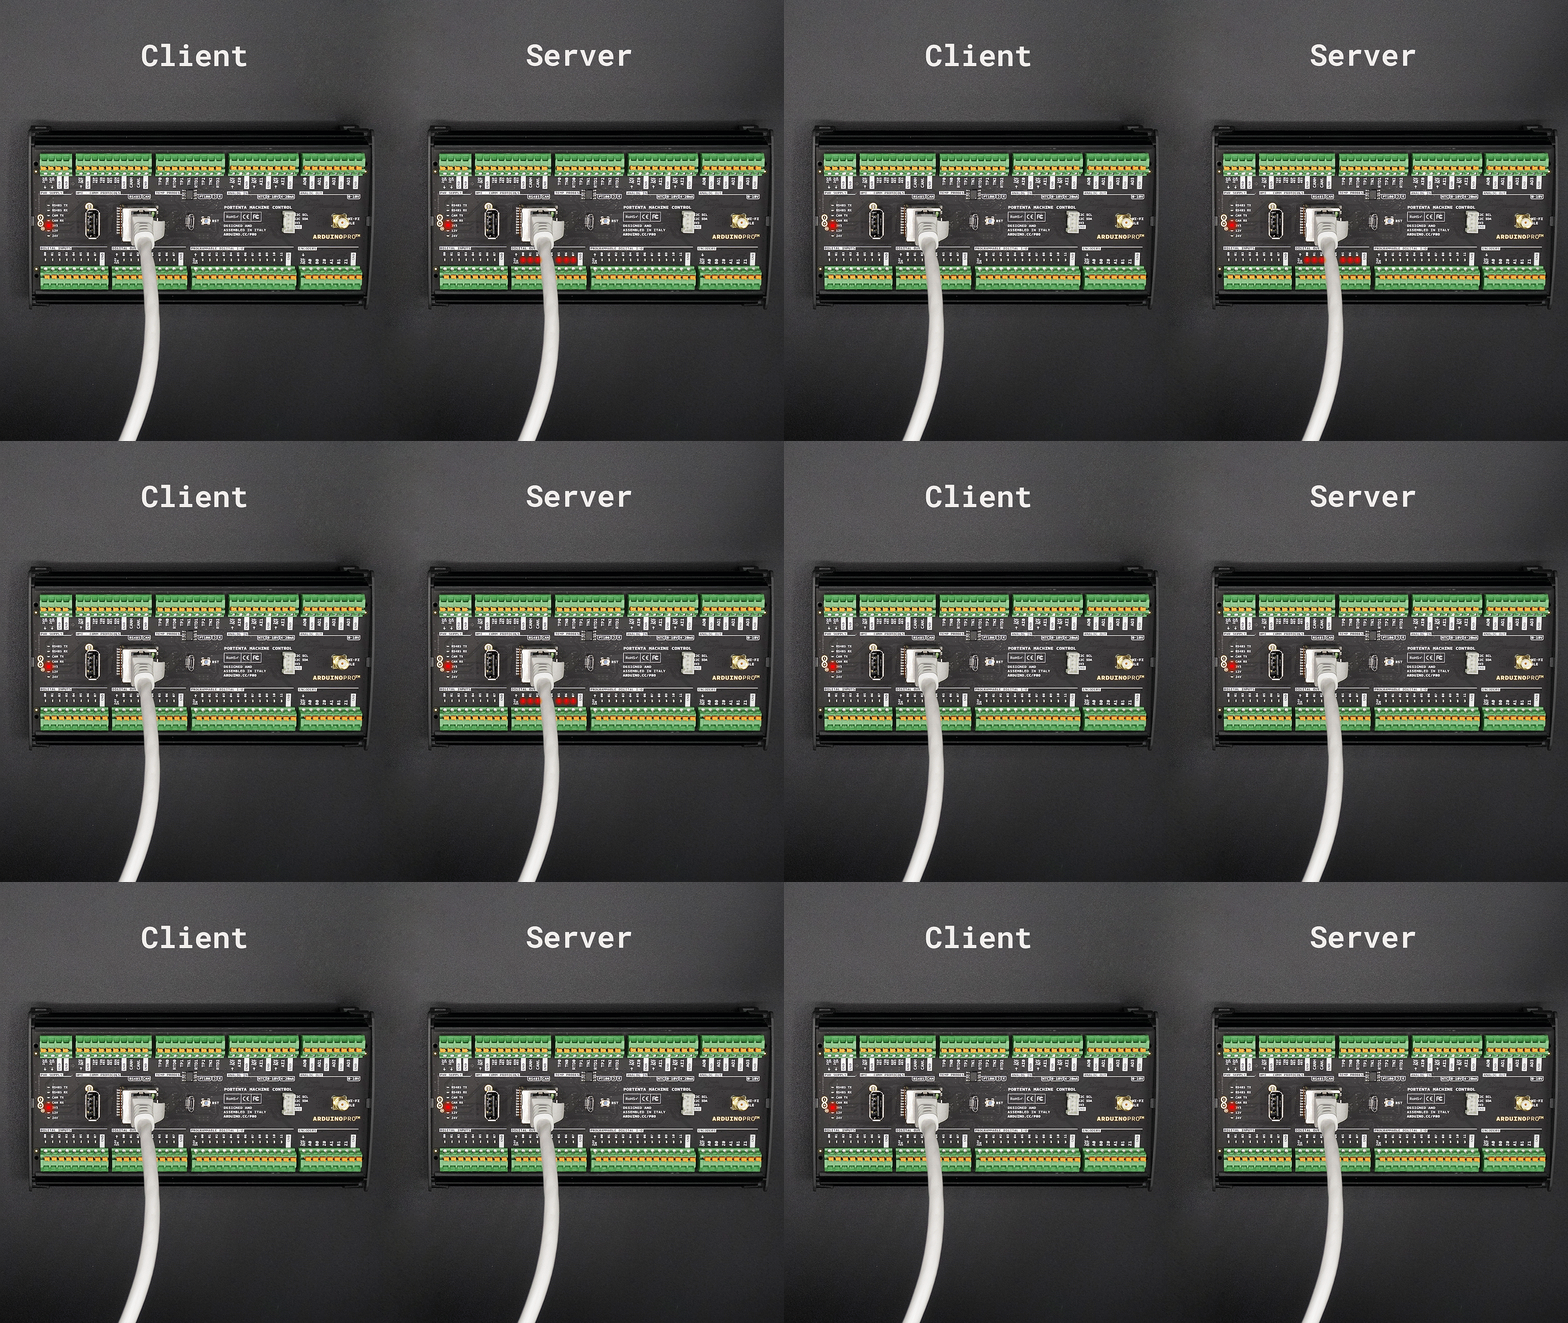
82/**83 * Updates the LED state based on the Modbus coil value.84 * Reads the current value of the coil from the Modbus TCP 85 * server and sets the LED state. If the coil value is high, 86 * the LED is turned on. If it is low, the LED is turned off87 *88 * @param None89 */90void updateLED() {91 // Read the current value of the coil at address 0x0092 int coilValue = modbusTCPServer.coilRead(0x00);93 94 // Set the LED state; HIGH if coil value is 1, LOW if coil value is 095 for (int i = 0; i < 8; i++){96 MachineControl_DigitalOutputs.write(i, coilValue ? HIGH : LOW);97 }98}You should see the server digital output LEDs turning on and off, as shown below:
CAN Bus
The Portenta Machine Control features a built-in CAN bus interface, enabling the implementation of robust and reliable data transmission systems in automotive and industrial automation applications. The CAN bus is widely used due to its ability to operate effectively in electrically noisy environments and its communication method that reduces errors.
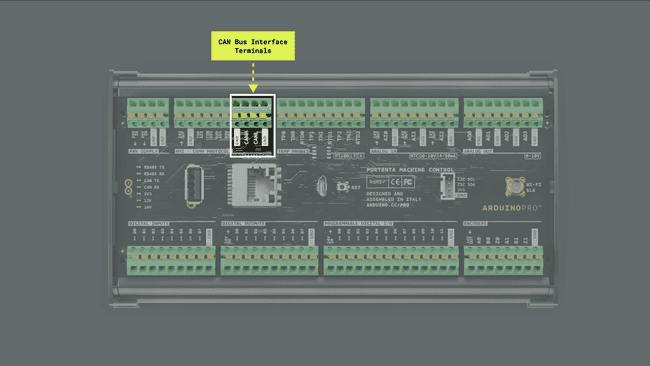
The onboard CAN transceiver of the Portenta Machine Control is the TJA1049 from NXP®. The TJA1049 is a specialized high-speed CAN transceiver for various applications, especially in automotive and high-speed CAN networks. The third-generation device offers enhanced electromagnetic compatibility (EMC) and ESD protection. This transceiver also features a low-current standby mode with a wake-up function and is compatible with microcontrollers ranging from 3 to 5 VDC. Adhering to the ISO11898 standard, the TJA1049 ensures reliable communication at data rates up to 5 Mbps, making it an optimal choice for High-Speed (HS) CAN networks that require efficient low-power operation modes.
Some of the key capabilities of the onboard CAN transceiver in the Portenta Machine Control include:
- High-speed operation: The onboard transceiver can operate at bit rates up to 5 Mbps.
- Noise tolerance: The onboard transceiver is designed to function reliably in environments with high electromagnetic interference.
- Low-current standby mode with wake-up functionality: The onboard transceiver features a low-power standby mode, which includes efficient wake-up capabilities, crucial for energy-efficient applications.
- Compliance with ISO11898 standard: Adhering to the ISO11898 standard, the TJA1049 ensures reliable communication at data rates up to 5 Mbit/s, making it ideal for HS CAN networks operating in low-power modes.
The example sketch below shows how to use the CAN bus interface of the Portenta Machine Control to transmit data. You can also find it in File > Examples > Arduino_PortentaMachineControl > CAN > WriteCan.
1/*2 Portenta Machine Control's CAN Bus Communication3 Name: WriteCan.ino4 Purpose: Demonstrates data transmission using the CAN bus5 interface on the Portenta Machine Control.6
7 @author Arduino PRO Content Team8 @version 1.0 01/10/239*/10
11// Include necessary libraries12#include <Arduino_PortentaMachineControl.h>13
14// Define the CAN message ID and message counter15static uint32_t const CAN_ID = 13ul;16static uint32_t msg_cnt = 0;17
18void setup() {19 // Initialize serial communication at 9600 bauds20 Serial.begin(9600);21
22 // Wait 2.5 seconds for the serial port availability, then start the transmission23 for (const auto timeout = millis() + 2500; !Serial && millis() < timeout; delay(250));24
25 // Initialize the CAN interface with a bit rate of 500 kbps26 if (!MachineControl_CANComm.begin(CanBitRate::BR_500k)) {27 Serial.println("- CAN init failed!");28 while(1);29 }30}31
32void loop() {33 // Assemble the CAN message34 uint8_t const msg_data[] = {0x01, 0x02, 0x03, 0x04, 0x05, 0x06, 0x07, 0x08};35 CanMsg msg(CAN_ID, sizeof(msg_data), msg_data);36
37 // Transmit the CAN message38 int const rc = MachineControl_CANComm.write(msg);39 if (rc <= 0) {40 Serial.print("- CAN write failed with error code: ");41 Serial.println(rc);42 while(1);43 }44
45 // CAN message sent46 Serial.println("- CAN write message!");47
48 // Increase the message counter49 msg_cnt++;50
51 // Send a message every second52 delay(1000);53}The example sketch uses the
Arduino_PortentaMachineControl
: Initializes the CAN module with a specified bit rate.MachineControl_CANComm.begin(bitRate)
: Transmits a data message over the CAN network. TheMachineControl_CANComm.write(msg)
parameter contains the data to be sent.msg
: Checks if data is available on the CAN bus to be read.MachineControl_CANComm.available()
: Reads incoming data from the CAN bus. This function is used to retrieve data that has been received.MachineControl_CANComm.read()
: This function can disable the CAN module when it's no longer needed, helping conserve power.MachineControl_CANComm.end()
The example sketch below shows how to use the CAN bus interface of the Portenta Machine Control to read data. You can also find it in File > Examples > Arduino_PortentaMachineControl > CAN > ReadCan.
1#include <Arduino_PortentaMachineControl.h>2
3void setup() {4 // Initialize serial communication at 9600 bauds,5 // wait for serial port to connect6 Serial.begin(9600);7 while (!Serial) {8 ; 9 }10
11 if (!MachineControl_CANComm.begin(CanBitRate::BR_500k)) {12 Serial.println("- CAN init failed!");13 while(1) ;14 }15}16
17void loop() {18 if (MachineControl_CANComm.available()) {19 CanMsg const msg = MachineControl_CANComm.read();20 Serial.println(msg);21 }22}As a practical example, we will establish a CAN communication between two Portenta Machine Control devices. Follow the wiring shown below for the CAN communication.
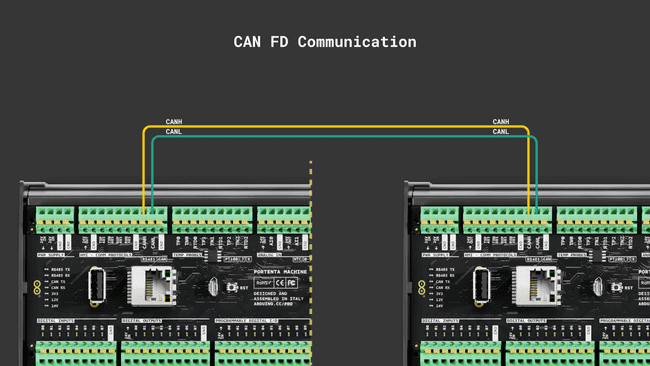
The Portenta Machine Control has built-in 120 Ω termination resistors.
For one of the devices, use the CAN writing example; for the other one, use the CAN reading example explained above.
The Portenta Machine Control will send messages continuously to the other Machine Control through the CAN bus; you can see the received message using the Arduino's IDE Serial Monitor.
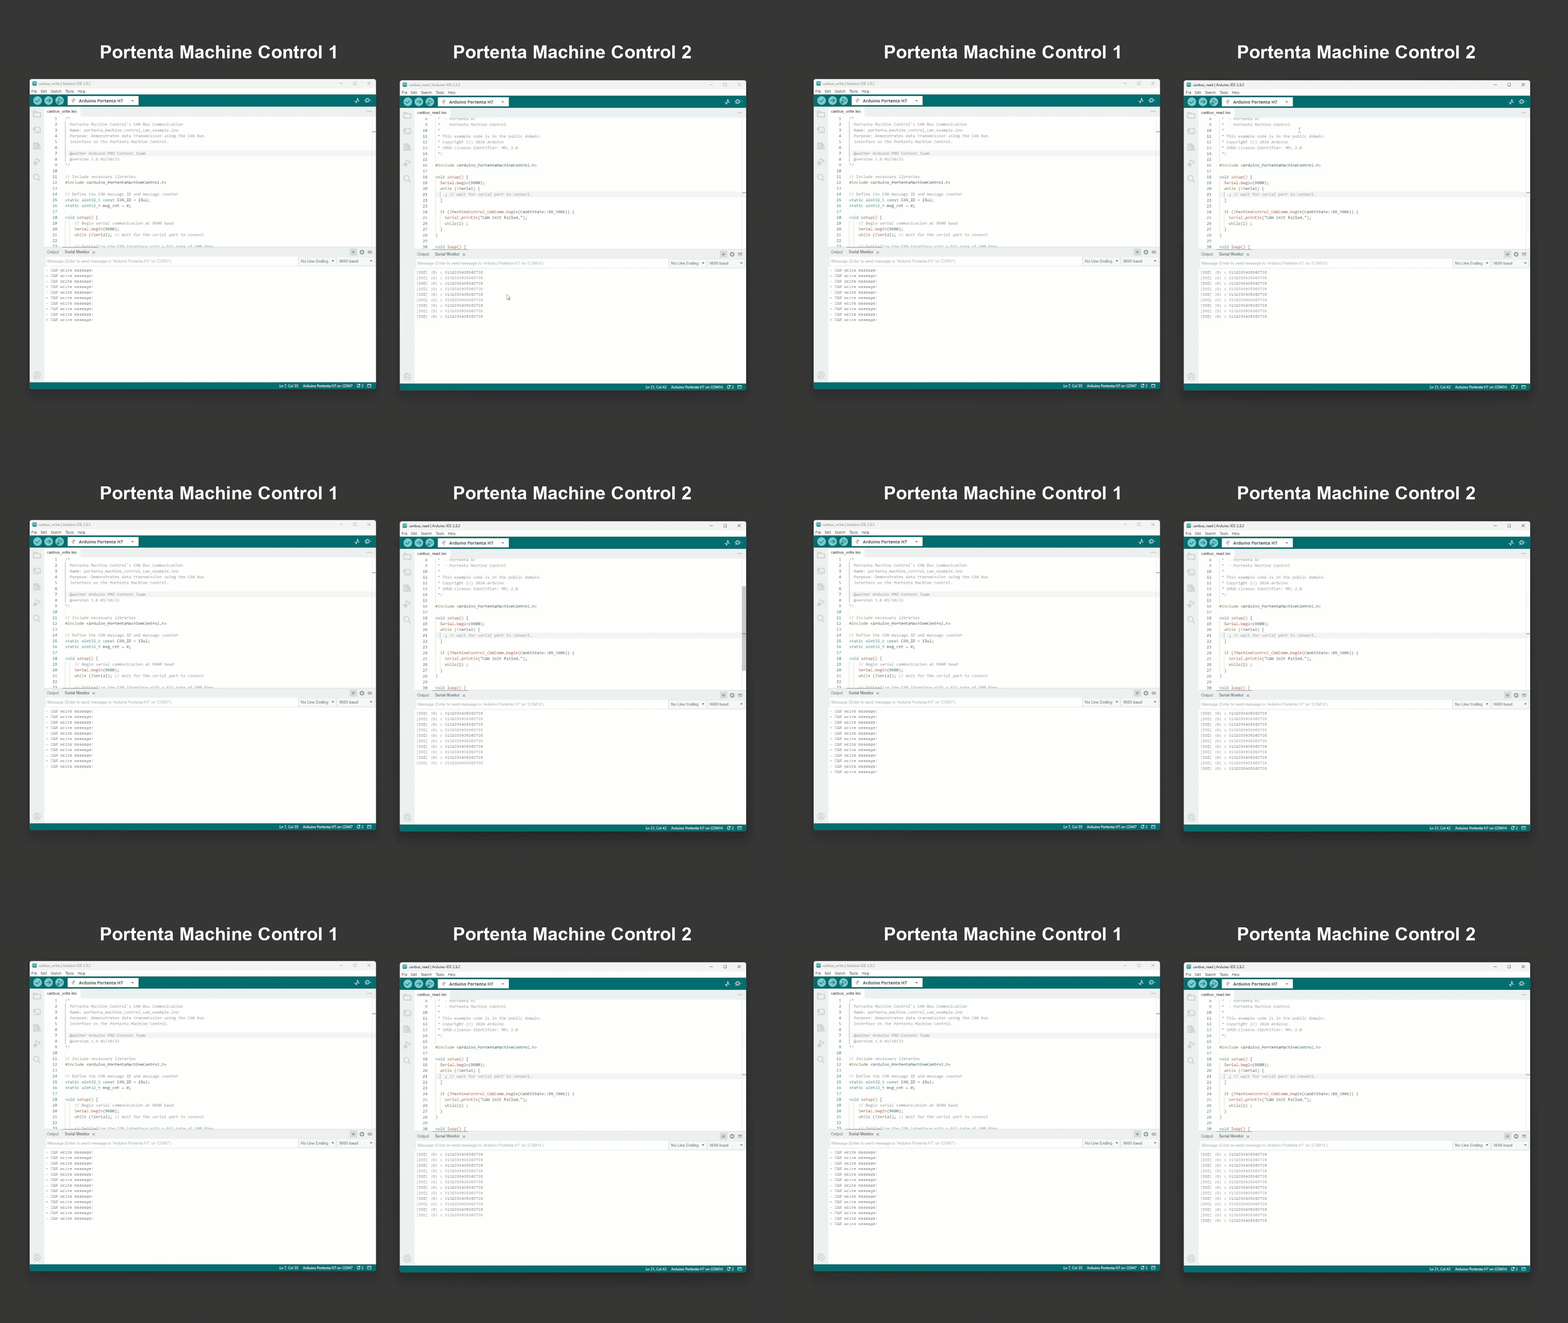
To receive and show the messages on your computer, you can use a USB to CAN bus converter as an example. You can use the Arduino IDE's Serial Monitor to display the messages received in the converter or another serial terminal such as CoolTerm, a simple and cross-platform (Windows, Mac, and Linux) serial port terminal application (no terminal emulation) that is geared towards hobbyists and professionals.
Real-Time Clock
The Portenta Machine Control features an onboard CMOS Real-Time Clock (RTC) and calendar, the PCF8563 from NXP®, optimized for low power consumption.
Some of the key capabilities of Portenta's Machine Control onboard RTC are the following:
- Timekeeping accuracy: Provides year, month, day, weekday, hours, minutes, and seconds based on a 32.768 kHz quartz crystal.
- Alarm and timer functions: Offers additional utility for time-based alerts and operations.
- Integrated oscillator capacitor: Enhances timekeeping reliability and stability.
- Internal Power-On Reset (POR): Ensures consistent performance and reliable operation.
- Open-drain interrupt pin: Facilitates external notifications and system wake-up.
The
Arduino Mbed OS Portenta BoardsArduino_PortentaMachineControlmbed_mktime libraryThe following example sketch demonstrates how to connect a Portenta Machine Control device to a Wi-Fi® network, synchronize its onboard RTC with a Network Time Protocol (NTP) server using the
NTPClientNTPClientBefore running the sketch, create a header file named
arduino_secrets.harduino_secrets.h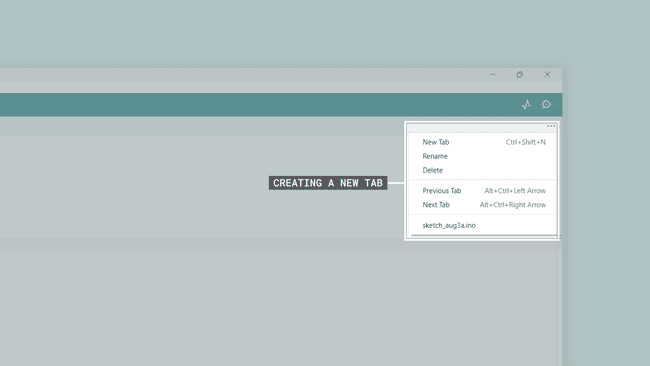
In this file, define your Wi-Fi network SSID and password as constants.
1char ssid[] = "SECRET_SSID"; // Your network SSID (name)2char password[] = "SECRET_PASS"; // Your network password (use for WPA, or use as key for WEP)Replace
SECRET_SSIDSECRET_PASS1/*2 Portenta Machine Control's RTC3 Name: portenta_machine_control_enhanced_rtc.ino4 Purpose: Connects the Portenta Machine Control to a Wi-Fi network5 and synchronizes its onboard RTC with a NTP server. Displays 6 the current RTC time on the IDE's Serial Monitor every 5 seconds.7 8 @author Arduino PRO Content Team9 @version 1.0 23/07/2310*/11
12// Libraries used in the sketch13#include <WiFi.h>14#include "arduino_secrets.h" 15#include <NTPClient.h>16#include <mbed_mktime.h>17#include <Arduino_PortentaMachineControl.h>18
19// Wi-Fi network credentials20int status = WL_IDLE_STATUS;21
22// NTP client configuration and RTC update interval23WiFiUDP ntpUDP;24NTPClient timeClient(ntpUDP, "pool.ntp.org", -6*3600, 0);25
26// Display time every 5 seconds27unsigned long interval = 5000UL;28unsigned long lastTime = 0;29
30void setup() {31 // Initialize serial communication at 9600 bauds32 Serial.begin(9600);33 34 // Wait 2.5 seconds for the serial port availability, then start the transmission35 for (const auto timeout = millis() + 2500; !Serial && millis() < timeout; delay(250));36 delay(5000);37
38 // Attempt Wi-Fi connection39 while (status != WL_CONNECTED) {40 Serial.print("- Attempting to connect to WPA SSID: ");41 Serial.println(ssid);42 status = WiFi.begin(ssid, password);43 delay(500);44 }45
46 // Initialize NTP client and synchronize time47 timeClient.begin();48 timeClient.update();49 const unsigned long epoch = timeClient.getEpochTime();50
51 // Synchronize Portenta's Machine Control RTC with NTP time52 MachineControl_RTCController.begin();53 MachineControl_RTCController.setEpoch(epoch);54
55 // Display synchronized time56 displayRTC();57}58
59void loop() {60 // Periodically display RTC time61 unsigned long currentTime = millis();62 if (currentTime - lastTime >= interval) {63 displayRTC();64 lastTime = currentTime;65 }66}67
68/**69 Display Portenta's Machine Control internal RTC time 70
71 @param none72 @return none73*/74void displayRTC() {75 Serial.println();76 Serial.println("- TIME INFORMATION:");77 Serial.print("- RTC time: ");78 79 char buffer[32];80 tm t;81 _rtc_localtime(time(NULL), &t, RTC_FULL_LEAP_YEAR_SUPPORT);82 strftime(buffer, 32, "%Y-%m-%d %H:%M:%S", &t);83 Serial.println(buffer);84}This sketch uses
WiFi.hNTPClient.hmbed_mktime.hNTPClient.hmbed_mktime.hOnce the RTC has been synchronized in the setup, the sketch enters an infinite loop. In this loop, every five seconds, it retrieves the current time from the RTC and prints it to the IDE's Serial Monitor in a more readable format, using the tm structure provided by
mbed_mktime.h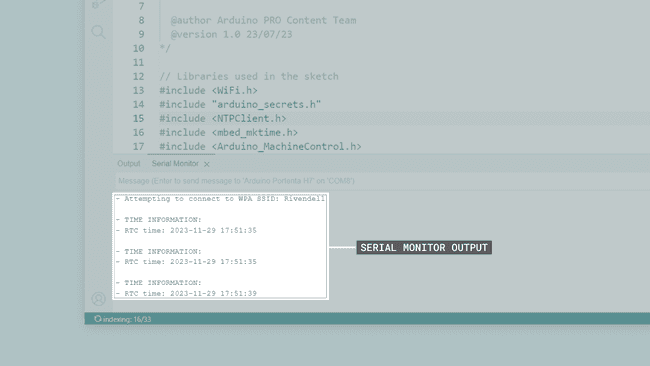
The sketch uses several key functions and methods:
: Connects the device to a specified Wi-Fi network.WiFi.begin(ssid, password)
: A client object to communicate with an NTP server.NTPClient
: Initializes the onboard RTC.MachineControl_RTCController.begin()
: Sets the RTC time based on the epoch time obtained from the NTP server.MachineControl_RTCController.setEpoch(epoch)
: A custom function to format and display the current time from the RTC on the IDE's Serial Monitor.displayRTC()
Temperature Measurements
The Portenta Machine Control is equipped with three independent temperature measurement channels, enhancing its capabilities for various industrial and environmental monitoring applications.
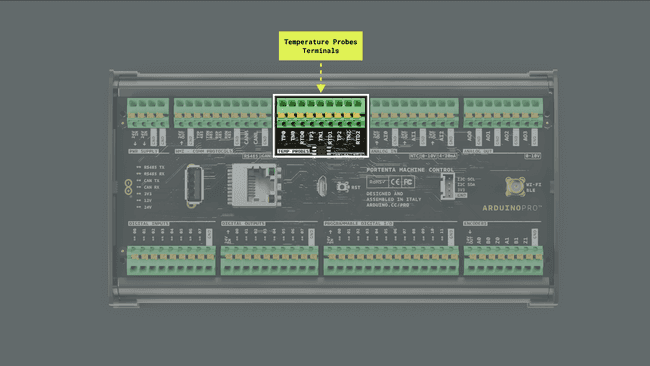
The Portenta Machine Control is compatible with the following temperature probes:
- Type K Thermocouples
- Type J Thermocouples
- PT100 probes
*Connect only non-grounded thermocouples. For more information about how to connect thermocouples to the Portenta Machine Control, please refer to the complete pinout available here.*
The Portenta Machine Control includes two onboard specialized front ends:
- MAX31855: This front end is dedicated to thermocouples, providing accurate temperature measurements for a wide range of thermocouple types.
- MAX31865: This front end is dedicated to PT100 sensors, ensuring precise temperature readings for these sensors.
The two onboard front ends are connected to the three temperature channels through a multiplexing system based on the following analog switches:
- NX3L4053: A single low-ohmic single-pole double-throw switch that selects between the two front ends.
- TMUX1511: Three quadruple single pole single throw switches that direct the active channel among the three available.
This multiplexing system allows for seamless switching between different sensor types and channels, enabling comprehensive temperature monitoring across multiple points.
Thermocouples
The Portenta Machine Control is compatible with non-grounded Type K and Type J Thermocouples. Connect a thermocouple following the next steps:
- Connect the thermocouple to one of the three channels named
.TEMP PROBES - Connect the thermocouple positive pin to
.TPCH - Connect the thermocouple negative pin to
.TNCH
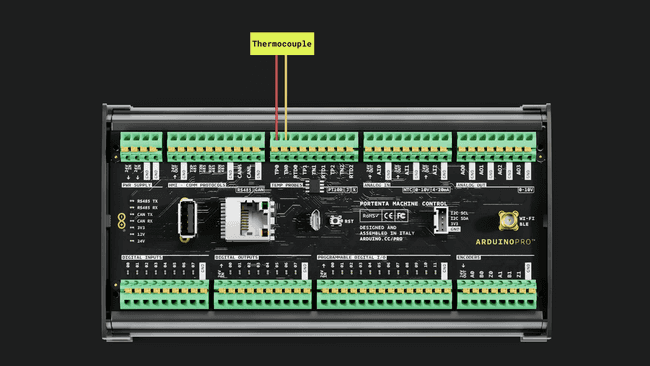
Thermocouples can have different cable color codes depending on the region and norm. Please check the meaning of each cable code before connecting them to the device. Do not connect the thermocouple negative pin to GND.
The following example sketch demonstrates how to read temperatures from thermocouples connected to a Portenta Machine Control device. It uses the
Arduino_PortentaMachineControl1/*2 Portenta Machine Control's Thermocouples Temperature Reading Example3 Name: portenta_machine_control_thermocouples_temp_read.ino4 Purpose: Reads temperatures from thermocouples connected to the 5 Portenta Machine Control. The temperature values are printed to the 6 Serial Monitor every second.7
8 @author Riccardo Rizzo, modified by Arduino PRO Content Team9 @version 1.0 01/10/2310*/11
12#include <Arduino_PortentaMachineControl.h>13
14void setup() {15 // Initialize serial communication16 Serial.begin(9600);17 18 // Wait 2.5 seconds for the serial port availability, then start the transmission19 for (const auto timeout = millis() + 2500; !Serial && millis() < timeout; delay(250));20 21 // Initialize temperature probes22 MachineControl_TCTempProbe.begin();23 Serial.println("- Temperature probes initialization done!");24}25
26void loop() {27 // Measure and display temperature from each channel28 for (int channel = 0; channel < 3; channel++) {29 // Select channel and read temperature30 MachineControl_TCTempProbe.selectChannel(channel);31 float temperature = MachineControl_TCTempProbe.readTemperature(); 32 Serial.print("- Temperature CH");33 Serial.print(channel);34 Serial.print(" °C: ");35 Serial.println(temperature);36 }37 Serial.println();38
39 // Wait one second before next reading40 delay(1000); 41}This example sketch reads temperatures from thermocouples connected to its temperature probe inputs. It demonstrates the use of the
Arduino_PortentaMachineControlsetup()Key functions used in the example sketch:
: Initializes the temperature probes.MachineControl_TCTempProbe.begin()
: Selects the active channel for temperature measurement.MachineControl_TCTempProbe.selectChannel(channel)
: Reads the temperature from the selected channel.MachineControl_TCTempProbe.readTemperature()
PT100
The Portenta Machine Control is compatible with two-wire RTD (PT100) and three-wire RTD (PT100) probes
Two Wire RTD Connection
The 2-wire RTD configuration is the simplest of the RTD circuit designs but is more prone to errors.
To connect a 2-wire RTD probe to one of the channels, like channel 0, connect one pin of the PT100 to the
TP0TN0TP0RTD0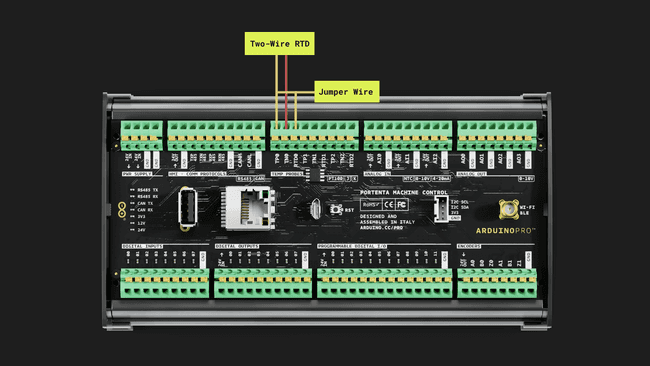
Do not connect any pin of the PT100 to GND
Three Wire RTD Connection
The 3-wire RTD configuration is the most commonly used RTD circuit. In this configuration, two wires link the sensing element to the monitoring device on one side of the sensing element, and one links it on the other side.
To connect a 3-wire RTD probe to one of the channels, like channel 0, connect one of the positive wires of the PT100 to the
TP0RTD0TN0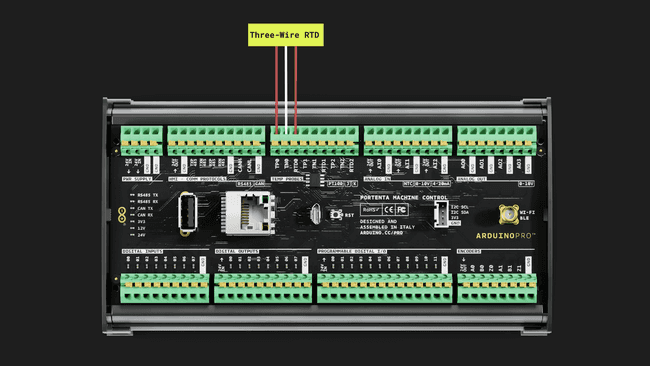
Do not connect any pin of the PT100 to GND
PT100 Example
The following example sketch demonstrates how to read temperatures from a 3-wire PT100 probe connected to a Portenta Machine Control device. It uses the
Arduino_PortentaMachineControl1/*2 * Portenta Machine Control - Temperature Probes RTD Example3 *4 * This example provides a method to test the 3-wire RTDs5 * on the Machine Control Carrier. It is also possible to6 * acquire 2-wire RTDs by shorting the RTDx pin to the TPx pin.7 * The Machine Control Carrier features a precise 400 ohm 0.1% reference resistor,8 * which serves as a reference for the MAX31865.9 *10 * Circuit:11 * - Portenta H712 * - Portenta Machine Control13 * - 3-wire RTD or 2-wire RTD14 *15 * This example code is in the public domain. 16 * Copyright (c) 2024 Arduino17 * SPDX-License-Identifier: MPL-2.018 */19
20#include <Arduino_PortentaMachineControl.h>21
22// The value of the Rref resistor. Use 430.0 for PT10023#define RREF 400.024// The 'nominal' 0-degrees-C resistance of the sensor25// 100.0 for PT10026#define RNOMINAL 100.027
28void setup() {29 // Initialize serial communication30 Serial.begin(9600);31 32 // Wait 2.5 seconds for the serial port availability, then start the transmission33 for (const auto timeout = millis() + 2500; !Serial && millis() < timeout; delay(250));34
35 // Initialize temperature probes36 MachineControl_RTDTempProbe.begin(THREE_WIRE);37 Serial.println("- Temperature probes initialization done!");38}39
40void loop() {41 MachineControl_RTDTempProbe.selectChannel(0);42 Serial.println("CHANNEL 0 SELECTED");43 uint16_t rtd = MachineControl_RTDTempProbe.readRTD();44 float ratio = rtd;45 ratio /= 32768;46
47 // Check and print any faults48 uint8_t fault = MachineControl_RTDTempProbe.readFault();49 if (fault) {50 Serial.print("Fault 0x"); Serial.println(fault, HEX);51 if (MachineControl_RTDTempProbe.getHighThresholdFault(fault)) {52 Serial.println("RTD High Threshold");53 }54 if (MachineControl_RTDTempProbe.getLowThresholdFault(fault)) {55 Serial.println("RTD Low Threshold");56 }57 if (MachineControl_RTDTempProbe.getLowREFINFault(fault)) {58 Serial.println("REFIN- > 0.85 x Bias");59 }60 if (MachineControl_RTDTempProbe.getHighREFINFault(fault)) {61 Serial.println("REFIN- < 0.85 x Bias - FORCE- open");62 }63 if (MachineControl_RTDTempProbe.getLowRTDINFault(fault)) {64 Serial.println("RTDIN- < 0.85 x Bias - FORCE- open");65 }66 if (MachineControl_RTDTempProbe.getVoltageFault(fault)) {67 Serial.println("Under/Over voltage");68 }69 MachineControl_RTDTempProbe.clearFault();70 } else {71 Serial.print("RTD value: "); Serial.println(rtd);72 Serial.print("Ratio = "); Serial.println(ratio, 8);73 Serial.print("Resistance = "); Serial.println(RREF * ratio, 8);74 Serial.print("Temperature = "); Serial.println(MachineControl_RTDTempProbe.readTemperature(RNOMINAL, RREF));75 }76 Serial.println();77 delay(100);78
79 MachineControl_RTDTempProbe.selectChannel(1);80 Serial.println("CHANNEL 1 SELECTED");81 rtd = MachineControl_RTDTempProbe.readRTD();82 ratio = rtd;83 ratio /= 32768;84
85 // Check and print any faults86 fault = MachineControl_RTDTempProbe.readFault();87 if (fault) {88 Serial.print("Fault 0x"); Serial.println(fault, HEX);89 if (MachineControl_RTDTempProbe.getHighThresholdFault(fault)) {90 Serial.println("RTD High Threshold");91 }92 if (MachineControl_RTDTempProbe.getLowThresholdFault(fault)) {93 Serial.println("RTD Low Threshold");94 }95 if (MachineControl_RTDTempProbe.getLowREFINFault(fault)) {96 Serial.println("REFIN- > 0.85 x Bias");97 }98 if (MachineControl_RTDTempProbe.getHighREFINFault(fault)) {99 Serial.println("REFIN- < 0.85 x Bias - FORCE- open");100 }101 if (MachineControl_RTDTempProbe.getLowRTDINFault(fault)) {102 Serial.println("RTDIN- < 0.85 x Bias - FORCE- open");103 }104 if (MachineControl_RTDTempProbe.getVoltageFault(fault)) {105 Serial.println("Under/Over voltage");106 }107 MachineControl_RTDTempProbe.clearFault();108 } else {109 Serial.print("RTD value: "); Serial.println(rtd);110 Serial.print("Ratio = "); Serial.println(ratio, 8);111 Serial.print("Resistance = "); Serial.println(RREF * ratio, 8);112 Serial.print("Temperature = "); Serial.println(MachineControl_RTDTempProbe.readTemperature(RNOMINAL, RREF));113 }114 Serial.println();115 delay(100);116
117 MachineControl_RTDTempProbe.selectChannel(2);118 Serial.println("CHANNEL 2 SELECTED");119 rtd = MachineControl_RTDTempProbe.readRTD();120 ratio = rtd;121 ratio /= 32768;122
123 // Check and print any faults124 fault = MachineControl_RTDTempProbe.readFault();125 if (fault) {126 Serial.print("Fault 0x"); Serial.println(fault, HEX);127 if (MachineControl_RTDTempProbe.getHighThresholdFault(fault)) {128 Serial.println("RTD High Threshold");129 }130 if (MachineControl_RTDTempProbe.getLowThresholdFault(fault)) {131 Serial.println("RTD Low Threshold");132 }133 if (MachineControl_RTDTempProbe.getLowREFINFault(fault)) {134 Serial.println("REFIN- > 0.85 x Bias");135 }136 if (MachineControl_RTDTempProbe.getHighREFINFault(fault)) {137 Serial.println("REFIN- < 0.85 x Bias - FORCE- open");138 }139 if (MachineControl_RTDTempProbe.getLowRTDINFault(fault)) {140 Serial.println("RTDIN- < 0.85 x Bias - FORCE- open");141 }142 if (MachineControl_RTDTempProbe.getVoltageFault(fault)) {143 Serial.println("Under/Over voltage");144 }145 MachineControl_RTDTempProbe.clearFault();146 } else {147 Serial.print("RTD value: "); Serial.println(rtd);148 Serial.print("Ratio = "); Serial.println(ratio, 8);149 Serial.print("Resistance = "); Serial.println(RREF * ratio, 8);150 Serial.print("Temperature = "); Serial.println(MachineControl_RTDTempProbe.readTemperature(RNOMINAL, RREF));151 }152 Serial.println();153 delay(1000);154}In case you want to use this example with a 2-wire RTD PT100 probe, change the function
MachineControl_RTDTempProbe.begin(THREE_WIRE);MachineControl_RTDTempProbe.begin(TWO_WIRE);This example sketch reads temperatures from the PT100 connected to its temperature probe inputs. It demonstrates the use of the
Arduino_PortentaMachineControlsetup()Key functions used in the sketch:
: Initializes the temperature probes. In case you want to use this example with a 2-wire RTD PT100 probe, change the constantMachineControl_RTDTempProbe.begin(THREE_WIRE)
toTHREE_WIRE
.TWO_WIRE
: Selects the active channel for temperature measurement.MachineControl_RTDTempProbe.selectChannel(channel)
: Reads the raw value from the selected channel to calculate aMachineControl_RTDTempProbe.readRTD()
. The value needs to be converted to a valid temperature value in Celsius degrees using the functionratio
, as can be seen in the lines that follow the calls of the function.MachineControl_RTDTempProbe.readTemperature(RNOMINAL, RREF)
: Converts the values read from theMachineControl_RTDTempProbe.readTemperature(RNOMINAL, RREF)
function and theMachineControl_RTDTempProbe.readRTD()
constant to get the PT100 probe temperature reading in Celsius degrees.RNOMINAL
Encoders
The Portenta Machine Control has two independent
ABZ01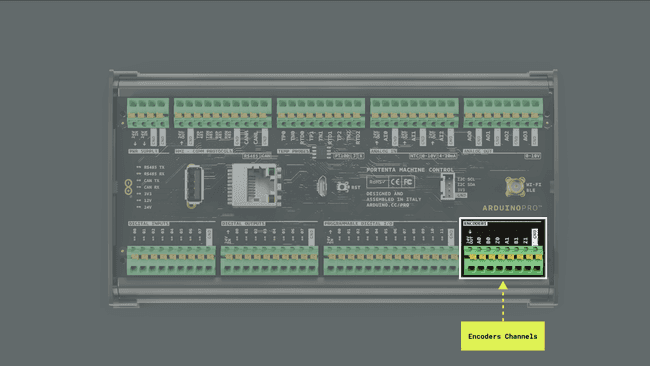
Some of the key capabilities of Portenta's Machine Control encoder channels are the following:
- Independent operation: Each
encoder channel functions independently, providing motion measurement and control versatility.ABZ - Pull-up resistance: The channels are equipped with 10 kΩ pull-up resistors connected to the board's 24 VDC supply, ensuring stable signal integrity and reduced noise interference.
- 24 VDC compatibility: The connection to the 24 VDC supply makes these encoders suitable for industrial systems and applications that operate at this voltage level.
The
Arduino Mbed OS Portenta BoardsArduino_PortentaMachineControl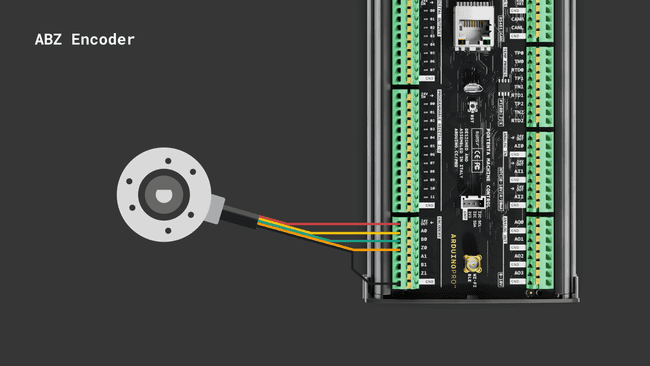
The example sketch is shown below.
1/*2 Portenta Machine Control's Single Encoder Read Example3 Name: portenta_machine_control_single_encoder_read.ino4 Purpose: Reads values from one of the encoder channels on the Portenta Machine Control,5 periodically displays the state, number of pulses, and revolutions of the encoder.6 7 @author Riccardo Rizzo, modified by Arduino PRO Content Team8 @version 1.0 01/10/239*/10
11#include <Arduino_PortentaMachineControl.h>12
13void setup() {14 // Initialize serial communication15 Serial.begin(9600);´16 // Wait 2.5 seconds for the serial port availability, then start the transmission17 for (const auto timeout = millis() + 2500; !Serial && millis() < timeout; delay(250)); 18}19
20void loop() {21 // Read and print the current state of encoder channel 0 in binary format22 Serial.print("- Encoder 0 state: ");23 Serial.println(MachineControl_Encoders.getCurrentState(0), BIN);24
25 // Read and print the number of pulses recorded by encoder channel 026 Serial.print("- Encoder 0 pulses: ");27 Serial.println(MachineControl_Encoders.getPulses(0));28
29 // Read and print the number of complete revolutions made by encoder channel 030 Serial.print("- Encoder 0 revolutions: ");31 Serial.println(MachineControl_Encoders.getRevolutions(0));32 Serial.println();33
34 // Short delay before the next read35 delay(25); 36}This sketch for the Portenta Machine Control reads and displays data from one of its encoder channels, primarily using the
Arduino_PortentaMachineControlsetup()The sketch uses several key functions and methods:
: Retrieves the current binary state of the specified encoder channel.MachineControl_Encoders.getCurrentState(channel)
: Obtains the total number of pulses recorded by the specified encoder channel.MachineControl_Encoders.getPulses(channel)
: Calculates the total revolutions made by the specified encoder channel.MachineControl_Encoders.getRevolutions(channel)
Arduino Cloud
The Portenta Machine Control is fully compatible with Arduino Cloud, simplifying how professional applications are developed and tracked. By using Arduino Cloud, you can, for example, monitor your Portenta's Machine Control input terminals, control your device's user LEDs and output relays remotely, and update your device's firmware OTA.
In case it is the first time you are using Arduino Cloud:
- To use it, you need an account. If you do not have an account, create one for free here.
- To use the Arduino Web Editor, the Arduino Create Agent must be running on your computer. You can install the Arduino Create Agent by downloading it here.
Let's walk through a step-by-step demonstration of how to use a Portenta Machine Control device with Arduino Cloud. Log in to your Cloud account; provision your Portenta Machine Control on your Cloud space. To do this, navigate to Devices and then click on the ADD DEVICE button:
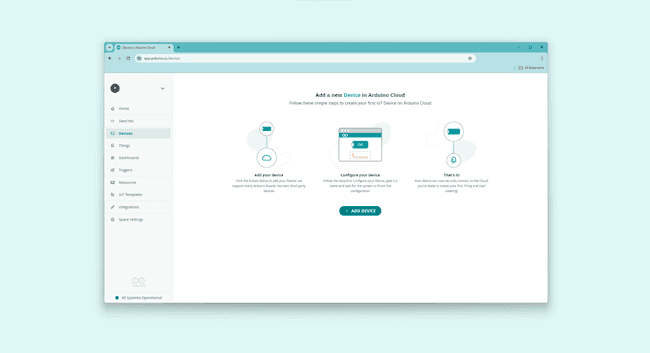
The Setup Device pop-up window will appear. Navigate into AUTOMATIC and select the Arduino board option:
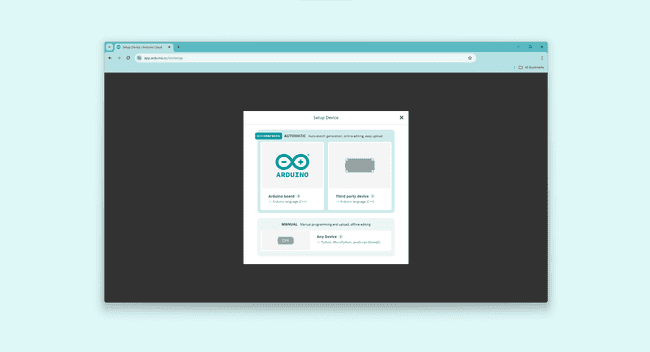
After a while, your Portenta Machine Control should be discovered by Cloud, as shown below:
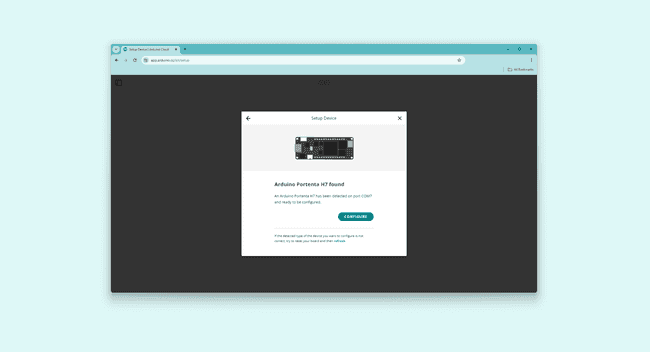
Click the CONFIGURE button, give your device a name, and select the type of network connection. In this example, we will use a Wi-Fi® connection; you can also use an Ethernet connection with your device. Your Portenta Machine Control will be configured to communicate securely with the Cloud; this process can take a while.
Once your Portenta Machine Control has been configured, let's create a "Thing" to test the connection between your board and Cloud. Navigate into Things and select the CREATE THING button; give your thing a name.
Navigate into Associate Device and click the Select Device button. Select your Portenta Machine Control device and associate it with your "Thing." Then, navigate into Network and click the Configure button; enter your network credentials.
The project is ready to add variables to your "Thing"; navigate into Cloud Variables and click the ADD button.
Add one variable with the following characteristics:
- Name:
led - Variable type:
boolean - Variable permission:
Read & Write - Variable update policy:
On change
You should see the
led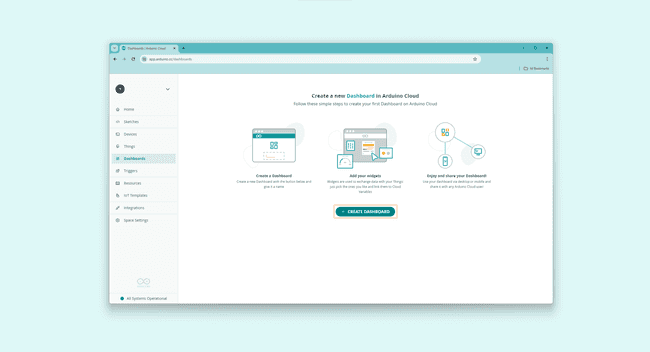
Add the following widgets to your dashboard:
- Switch: Name the widget Switch and link it to the
variable you created before.led - LED: Name the widget LED and link it to the
variable you created before.led
Your dashboard should look like the following:
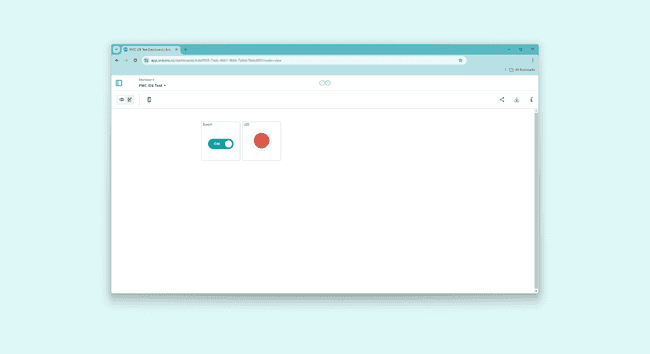
Go back to your Things and open the "Thing" you created. In the "Thing" setup page, navigate into Sketch, where you should see the online editor.
In the generated sketch, include the
Arduino_PortentaMachineControl.h0setup()1#include <Arduino_PortentaMachineControl.h>2#include "thingProperties.h"3
4void setup() {5 // Initialize serial and wait for port to open:6 Serial.begin(9600);7 // This delay gives the chance to wait for a Serial Monitor without blocking if none is found8 delay(1500);9
10 // Initialize the digital outputs terminals of the Arduino_PortentaMachineControl library11 MachineControl_DigitalOutputs.begin();12
13 // Defined in thingProperties.h14 initProperties();15
16 // Connect to Arduino Cloud17 ArduinoCloud.begin(ArduinoIoTPreferredConnection);18
19 /*20 The following function allows you to obtain more information21 related to the state of network and Cloud connection and errors22 the higher number the more granular information you’ll get.23 The default is 0 (only errors).24 Maximum is 425 */26 setDebugMessageLevel(2);27 ArduinoCloud.printDebugInfo();28}In the
onLedChange()led0led1/*2 Since Led is READ_WRITE variable, onLedChange() is3 executed every time a new value is received from Cloud.4*/5void onLedChange() {6 // Change digital output state of channel 0 according to led variable state (true-HIGH, false-LOW)7 MachineControl_DigitalOutputs.write(0, led ? HIGH : LOW);8}The complete example sketch can be found below:
1/*2 Sketch generated by the Arduino Cloud3
4 Arduino Cloud Variables description5
6 The following variables are automatically generated and updated when changes are made to the Thing7
8 bool led;9
10 Variables which are marked as READ/WRITE in the Cloud Thing will also have functions11 which are called when their values are changed from the Dashboard.12 These functions are generated with the Thing and added at the end of this sketch.13*/14
15#include <Arduino_PortentaMachineControl.h>16#include "thingProperties.h"17
18void setup() {19 // Initialize serial and wait for port to open:20 Serial.begin(9600);21 // This delay gives the chance to wait for a Serial Monitor without blocking if none is found22 delay(1500);23
24 // Initialize the digital outputs terminals of the Arduino_PortentaMachineControl library25 MachineControl_DigitalOutputs.begin();26
27 // Defined in thingProperties.h28 initProperties();29
30 // Connect to Arduino Cloud31 ArduinoCloud.begin(ArduinoIoTPreferredConnection);32
33 /*34 The following function allows you to obtain more information35 related to the state of network and Cloud connection and errors36 the higher number the more granular information you’ll get.37 The default is 0 (only errors).38 Maximum is 439 */40 setDebugMessageLevel(2);41 ArduinoCloud.printDebugInfo();42}43
44void loop() {45 ArduinoCloud.update();46 // Your code here47}48
49/*50 Since Led is READ_WRITE variable, onLedChange() is51 executed every time a new value is received from Cloud.52*/53void onLedChange() {54 // Change digital output state of channel 0 according to led variable state (true-HIGH, false-LOW)55 MachineControl_DigitalOutputs.write(0, led ? HIGH : LOW);56}To upload the code to the Portenta Machine Control from the online editor, click the green Verify button to compile the sketch and check for errors, then click the green Upload button to program the board with the sketch.
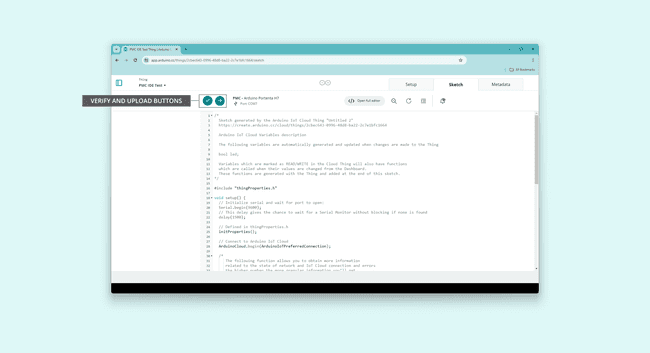
Navigate into Dashboards again; your board should connect to the Wi-Fi® network you defined before (you can follow the connection process with the online editor-integrated Serial Monitor). Your Portenta's Machine Control digital output at channel
0Support
If you encounter any issues or have questions while working with the Portenta Machine Control, we provide various support resources to help you find answers and solutions.
Help Center
Explore our Help Center, which offers a comprehensive collection of articles and guides for the Portenta Machine Control. The Help Center is designed to provide in-depth technical assistance and help you make the most of your device.
Forum
Join our community forum to connect with other Portenta Machine Control users, share your experiences, and ask questions. The Forum is an excellent place to learn from others, discuss issues, and discover new ideas and projects related to the Portenta Machine Control.
Contact Us
Please get in touch with our support team if you need personalized assistance or have questions not covered by the help and support resources described before. We are happy to help you with any issues or inquiries about the Portenta Machine Control.
Suggest changes
The content on docs.arduino.cc is facilitated through a public GitHub repository. If you see anything wrong, you can edit this page here.
License
The Arduino documentation is licensed under the Creative Commons Attribution-Share Alike 4.0 license.