Universal Asynchronous Receiver-Transmitter (UART)
A serial communication protocol for sending serial data over USB or via TX/RX pins.
In this article, you will learn the basics of Universal Asynchronous Receiver-Transmitter (UART), a serial communication protocol that can be used to send data between an Arduino board and other devices. This is the protocol used when you send data from an Arduino to your computer, using the classic
Serial.print()UART is one of the most used device-to-device (serial) communication protocols. It’s the protocol used by Arduino boards to communicate with the computer. It allows an asynchronous serial communication in which the data format and transmission speed are configurable. It's among the earliest serial protocols and even though it has in many places been replaced by SPI and I2C it's still widely used for lower-speed and lower-throughput applications because it is very simple, low-cost and easy to implement.
Communication via UART is enabled by the Serial class, which has a number of methods available, including reading & writing data.
If you want to jump straight to the examples click here or go to the end of this article.
Overview
Serial Class
With the Serial class, you can send / receive data to and from your computer over USB, or to a device connected via the Arduino's RX/TX pins.
- When sending data over USB, we use
. This data can be viewed in the Serial Monitor in the Arduino IDE.Serial - When sending data over RX/TX pins, we use
.Serial1 - The GIGA R1 WiFi, Mega 2560 and Due boards also have
andSerial2Serial3
The Serial class have several methods with some of the essentials being:
- begins serial communication, with a specified baud rate (many examples use eitherbegin()
or9600
).115200
- prints the content to the Serial Monitor.print()
- prints the content to the Serial Monitor, and adds a new line.println()
- checks if serial data is available (if you send a command from the Serial Monitor).available()
- reads data from the serial port.read()
- writes data to the serial port.write()
For example, to initialize serial communication on both serial ports, we would write it as:
1Serial.begin(9600); //init communication over USB2Serial1.begin(9600); //communication over RX/TX pinsThe Serial class is supported on all Arduino boards.
Arduino UART Pins
The default TX/RX pins on an Arduino board are the D0(RX) and D1(TX) pins. Some boards have additional serial ports, see table below:
| Form Factor | RX | TX | RX1 | TX1 | RX2 | TX2 | RX3 | TX3 |
|---|---|---|---|---|---|---|---|---|
| MKR | D0 | D1 | ||||||
| UNO | D0 | D1 | ||||||
| Nano | D0 | D1 | ||||||
| Mega | D0 | D1 | D19 | D18 | D17 | D16 | D15 | D14 |
Technical Specifications
How UART Works
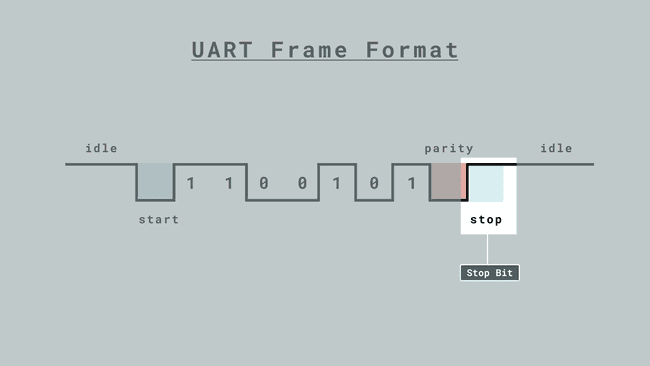
UART operates by transmitting data as a series of bits, including a start bit, data bits, an optional parity bit, and stop bit(s). Unlike parallel communication, where multiple bits are transmitted simultaneously, UART sends data serially, one bit at a time. As the name reveals the protocol operates asynchronous which means that it doesn't rely on a shared clock signal. Instead, it uses predefined baud rates to determine the timing of data bits.
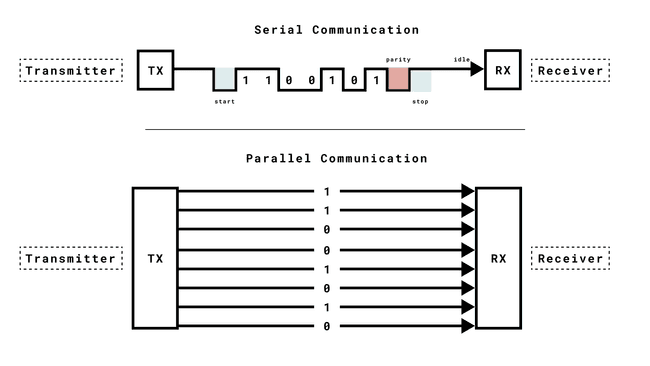
As seen in the image above when using parallel communication an 8-bit message would require eight cables while serial communication only requires one cable for sending messages and one for receiving.
Consider that you need to connect a common ground between the devices to define the high and low signals for UART communication. Without a common ground, devices may not be able to correctly interpret transmitted data.
Components
The key components of UART include the transmitter, receiver, and baud rate. The transmitter collects data from a source, formats it into serial bits, and sends it via a TX (Transmit) pin. The receiver receives it via a RX (Receive) pin, processes incoming serial data and converts it into parallel data for the host system. The baud rate determines the speed of data transmission.
Timing and Synchronization
Timing and synchronization are crucial aspects of UART communication. Unlike synchronous serial communication protocols such as SPI and I2C, UART operates operates asynchronously, meaning it doesn't rely on a shared clock signal to coordinate data transmission. Instead, it uses predefined baud rates to determine the timing of data bits.
Baud Rate
The baud rate is a fundamental parameter in UART communication. It defines the speed at which data is transmitted over the communication channel. The baud rate is specified in bits per second (bps) and represents the number of bits transmitted in one second. In UART, both the transmitting and receiving devices must agree on the same baud rate to ensure successful communication.
The significance of the baud rate lies in its direct influence on the data transfer speed. A higher baud rate allows for faster data transmission, but it also demands a more precise timing synchronization between the sender and receiver. On the other hand, a lower baud rate may be suitable for applications where timing accuracy is less critical, but it results in slower data transfer. When programming your Arduino common baud rates are
96001152004800576001Serial.begin(9600);Flow Control in UART
UART Flow Control is a method for slow and fast devices to communicate with each other over UART without the risk of losing data. Consider the case where two units are communicating over UART. A transmitter T is sending a long stream of bytes to a receiver R. R is a slower device than T, and R cannot keep up. It needs to either do some processing on the data or empty some buffers before it can keep receiving data.
R needs to tell T to stop transmitting for a while. This is where flow control comes in. Flow control provides extra signaling to inform the transmitter that it should stop (pause) or start (resume) the transmission.
Several forms of flow control exist. For example, hardware flow control uses extra wires, where the logic level on these wires define whether the transmitter should keep sending data or stop. With software flow control, special characters are sent over the normal data lines to start or stop the transmission.
You can read more about UART flow control here.
UART Messages
In UART communication, each data frame is encapsulated by start and stop bits. These bits serve a vital role in establishing the boundaries of data transmission and ensuring synchronization between the sender and receiver.
Frame Format

Start Bit
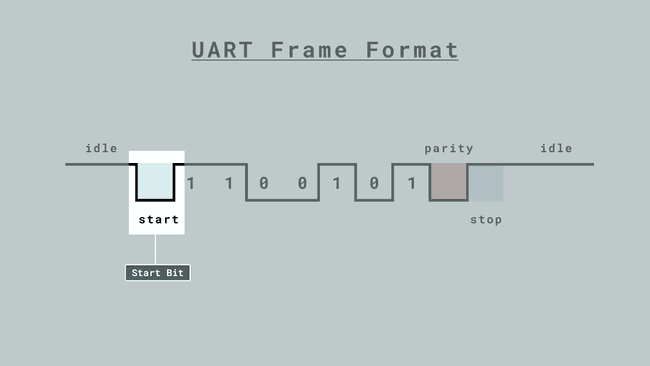
A single start bit is transmitted at the beginning of each UART frame. The primary purpose of the start bit is to indicate the start of the data transmission and prepare the receiver for data reception.
The start bit is always logic low (0) for UART communication. This means that the start bit is transmitted as a voltage level that is lower than the logic high threshold, typically at the receiver's end.
When the receiver detects a start bit, it knows that a new data frame is beginning, and it prepares to receive the incoming bits.
Data Bits
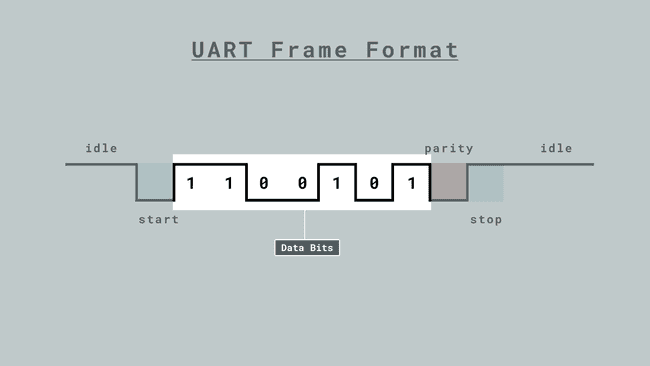
Data bits are a fundamental component of UART communication as they carry the actual information to be transmitted. The number of data bits in a UART frame can vary, but a common and widely used configuration is 8 bits. However, UART supports various character sizes, including 7-bit and 6-bit configurations, depending on the specific application requirements.
Character Size
The character size in UART communication is defined by the number of data bits within a frame. It's essential to choose the appropriate character size to match the requirements of the data being transmitted. Here are some common character size configurations:
8-Bit: This is the most prevalent character size in UART communication. It allows for the transmission of a byte of data, which can represent a wide range of values, including ASCII characters, numerical values, and more.
7-Bit: In cases where data size needs to be smaller, 7-bit character size is utilized. It's suitable for applications that require less data overhead and can represent 128 different values.
6-Bit: For even more compact data representation, 6-bit character size can be used. This configuration provides the ability to represent 64 different values.
Data Encoding
Data bits represent the characters or data using binary encoding, where each bit corresponds to a power of 2. Each bit within the data byte holds a specific position and weight in the binary representation. This encoding allows for the transmission of a wide range of information, making UART versatile for various data types, from simple text characters to complex binary data.
Data Integrity
The accuracy of data transmission in UART communication relies on the proper configuration of data bits. It's essential that both the transmitter and receiver agree on the number of data bits and their encoding. If the configuration is incorrect, data corruption can occur. For example, if the transmitter sends data as 8-bit characters, but the receiver is configured to expect 7-bit characters, data may be misinterpreted, leading to errors in the received information.
Parity
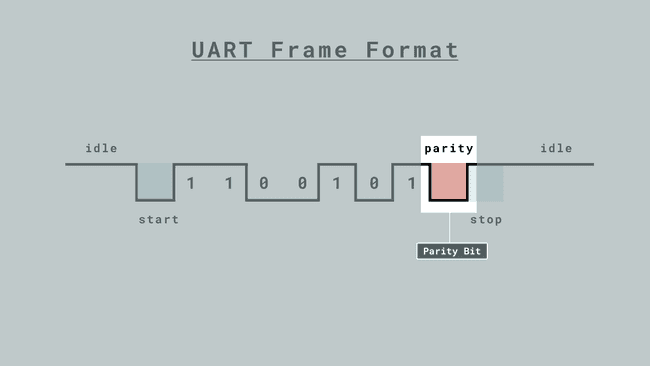
In addition to data bits, UART communication may include a parity bit as part of the data frame. Parity is an error-checking mechanism that can help detect data transmission errors. Parity can be set to "odd" or "even," and it ensures that the total number of bits set to logic "1" in a character is either even or odd, depending on the chosen parity type. The presence of a parity bit allows the receiver to verify the integrity of the received data. If the number of "1" bits don't match the expected parity, an error is detected.
Stop Bits
One or more stop bits are sent after the data bits within each UART frame. The stop bit(s) signal the end of the data byte and serve to indicate the conclusion of data transmission. The most common configuration is to use one stop bit, but in situations where added reliability is required, two stop bits can be employed.
The polarity of the stop bit(s) can vary, with some systems using a high stop bit and others using a low stop bit based on the specific UART configuration.
Serial USB Examples
To send data between an Arduino and a computer, you will need to the board to a computer with a USB cable.
Basic Print Example
This example will send the string
Hello World!Serial.println()1void setup(){2 Serial.begin(9600); //initialize serial communication at a 9600 baud rate3}4
5void loop(){6 Serial.println("Hello world!");7 delay(1000);8}Serial.print()Serial.println()Read
To send data from a computer to an Arduino (from the Serial Monitor), we can make use of the
Serial.available()Serial.read()This example will essentially print out whatever you enter in the Serial Monitor (because we send the data to the board, but we also print it back).
1int incomingByte = 0; // for incoming serial data2
3void setup() {4 Serial.begin(9600); //initialize serial communication at a 9600 baud rate5}6
7void loop() {8 // send data only when you receive data:9 if (Serial.available() > 0) {10 // read the incoming byte:11 incomingByte = Serial.read();12
13 // say what you got:14 Serial.print("I received: ");15 Serial.println(incomingByte, DEC);16 }17}RX/TX Pin Examples
This section contains some basic UART examples, where you send data between two Arduino boards. To set it up, connect the TX with RX pins on both boards, following the circuit below:

Transmit / Receive Messages
This example allows you to send messages (strings) back and forth between devices. Upload the following sketch to both devices:
1String sendMessage;2String receivedMessage;3
4void setup() {5 Serial.begin(9600); // Initialize the Serial monitor for debugging6 Serial1.begin(9600); // Initialize Serial1 for sending data7}8
9void loop() {10 while (Serial1.available() > 0) {11 char receivedChar = Serial1.read();12 if (receivedChar == '\n') {13 Serial.println(receivedMessage); // Print the received message in the Serial monitor14 receivedMessage = ""; // Reset the received message15 } else {16 receivedMessage += receivedChar; // Append characters to the received message17 }18 }19
20 if (Serial.available() > 0) {21 char inputChar = Serial.read();22 if (inputChar == '\n') {23 Serial1.println(sendMessage); // Send the message through Serial1 with a newline character24 sendMessage = ""; // Reset the message25 } else {26 sendMessage += inputChar; // Append characters to the message27 }28 }29}We start by declaring two
String1String sendMessage;2String receivedMessage;Inside
setup()SerialSerial11Serial.begin(9600); 2Serial1.begin(9600);Reading Messages
The core code can be found inside
loop()Serial1.available()01while (Serial1.available() > 0) {2 ...3 }We
readSerial11char receivedChar = Serial1.read();If a newline character
'\n'receivedMessageIn programming, the newline character ('\n') is like pressing "Enter" key. It's a special character that tells the computer, "Move to the next line." In our case we know that a message is sent after pressing enter which equals the newline character ('n').
1if (receivedChar == '\n') {2 Serial.println(receivedMessage);3 receivedMessage = "";4 }Send Messages
For sending messages we first check if there are any characters available in the
SerialSerial.available() > 01if (Serial.available() > 0) {2 ...3}When a newline character
'\n'Serial1sendMessage1char inputChar = Serial.read();2if (inputChar == '\n') {3 Serial1.println(sendMessage);4 sendMessage = "";5}If the input is not a newline (meaning everything is written on the same line) it's added to the same message.
1else {2 sendMessage += inputChar; // Append characters to the message3}Control Built-in LED
The following example lets you control the built-in LED by sending UART messages.
Receiver
1void setup() {2 pinMode(LED_BUILTIN, OUTPUT); // set LED pin as output3 digitalWrite(LED_BUILTIN, LOW); // switch off LED pin4
5 Serial1.begin(9600); // initialize UART with baud rate of 96006}7void loop() {8 while (Serial1.available() >= 0) {9 char receivedData = Serial1.read(); // read one byte from serial buffer and save to receivedData10 if (receivedData == '1') {11 digitalWrite(LED_BUILTIN, HIGH); // switch LED On12 }13 else if (receivedData == '0') {14 digitalWrite(LED_BUILTIN, LOW); // switch LED Off15 }16 }17}Transmitter
1void setup() {2 pinMode(LED_BUILTIN, OUTPUT); // set LED pin as output3 digitalWrite(LED_BUILTIN, LOW); // switch off LED pin4
5 Serial.begin(9600); // initialize serial communication at 9600 bits per second:6 Serial1.begin(9600); // initialize UART with baud rate of 96007}8void loop() {9 if (Serial.read() == '1'){10 Serial1.println('1');11 digitalWrite(LED_BUILTIN, HIGH);12 Serial.println("LEDS ON");13 }14 else if (Serial.read() == '0'){15 Serial1.println('0');16 digitalWrite(LED_BUILTIN, LOW);17 Serial.print("LEDS OFF");18 }19}Receiver
First, we start by setting up our devices setting the built-in LED as
OUTPUTLOW1pinMode(LED_BUILTIN, OUTPUT); 2digitalWrite(LED_BUILTIN, LOW);Inside
setup()Serial11Serial1.begin(9600);If a new byte is received, meaning
Serial1.available()01while (Serial1.available() > 0) {2 ...3 }Next, we
readHIGH1char receivedData = Serial1.read(); // read one byte from serial buffer and save to receivedData2 if (receivedData == '1') {3 digitalWrite(LED_BUILTIN, HIGH); // switch LED On4 }If the received byte equals '0' we write
LOW1else if (receivedData == '0') {2 digitalWrite(LED_BUILTIN, LOW); // switch LED Off3 }Transmitter
First, we start by setting up our devices setting the built-in LED as
OUTPUTLOW1pinMode(LED_BUILTIN, OUTPUT); 2digitalWrite(LED_BUILTIN, LOW);Inside
setup()SerialSerial11Serial.begin(9600); 2Serial1.begin(9600);Inside
loop()SerialSerial11if (Serial.read() == '1'){2 Serial1.println('1');3 digitalWrite(LED_BUILTIN, HIGH);4 Serial.println("LEDS ON");5 }If the written message inside the IDE serial monitor (
SerialSerial1Suggest changes
The content on docs.arduino.cc is facilitated through a public GitHub repository. If you see anything wrong, you can edit this page here.
License
The Arduino documentation is licensed under the Creative Commons Attribution-Share Alike 4.0 license.